24 minute read · August 8, 2023
Getting Started with Flink SQL and Apache Iceberg

· Developer Advocate, Dremio
Apache Flink is an open source data processing framework for handling batch and real-time data. While it supports building diverse applications, including event-driven and batch analytical workloads, Flink stands out particularly for streaming analytical applications. What gives it a solid edge with real-time data are features such as event-time processing, exactly one semantics, high throughput, low latency, and its diverse windowing mechanisms.
Apache Iceberg is a highly efficient, open table format for managing large volumes of analytical data. Iceberg introduces capabilities such as ACID-compliant queries, full schema evolution, hidden partitioning, and time travel to seamlessly handle data stored in data lakes like Amazon S3. These capabilities tackle critical challenges typically associated with data lakes while providing similar data management capabilities as a data warehouse.
By combining Iceberg's capabilities with Flink, an efficient real-time data lakehouse can be constructed, offering users and tools quick and fresh access to data. This blog post delves into the practical aspects of configuring Flink with Iceberg and shows how to do basic operations such as reading and writing from Iceberg tables.
Implementation Details
Apache Flink offers three types of APIs for data processing: ProcessFunction, DataStream API, and SQL/Table API. The first two allow more expression but are less concise, while the SQL/Table APIs are relational and more concise but comparatively less expressive. This blog focuses on the SQL/Table API and uses the Flink SQL Client to submit Flink jobs quickly. If you are interested in using the DataStream and Table API with Java, here is an excellent blog.
The overall goal in this blog post is to create an Iceberg table, ingest some records using the Flink SQL client, and read the records later using Flink SQL. To do so, you must configure three components: Flink SQL client, a catalog, and the Iceberg table. Below is a visual representation of this configuration at a high level.
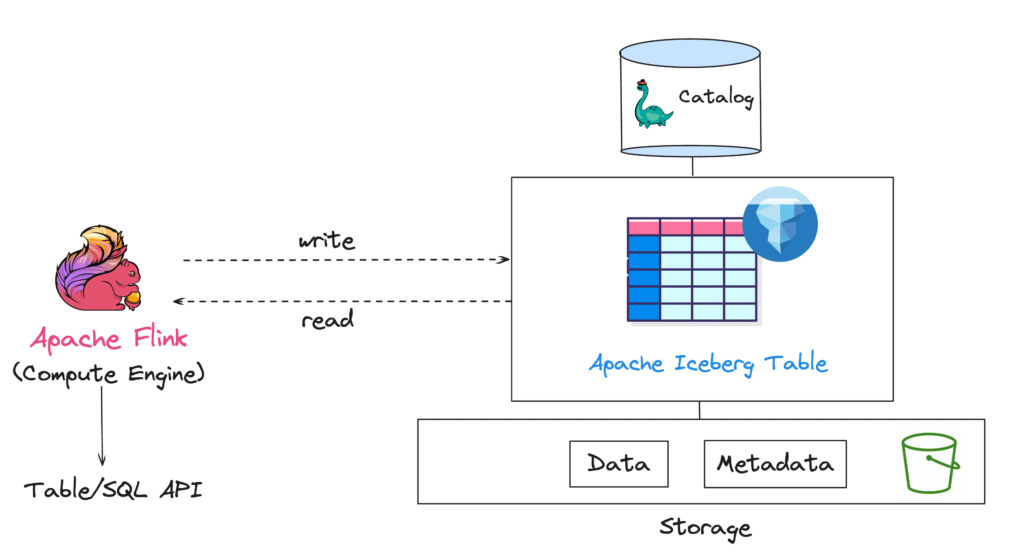
Keep in mind that configuring a catalog is the very first step when dealing with Iceberg tables. A catalog provides a unified view of all the tables in your data lake, ensuring atomicity and consistency in read-write operations. You can opt for various catalogs such as Hive metastore, Project Nessie, Hadoop, or AWS Glue. This blog uses Nessie, an open source option with features like data versioning and Git-like branches/tags.
Configuration
Prerequisites
Before getting started with configuration, there are a couple of libraries and classes that you need to download. Here’s a list of the prerequisites:
- Apache Flink: Download the latest version of Flink that is compatible with Apache Iceberg from the official website. As of writing this blog post, it is recommended to use Flink 1.16 bundled with Scala 2.12.
- Runtime JAR: The next important component is the
iceberg-flink-runtimeJAR file that needs to be downloaded. This library facilitates Iceberg and Flink integration. You can download the latest compatible JAR here. - Hadoop Common libs: For Flink and Iceberg to interact with file systems such as S3 or HDFS, i.e., the underlying storage, you will need the Hadoop common classes. These classes are packaged in this JAR file.
- Hadoop AWS classes: The Hadoop AWS classes are necessary if you want to read or write data specifically from Amazon S3. It handles things like management of connections and I/O operations.
- AWS Bundled classes: These classes enable support for dealing with a variety of AWS services like S3, Identity and Access Management (IAM), AWS Lambda, and others. While the Hadoop AWS library provides some level of support for S3-based operations, the AWS bundle allows you to do more advanced operations like upload or download objects.
After you download these libraries, you will need to move the files to the FLINK_HOME/lib directory so Flink can leverage them during startup.
Setting the Environment
The next step in the configuration is to set up the environment with Flink, Nessie catalog, and the data lake storage. You can either host these three services as Docker containers or set up a standalone cluster for each of them locally. For this demonstration, we will create a docker-compose.yaml file with the following details.
Nessie Catalog
# Nessie Catalog
services:
 catalog:
   image: projectnessie/nessie
   container_name: catalog
   networks:
     iceberg-nessie-flink-net:
   ports:
     - 19120:19120
Flink Processes
Apache Flink consists of two types of processes: JobManager and TaskManager. In short, a JobManager is responsible for execution of various operations related to an application such as scheduling the next task, coordinating checkpoints, etc. Whereas a TaskManager executes the scheduled tasks. Below is an excerpt of the Docker image settings for the two. The complete file can be downloaded from this repository.
# Flink Job Manager
flink-jobmanager:
   image: dip/flink-iceberg:latest
   ports:
     - "8081:8081"
   command: jobmanager
   networks:
     iceberg-nessie-flink-net:
   environment:
     - |
       FLINK_PROPERTIES=
       jobmanager.rpc.address: flink-jobmanager
     - AWS_ACCESS_KEY_ID=admin
     - AWS_SECRET_ACCESS_KEY=password
     - AWS_REGION=us-east-1
     - AWS_DEFAULT_REGION=us-east-1
     - S3_ENDPOINT=http://minio.storage:9000
     - S3_PATH_STYLE_ACCESS=true

# Flink Task Manager
flink-taskmanager:
   image: dip/flink-iceberg:latest
   depends_on:
     - flink-jobmanager
   command: taskmanager
   networks:
     iceberg-nessie-flink-net:
   scale: 1
   environment:
     - |
       FLINK_PROPERTIES=
       jobmanager.rpc.address: flink-jobmanager
       taskmanager.numberOfTaskSlots: 2
     - AWS_ACCESS_KEY_ID=admin
     - AWS_SECRET_ACCESS_KEY=password
     - AWS_REGION=us-east-1
     - AWS_DEFAULT_REGION=us-east-1
     - S3_ENDPOINT=http://minio.storage:9000
     - S3_PATH_STYLE_ACCESS=true
Storage
This is where the data and metadata files from Iceberg will land. Instead of using an AWS S3 bucket, we will use MinIO, an S3 compatible open source object storage.
# Minio Storage Server
 storage:
   image: minio/minio
   container_name: storage
   environment:
     - MINIO_ROOT_USER=admin
     - MINIO_ROOT_PASSWORD=password
     - MINIO_DOMAIN=storage
     - MINIO_REGION_NAME=us-east-1
     - MINIO_REGION=us-east-1
   networks:
     iceberg-nessie-flink-net:
   ports:
     - 9001:9001
     - 9000:9000
   command: ["server", "/data", "--console-address", ":9001"]

 # Minio Client Container
 mc:
   depends_on:
     - storage
   image: minio/mc
   container_name: mc
   networks:
     iceberg-nessie-flink-net:
       aliases:
         - minio.storage
   environment:
     - AWS_ACCESS_KEY_ID=admin
     - AWS_SECRET_ACCESS_KEY=password
     - AWS_REGION=us-east-1
     - AWS_DEFAULT_REGION=us-east-1
   entrypoint: >
     /bin/sh -c "
     until (/usr/bin/mc config host add minio http://storage:9000 admin password) do echo '...waiting...' && sleep 1; done;
     /usr/bin/mc rm -r --force minio/warehouse;
     /usr/bin/mc mb minio/warehouse;
     /usr/bin/mc mb minio/iceberg;
     /usr/bin/mc policy set public minio/warehouse;
     /usr/bin/mc policy set public minio/iceberg;
     tail -f /dev/null
     "
Start the Environment & Flink SQL Client
You can now run the docker-compose.yaml file. This will start all the three containers which comprise of Nessie server, Flink JobManager, and TaskManager.
docker-compose up
As you can see in the CLI snippet below, all the required services are up and running. This means you are now ready to use Flink with Apache Iceberg which is configured with the Nessie catalog.
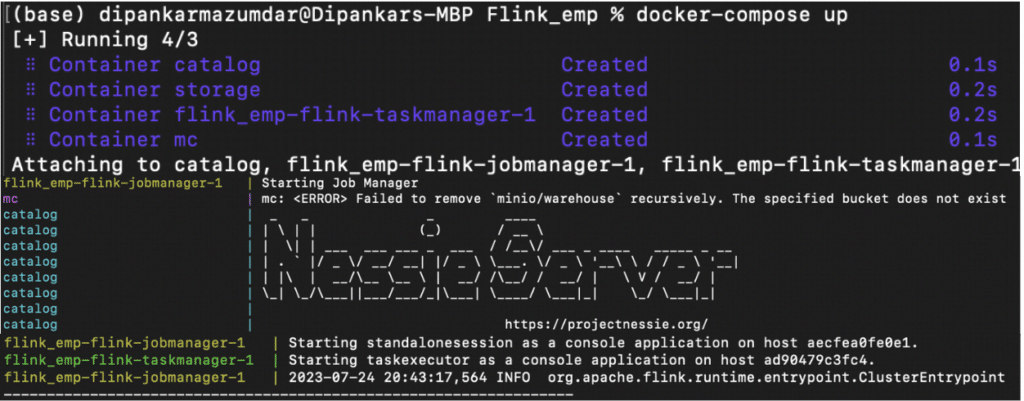
Note: If you want to set up all these components locally in your machine, you can download the prerequisites and start both JobManager and TaskManager like below. Make sure to check the configuration in your flink-conf.yaml file before starting these processes.
./jobmanager.sh start
./taskmanager.sh start
The final step is to start the Flink SQL client to continue with the Iceberg-specific operations. Here is the command to do so:
./bin/sql-client.sh embedded
The Flink SQL Client is now ready to interact with Iceberg tables.
Create an Iceberg Catalog
The first step is to create a catalog so it can store all of the Iceberg tables. In this case, we are using a Nessie catalog. So, here is the query to create the first catalog:
CREATE CATALOG nessie_catalog WITH (
'type'='iceberg',
'catalog-impl'='org.apache.iceberg.nessie.NessieCatalog',
'io-impl'='org.apache.iceberg.aws.s3.S3FileIO',
'uri'='http://catalog:19120/api/v1', 'authentication.type'='none',
'client.assume-role.region'='us-east-1',
'warehouse' = 's3://warehouse',
's3.endpoint'='http://{ip-address}:9000');
Some of the important properties to note in this query are:
- type: This must be set to
‘iceberg’representing an Iceberg catalog. - catalog-impl: This is the class name of the Nessie catalog implementation. This is not required if you plan to use a non-custom catalog like Hadoop, Hive, or REST.
- uri: Nessie server URI.
- warehouse: Directory where Flink will write files or read files from.
- s3.endpoint: Endpoint of the MinIO server; used by clients to connect. You need to provide the actual IP address of the MinIO machine here so DNS resolution can happen (if accessed outside of the network context).
When you execute the above query, the Nessie catalog will be created. Let’s check all the available catalogs in the Flink environment.
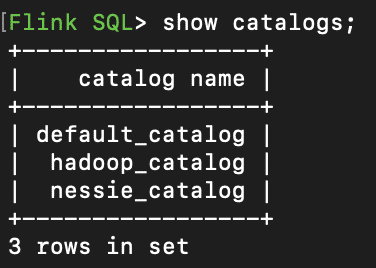
Great, you can see the newly created nessie_catalog!
Now, to use this catalog, you have to use the following command:
USE CATALOG nessie_catalog;
Create a Database
Until Apache Iceberg 1.3.1, Flink came with a ‘default’ database. You can create a new database using this command:
CREATE database db;
USE db;
To explicitly use the newly created database, you can use the USE database_name command.
Create Iceberg Table
Now that you have created your Iceberg catalog and created a database inside it, let’s create an Apache Iceberg table.
Here is a simple query:
CREATE TABLE spotify (songid BIGINT, artist STRING, rating BIGINT);

This means Flink SQL was successfully able to create the first Iceberg table called spotify in the nessie_catalog.
Insert Records
Let’s insert a few records now using the INSERT INTO statement provided by Flink SQL.
INSERT INTO spotify VALUES (2, 'drake', 3);

Based on the query, Flink SQL submits a job, which is then executed and managed by TaskManager and JobManager respectively.
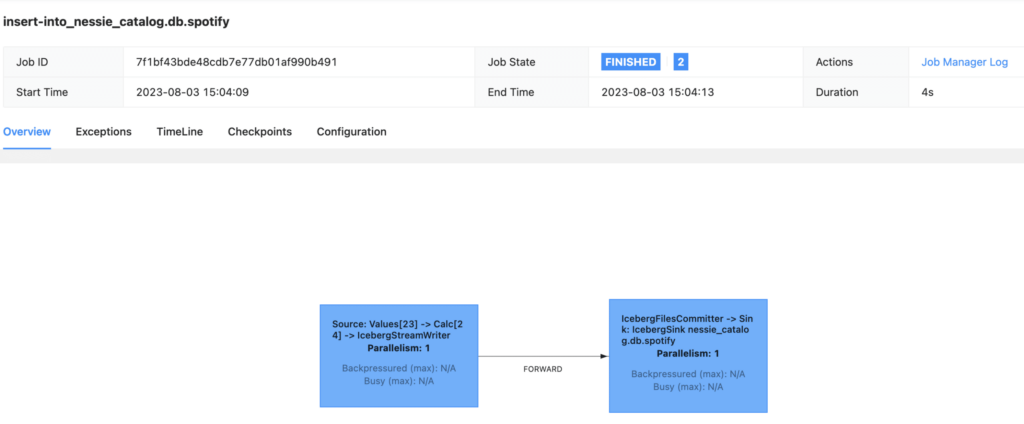
Apache Flink also comes with a native user interface, which can be accessed at http://localhost:8081/. This interface allows you to monitor any running jobs, access completed jobs and relevant log files, among other things which can be super beneficial.
If you check the Flink UI, you can see all the completed jobs.

Here is a detailed look on one INSERT job.
Insert Overwrite
Flink SQL also allows you to replace the data in an Iceberg table with the result of a query using INSERT OVERWRITE. Note that this statement is only supported in the batch mode and not streaming.
SET execution.runtime-mode = batch;
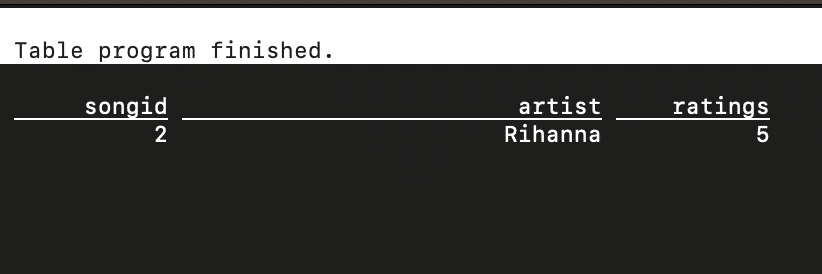
INSERT OVERWRITE spotify VALUES (2, 'Rihanna', 5);
This query will replace all the existing records with the specific row.
Here is the result.
Upserts
An Upsert statement allows you to UPDATE or INSERT in one single operation, i.e., based on whether the primary identifier matches between two tables, it either updates the record or inserts them. Flink SQL does not offer an MERGE INTO/UPSERT statement but there are two ways to do such operations:
- Enabling upsert mode at the table level.
CREATE TABLE spotify (
  `songid`  INT UNIQUE,
  `artist` STRING NOT NULL,
  `ratings` INT,
 PRIMARY KEY(`songid`) NOT ENFORCED
) WITH ('format-version'='2', 'write.upsert.enabled'='true');
You can then run an INSERT INTO statement and, based on the table identifier, the records will either be updated or inserted.
- Enabling upsert mode during write
This is what is in our Iceberg table.

Now, let’s say you have an updated rating for Rihanna’s songid=2 from another table that gathers all the recent updates for each song. So, if you now run the below query, it will update or insert based on the primary key, ‘songid’.
INSERT INTO spotify /*+ OPTIONS('upsert-enabled'='true') */ VALUES (2, 'Rihanna', 4);Here is the updated result.

This mode allows more flexibility to supply the parameter as a SQL Hint during individual writes in Flink.
Note that you need to have a primary identifier defined before you can run an UPSERT operation.
Read Records
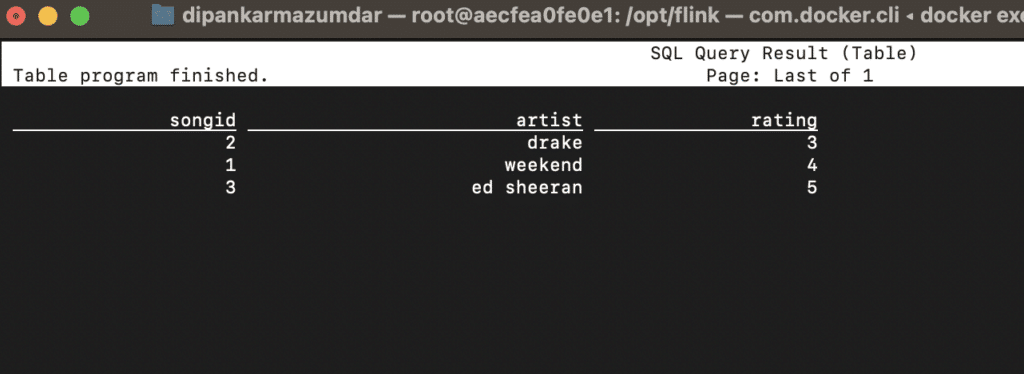
So now you have your Iceberg table and some records inside it. Let’s try to read them using Flink SQL. Since the catalog name and database name were explicitly used in the Flink SQL client, you can just query using the table name as shown below.
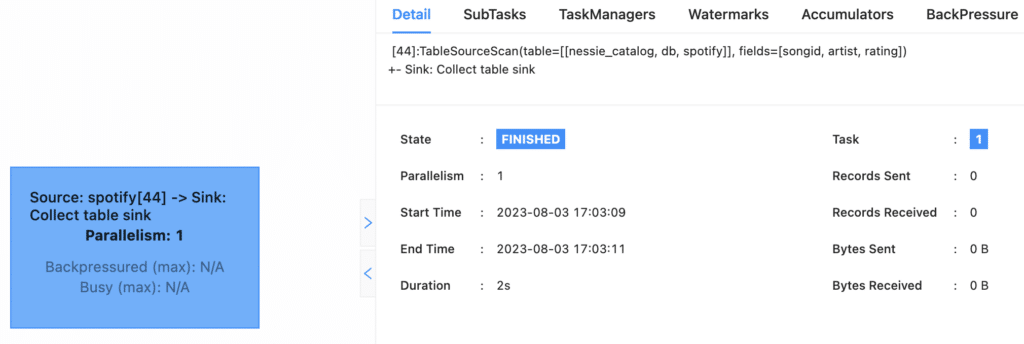
select * from spotify;
This starts up a new job which can be seen in the Flink UI.
And the results are returned back after the job completes.
Exploring Metadata Queries using Flink SQL
Apache Iceberg's metadata files serve as a critical resource, helping you to derive insights on the overall health of a table, and providing essential information on the table’s history, stored data files, snapshots, and more. Iceberg allows you to query these files using metadata tables, which provide a structured view of the information.
One of the best parts of using Flink SQL is to be able to directly query the metadata system tables. Let’s take a look at a few metadata tables to better understand how to query them using Flink SQL.
History
SELECT * FROM spotify$history;
The result of this query presents ideas on things such as when a snapshot was created, if there were any rollbacks, among other things.

Metadata Log Entries
SELECT * FROM spotify$metadata_log_entries;

This pertains to the metadata files present in our data lake for the Iceberg table spotify and shows information about latest_snapshot_id, file, etc.
Snapshots
You can see all the snapshots that exist for your Iceberg table along with their committed_at timestamp, type of operation and manifest_list using this table.
SELECT * FROM spotify$snapshots;

Conclusion
This article explored how to set up and configure a real-time lakehouse architecture using Apache Flink and Iceberg by walking through various data-specific operations such as DDLs, reads, and writes and showing how this combination works in action. What makes this combination great is the strong infrastructure it provides for handling and processing data, particularly for real-time applications. A key point is that once Flink processes data and adds it to an Iceberg table, it is accessible to other compute engines like Spark, Dremio, or Trino for other analytical tasks such as machine learning, BI, or ad hoc SQL. With Iceberg’s critical features such as read-write isolation, incremental reads, small file compaction, and concurrent read, etc., Flink allows for quicker data access. This not only improves performance but also cuts costs, making it a perfect choice for real-time data analytics.

