38 minute read · September 23, 2022
Streaming Data into Apache Iceberg Tables Using AWS Kinesis and AWS Glue

· Head of DevRel, Dremio

A recent article demonstrated how to create an Iceberg table using AWS Glue. While this works great for periodic batch jobs, there is the world of continuous streaming data. This tutorial aims to show how you can take advantage of the power of Iceberg tables and convenience of AWS Glue for streaming. First, let’s discuss streaming in general.
For more on implementing a data lakehouse with Dremio + AWS check out this joint blog on the AWS Partner Nework blog.
Batch vs. Streaming Data
Data is generated while applications are used by consumers such as purchase data, click data, outbound link data, and so forth. Originally, the only way to take all this data and move it over to an analytical system was to undergo “batch” jobs. This means that on a set schedule the new generated data is processed generally once a quarter, month, week, or day depending on the data consumer's needs.
This of course creates a lag in the availability of data to data scientists and data analysts, and in a world where we need to respond quickly to data insight in real time this is not ideal.
For data that requires real-time processing, the norm is to stream the data. New data is constantly being produced into a pipeline to be made available to many consumers right away. The streaming world is supported by many tools like Apache Kafka, Apache Flink, Apache Spark Streaming, AWS Kinesis, and more. Streaming data generally follows a pattern like the one illustrated below:
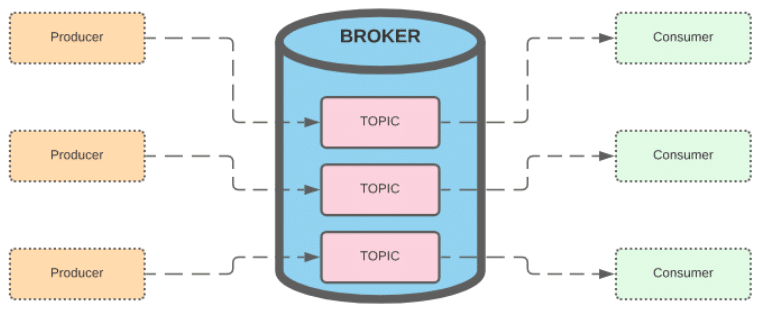
You have producers that generate data from an application and other sources that send messages to a broker, which is a platform like Apache Kafka or AWS Kinesis. Each message sent to the broker is categorized into different topics (clicks, purchases, etc.), and the data can be requested by consumers who then further process the data using tools like Flink, Kafka Streaming API, Spark Streaming, etc. So producers continuously produce data and the consumers continuously consume the data with the broker coordinating in between.
Manually setting up your own Kafka and Flink clusters to enable the ability to stream and process data in real time can be quite an undertaking, so many managed cloud services now exist so you can just focus on the production and consumption of the data and not everything in between. In the AWS Cloud platform, the service is called AWS Kinesis.
With AWS Kinesis the equivalent of a topic is a stream, so you create a stream for clicks, purchases, and so forth. Even better, you can now process the data from your Kinesis streams using AWS Glue, making it possible to ingest streaming data without having to write much, if any, code. Although ideally, you want to store that data in your data lake in a format that will give you the most robust ability to work with the data, such as the Apache Iceberg table format.
Apache Iceberg 101
You can read this article and watch this video to learn more about the architecture of Apache Iceberg. Below is a quick summary.
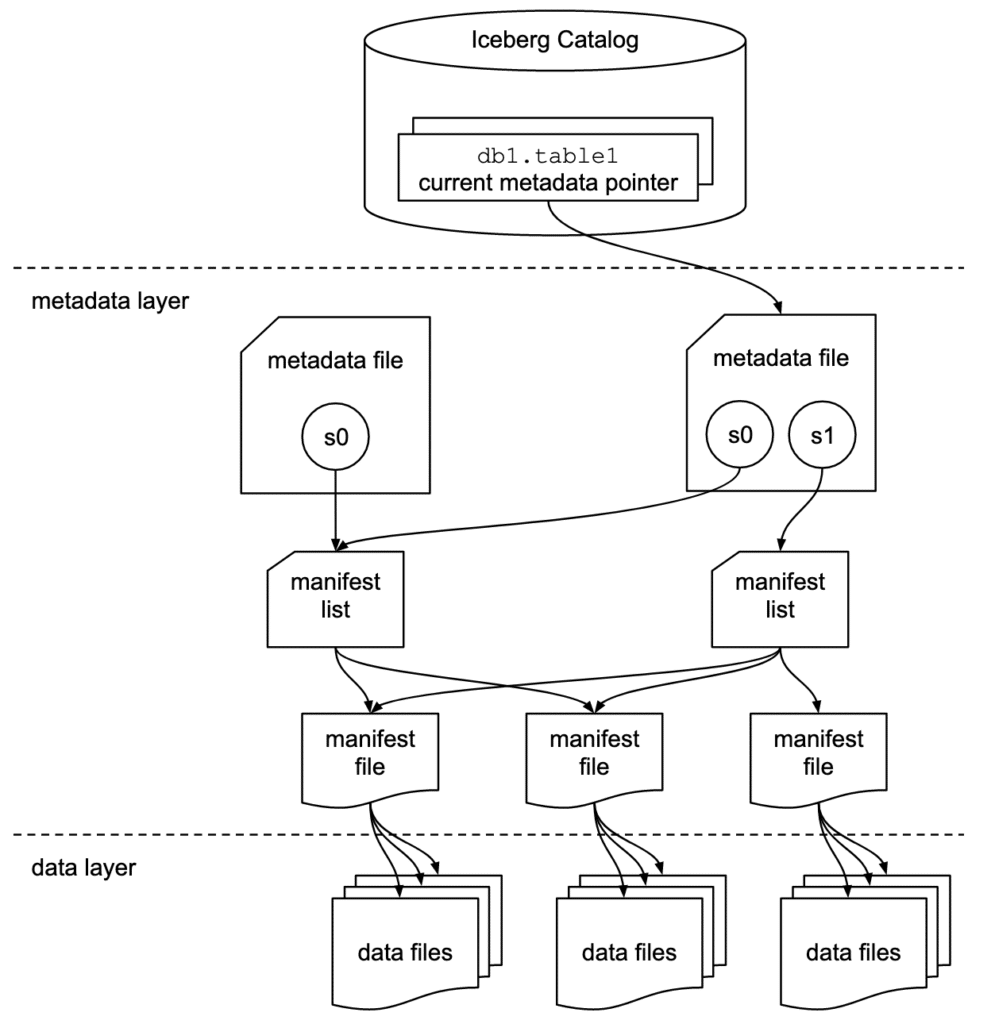
Apache Iceberg has a tiered metadata structure and it’s key to how Iceberg provides high-speed queries for both reads and writes on data lakehouse storage. Let’s summarize the structure of Apache Iceberg to see how this works. If you are already familiar with Iceberg’s architecture, then feel free to skip ahead to the section titled “Streaming Data from AWS Kinesis to an Iceberg Table.”
Data Layer
Starting from the bottom of the diagram, the data layer holds the actual data in the table. It’s made up of two types of files:
Data files – Stores the data in file formats such as Parquet or ORC.
Delete files – Tracks records that still exist in the data files, but that should be considered as deleted.
Metadata Layer
Apache Iceberg uses three tiers of metadata files which cover three different scopes.
Manifest files – A subset of the snapshot. These files track the individual files in the data layer in that subset along with metadata for further pruning.
Manifest lists – Defines a snapshot of the table and lists all the manifest files that make up that snapshot with metadata on those manifest files for pruning.
Metadata files – Defines the table, and tracks manifest lists, current and previous snapshots, schemas, and partition schemes.
The Catalog
Tracks a reference/pointer to the current metadata file. This is usually some store that can provide some transactional guarantees like a relational database (Postgres, etc.) or metastore (Hive, Project Nessie, Glue).
Streaming Data from AWS Kinesis to an Iceberg Table
The first step is to make sure you have an AWS user with the following permissions in place. If your user is the admin of the AWS account, there’s no need to grant these explicitly.
- Write files to a bucket or your path of choice in S3.
- Create databases and tables on AWS Glue.
- GetAuthorizationToken for ECR.
- Optionally, write and view logs in CloudWatch. This is not necessary but can help with debugging if you run into issues.
- Ability to create streams with AWS Kinesis.
IAM Role
Head over to the IAM dashboard, click “Roles” on the left sidebar, then click “Create Role” in the upper right. Select “AWS Service” as the type of trusted entity, select Glue, then click “Next: Permissions.”
On the next page, click “Create Policy” and paste the JSON shown below in the JSON tab of the “Create policy” screen. Then proceed through the wizard steps to add any tags, give it a name, and create the policy.
Note: If you don’t have permissions to do this, you need to request these steps to be done by someone who does have permission to do this on the account.
- This JSON permissions policy limits everything to a users account, so you must replace any instance of “############” with a user account number. The only thing that is not limited is the retrieval of connectors from ECR since the Iceberg Connector exists outside of the account. After copying this policy, you can use the visual editor if you want to limit permissions to particular buckets, databases, and so forth.
{
    "Version": "2012-10-17",
    "Statement": [
        {
            "Sid": "VisualEditor0",
            "Effect": "Allow",
            "Action": [
                "logs:CreateLogDelivery",
                "logs:PutDestinationPolicy",
                "ecr:GetDownloadUrlForLayer",
                "ecr:DescribeRegistry",
                "ecr:BatchGetImage",
                "ecr:GetAuthorizationToken",
                "s3:CreateJob",
                "ecr:BatchCheckLayerAvailability"
            ],
            "Resource": "*"
        },
        {
            "Sid": "VisualEditor1",
            "Effect": "Allow",
            "Action": [
                "glue:GetDatabase",
                "s3:PutObject",
                "s3:GetObject",
                "glue:GetConnections",
                "glue:GetConnection",
                "glue:CreateTable",
                "glue:UpdateTable",
                "s3:DeleteObject",
                "logs:PutLogEvents",
                "glue:GetTable"
            ],
            "Resource": [
                "arn:aws:glue:*:############:database/*",
                "arn:aws:glue:*:############:table/*/*",
                "arn:aws:glue:*:############:catalog",
                "arn:aws:glue:*:############:connection/*",
                "arn:aws:logs:*:############:log-group:*:log-stream:*",
                "arn:aws:s3:::*/*"
            ]
        },
        {
            "Sid": "VisualEditor2",
            "Effect": "Allow",
            "Action": [
                "s3:PutBucketNotification",
                "logs:PutMetricFilter",
                "logs:CreateLogStream",
                "s3:PutBucketLogging",
                "s3:CreateBucket",
                "logs:CreateLogGroup"
            ],
            "Resource": [
                "arn:aws:s3:::*",
                "arn:aws:logs:*:############:log-group:*"
            ]
        }
    ]
}
After creating this policy, create another and call it “aws_kinesis_policy” with the following JSON:
{
    "Version": "2012-10-17",
    "Statement": [
        {
            "Sid": "VisualEditor0",
            "Effect": "Allow",
            "Action": [
                "kinesis:PutRecord",
                "cloudwatch:PutMetricData",
                "kinesis:SubscribeToShard",
                "kinesis:DescribeStreamSummary",
                "kinesis:DescribeStreamConsumer",
                "kinesis:PutRecords",
                "kinesis:GetShardIterator",
                "kinesis:GetRecords",
                "kinesis:DescribeStream",
                "kinesis:RegisterStreamConsumer"
            ],
            "Resource": "*"
        },
        {
            "Sid": "VisualEditor1",
            "Effect": "Allow",
            "Action": "kinesis:ListShards",
            "Resource": "*"
        },
        {
            "Sid": "VisualEditor2",
            "Effect": "Allow",
            "Action": "dynamodb:*",
            "Resource": "*"
        }
    ]
}
After creating the policy on the IAM dashboard, click on “Roles” and select “create role.”
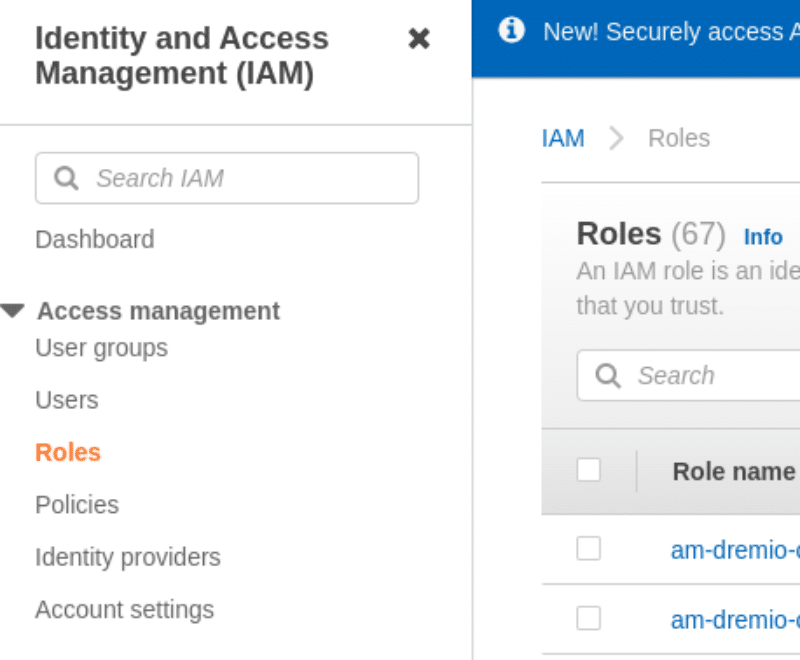
On the following screen, you want to select Glue as your trusted entity.
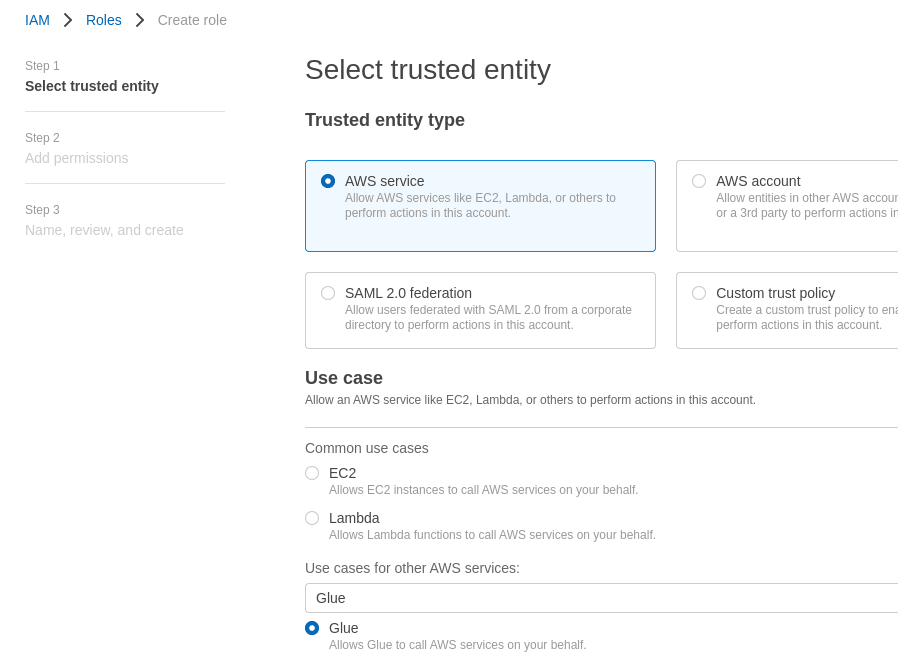
After selecting Glue click on “Next.”
On the Permissions page search for both permissions policies you just created, select it, and click “Next.”
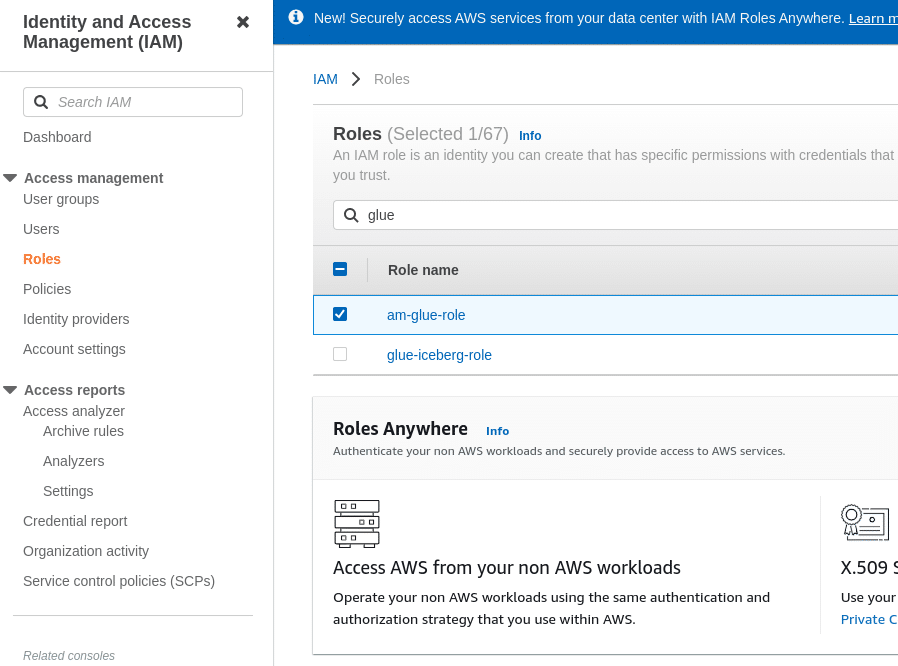
Name the role and add any tags you like, and when you’re done click “Create Role.”
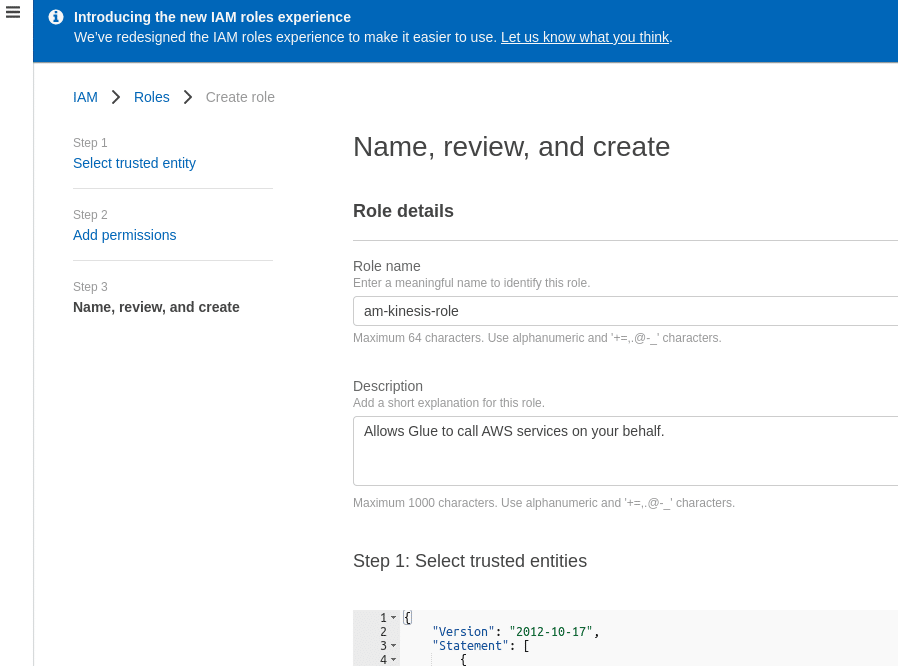
Create the Kinesis Stream
Head over to the AWS Kinesis dashboard and create a new data stream.
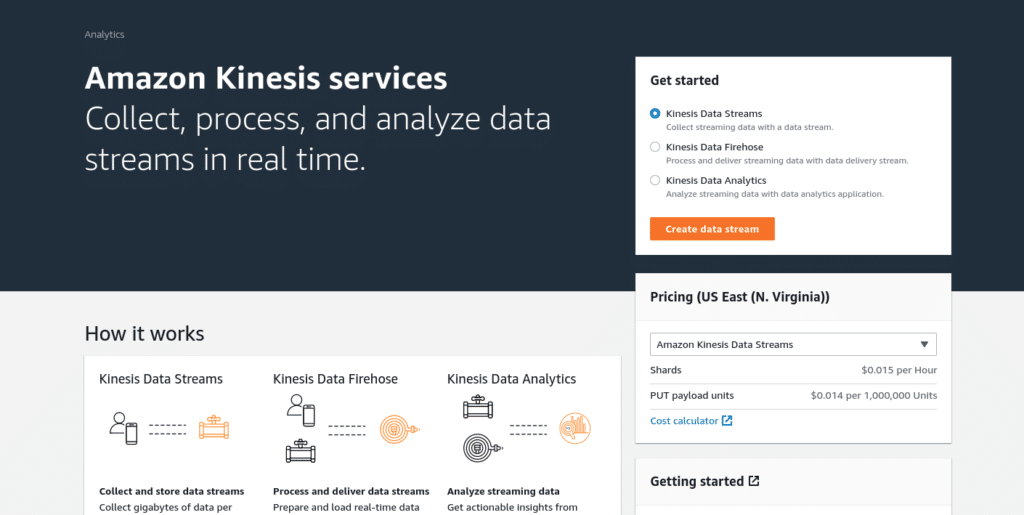
You want to control how many shards are created for your stream (as you are charged per shard) so give the stream a name and select “Provisioned” so it only provisions one shard (1.5 cents per hour cost). Then click “create data stream.”
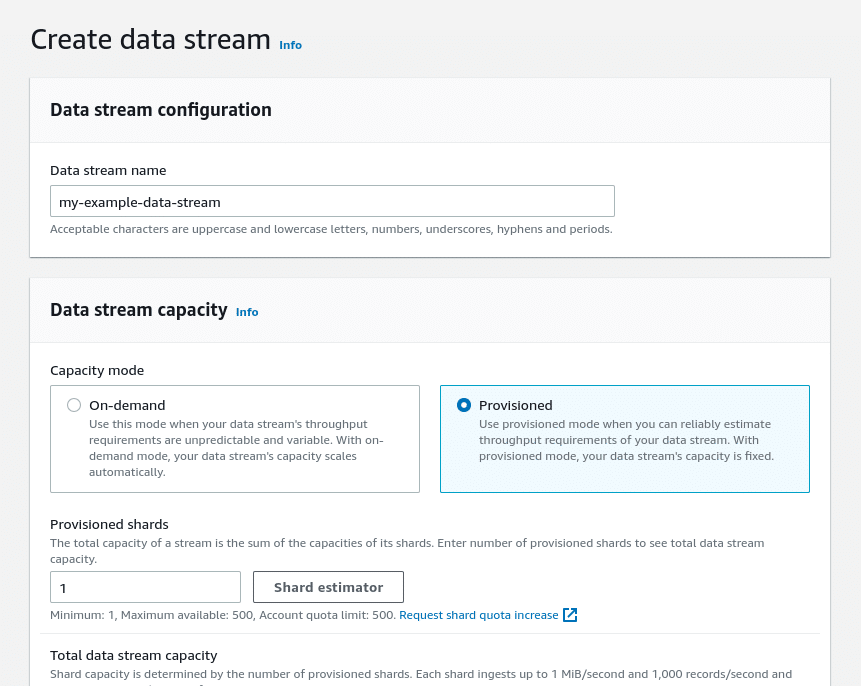
That’s it, your stream is now up and running. You can AWS SDKs for different languages to put records into the stream, but for the purpose of this demonstration, it is done with the AWS CLI.
Make sure you have the AWS CLI installed and log in to it by using the command aws configure in your favorite terminal emulator. Use the following command to put a record into your stream:
aws kinesis put-record --stream-name my-example-data-stream
--partition-key 001 --cli-binary-format raw-in-base64-out --data
'{"name":"Alex", "age":36}'
Overview of the command flags:
--stream-name (required): The name of the stream.
--partition-key (required): A key to help organize the data by shards when there is more than one shard.
--cli-binary-format raw-in-base64-out: Without this, you would have to pass the data as a base64 encoded string.
--data: A string that represents incoming data, in this case, you are passing JSON strings.
If this was successful, you should see output that looks like this:
{
    "ShardId": "shardId-000000000000",
    "SequenceNumber": "49626582931429259521588684201566057981928158383606595586"
}
Add a few more records with the same command, just use different names and ages. Now you can begin ingesting the data with AWS Glue.
Set Up the Iceberg Connector for AWS Glue
To set up the Iceberg Connector for AWS Glue, visit this link to subscribe to the free image in the AWS marketplace. This allows you to use the Iceberg Connector in your AWS Glue jobs, which makes the Iceberg libraries available to your Glue script to do operations on Iceberg tables.
Upon landing on the page linked above and shown below, click “Continue to Subscribe.”
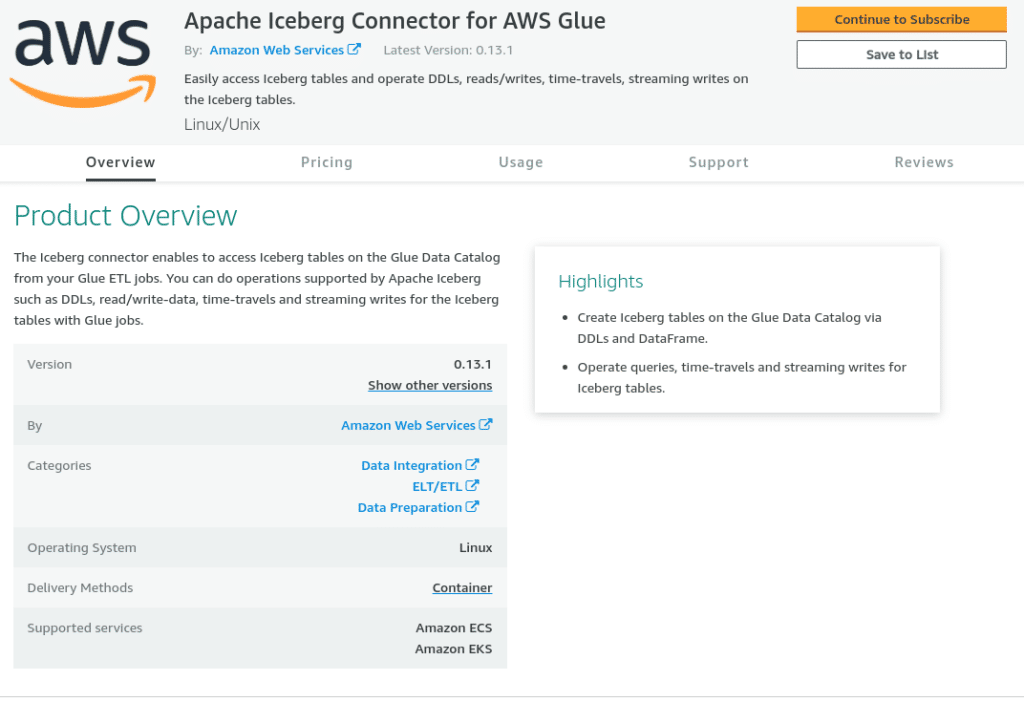
Accept the terms on the next page, and when the “Continue to Configuration” button in the upper right activates by turning orange (which can take a minute or two), click it. Then, on the next screen (pictured below), select Glue 3.0 as the fulfillment option, and the latest version as the software version, and click “Continue to Launch”:
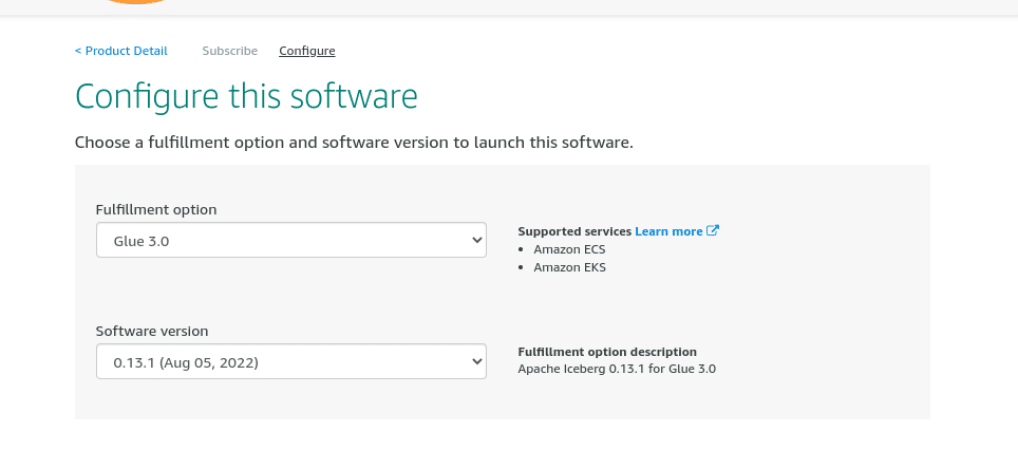
Note that even though it says “Review the launch configuration details and follow the instructions to launch this software,” you don’t need to do anything else on this screen — it’s now available for you to use.
After clicking “Continue to Launch” the following screen is shown:
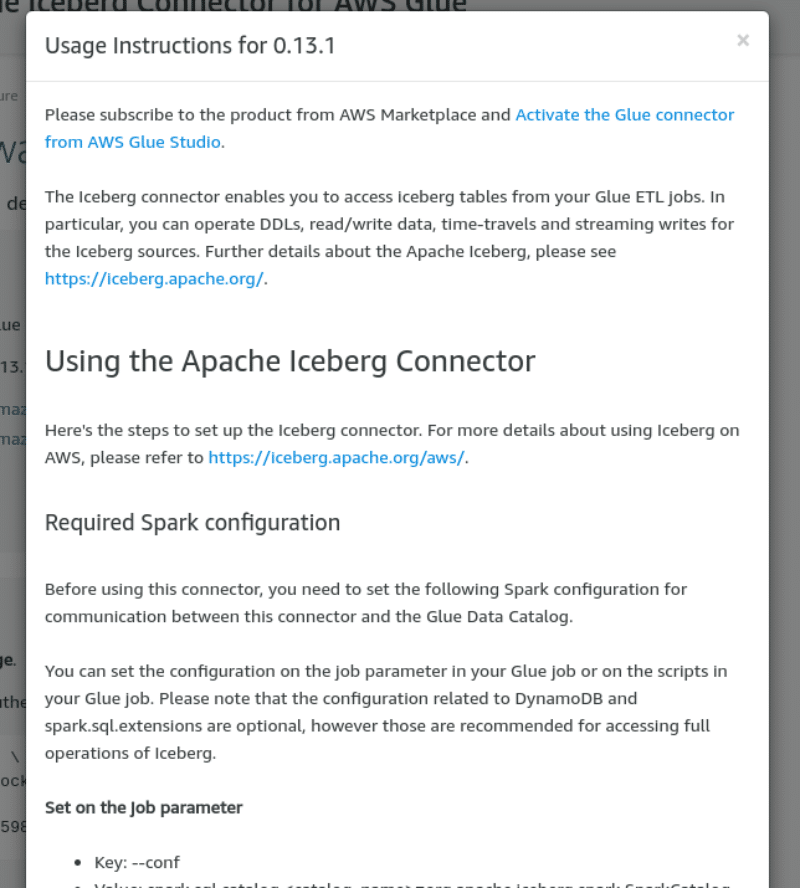
From this screen, click on “Usage Instructions,” which pops up the connector documentation. At the top there is a link to "Activate the Glue Connector" which allows you to create a connection.
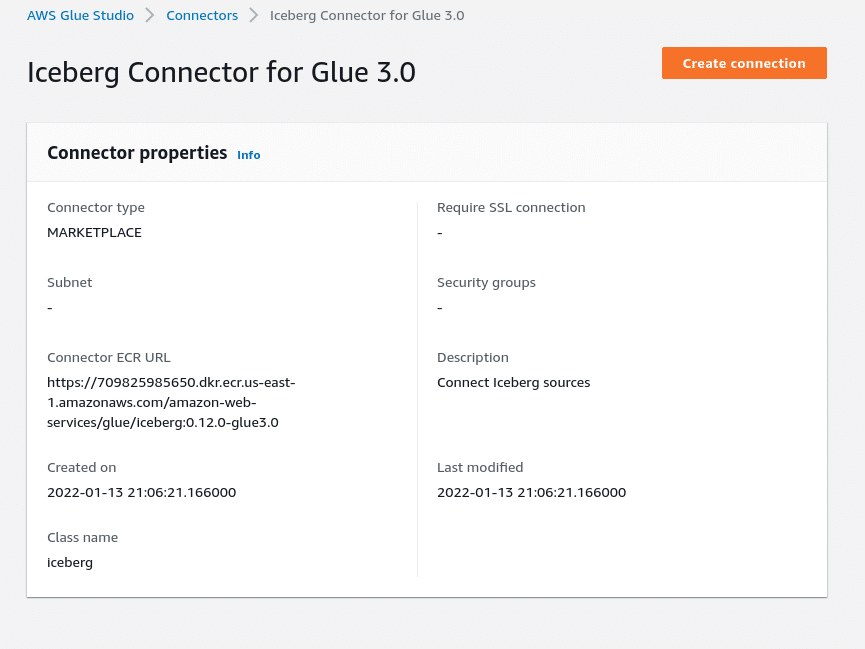
Another way to create a connection with this connector is from the AWS Glue Studio dashboard. Simply navigate to the Glue Studio dashboard and select “Connectors.”
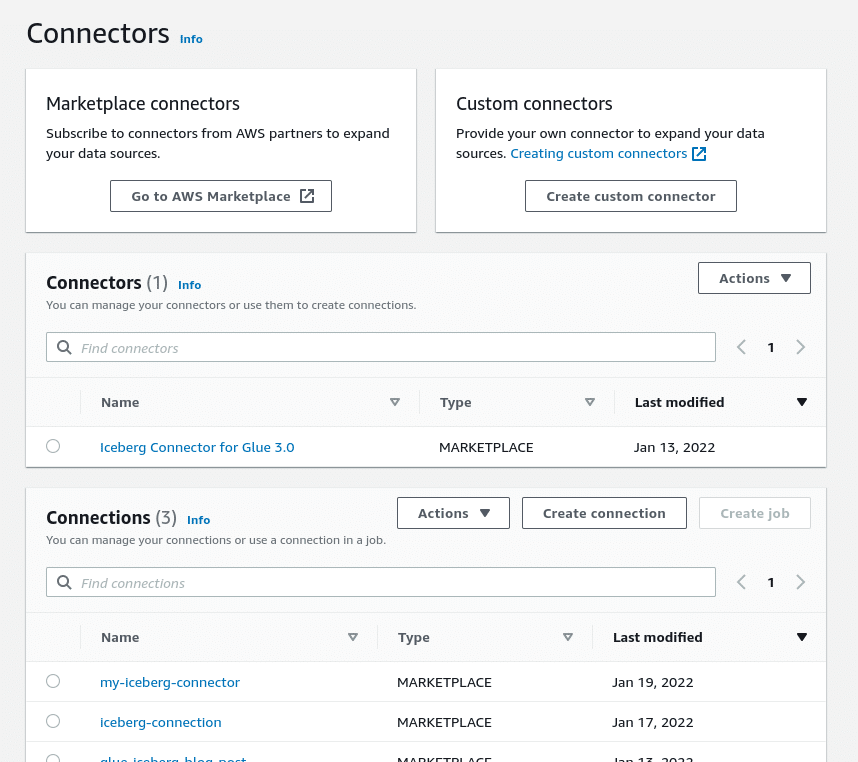
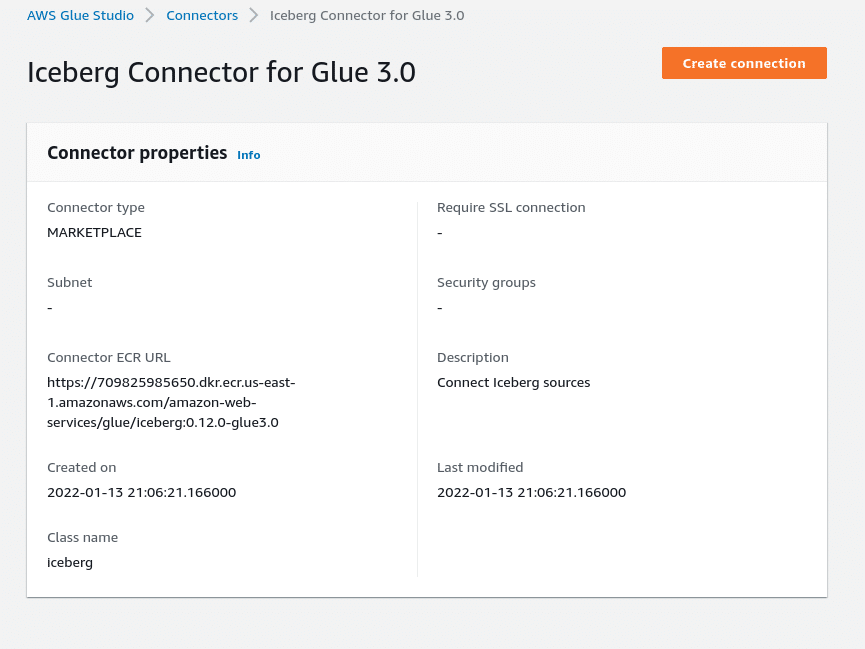
Click on the “Iceberg Connector for Glue 3.0,” and on the next screen click “Create connection.”
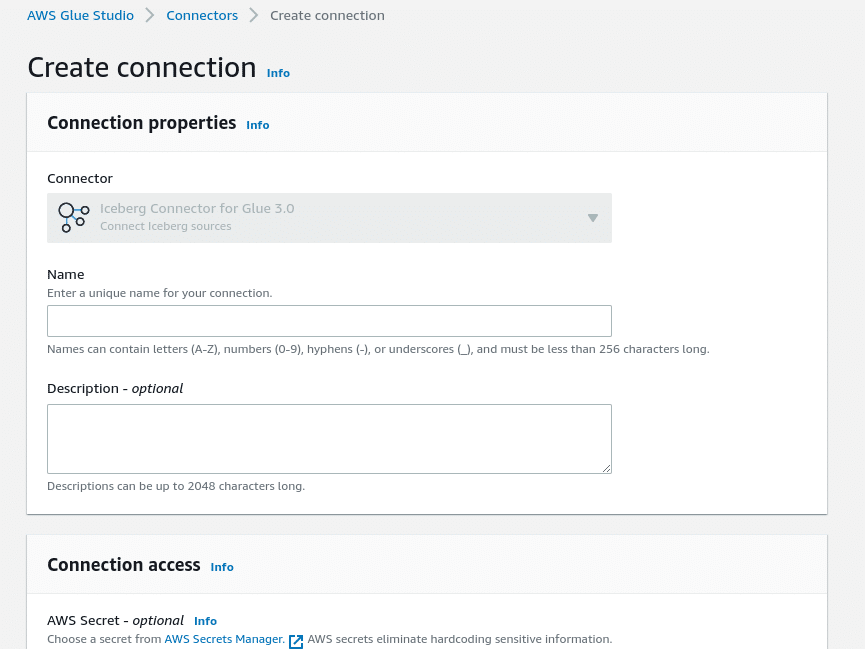
On the screen below give the connection a name and click “Create connection and activate connector.” If you are working with a VPC (virtual private cloud), this screen is where those details can be entered in the optional “Network options” section at the bottom:
Create the Glue Job to Write to an Iceberg Table
Create the Glue Database
Before you create the Glue job, you need a database in your Glue catalog in which your job can create a table.
Glue Database
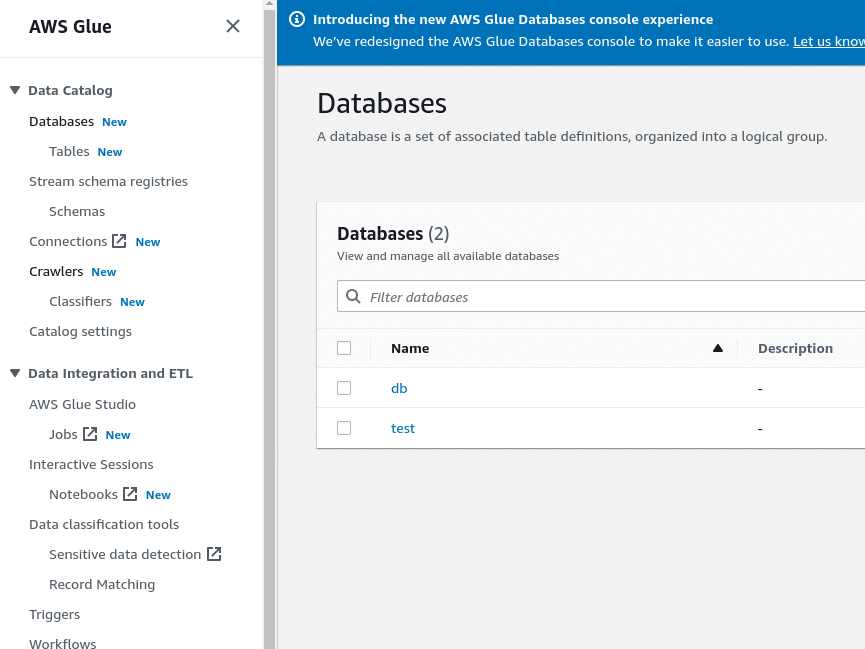
On the Glue dashboard click on “Databases” and create a database. You can give it any name you like, the directions in this tutorial assume a database called “db.”
Create the Glue Job
Head to the AWS Glue Studio dashboard and create a new job with Kinesis as a source and Apache Iceberg as a target.
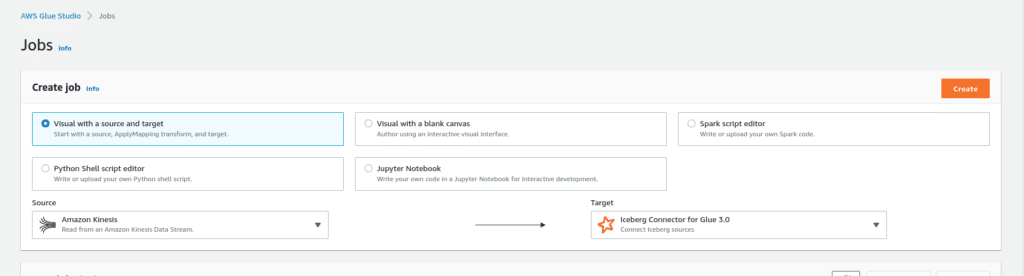
After selecting “create” the following screen is presented:
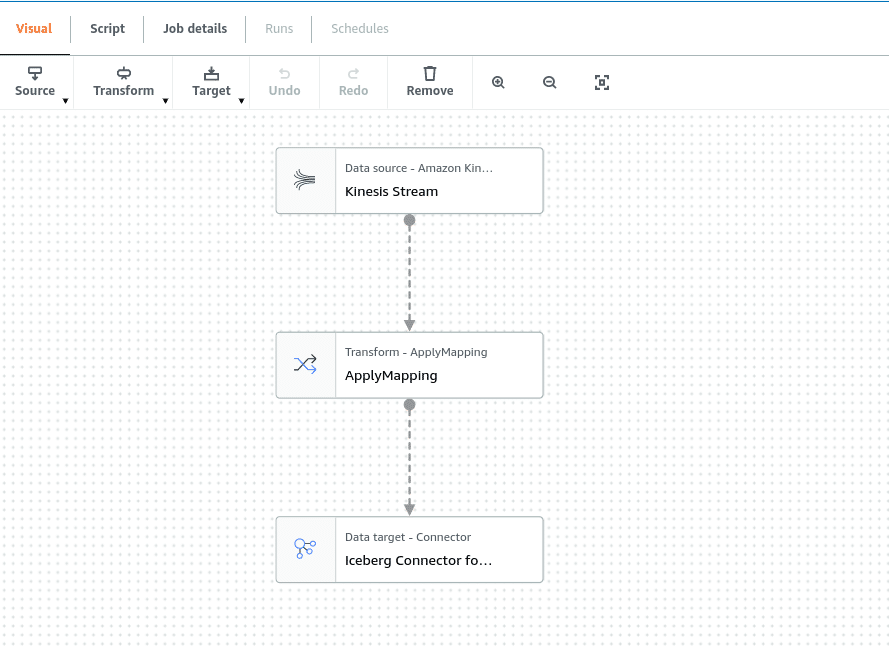
Because you are working with streaming data you can remove the ApplyMapping node (it doesn’t know what data will be streamed in to adjust the inferred schema), click on it and click “remove.”
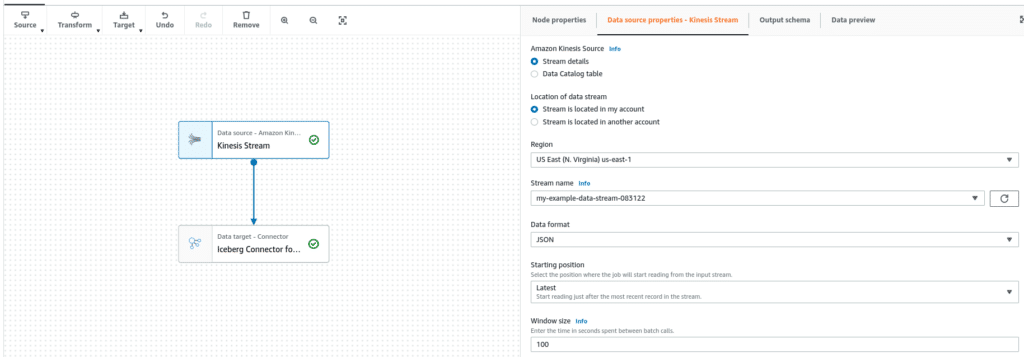
Then select the Kinesis node and make sure to select your stream and specify the data as JSON. Also select the starting position as latest so it only adds new data every time it checks the stream (selecting earliest will re-add all the data on each run). The window size (which defaults to 100) is the number of seconds between checking the stream for new data.
With the Kinesis node selected, add a SQL node under transform. The SQL node's job is to create the Iceberg table if it does not already exist, otherwise it will do nothing.
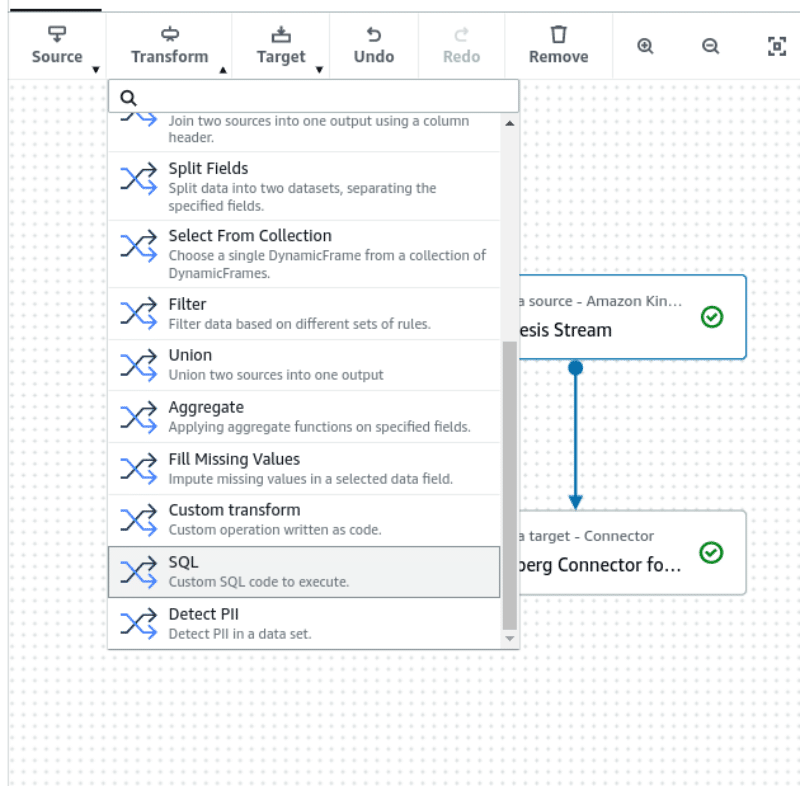
Add the node and under the Node properties tab give the node the name “CREATE TABLE.”
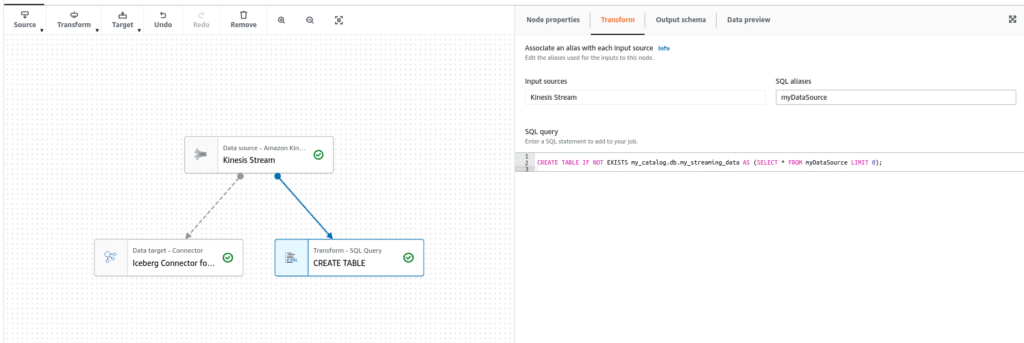
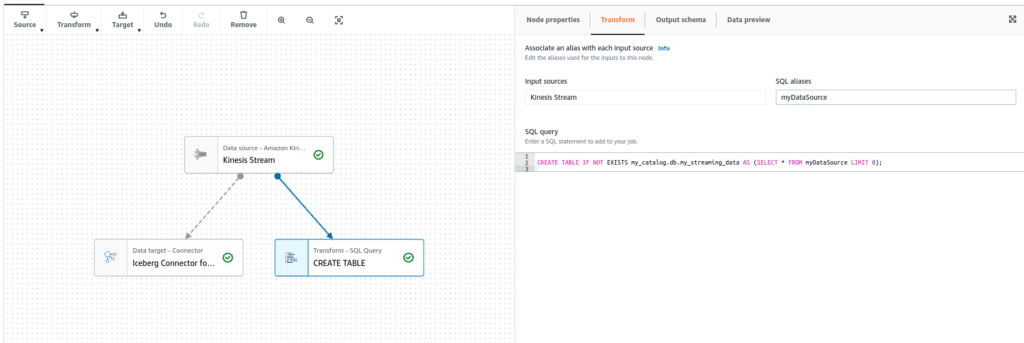
Then pass the following query under the transform tab. “myDataSource” is the data frame created by the Kinesis node; you want to create a table with a matching schema as the stream, which is why you need to use the LIMIT of 0, and you will add the records in a separate step.
CREATE TABLE IF NOT EXISTS my_catalog.db.my_streaming_data AS
(SELECT * FROM myDataSource LIMIT 0);
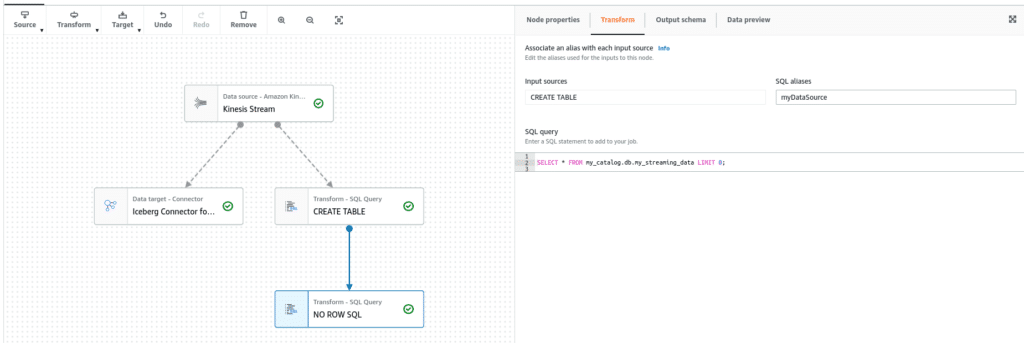
Create another SQL node as a child of the “CREATE TABLE” node and call it “NO ROW SQL” with the following SQL statement. The purpose of this query is to pass the schema to the Iceberg Connector so it does not create an error.
SELECT * FROM my_catalog.db.my_streaming_data LIMIT 0;
Now create another SQL node as a child of the Kinesis node with the name “INSERT INTO” with the following query. The job of this SQL node is to insert records after the table has been created and on future checks of the stream.
INSERT INTO my_catalog.db.my_streaming_data SELECT * FROM myDataSource;
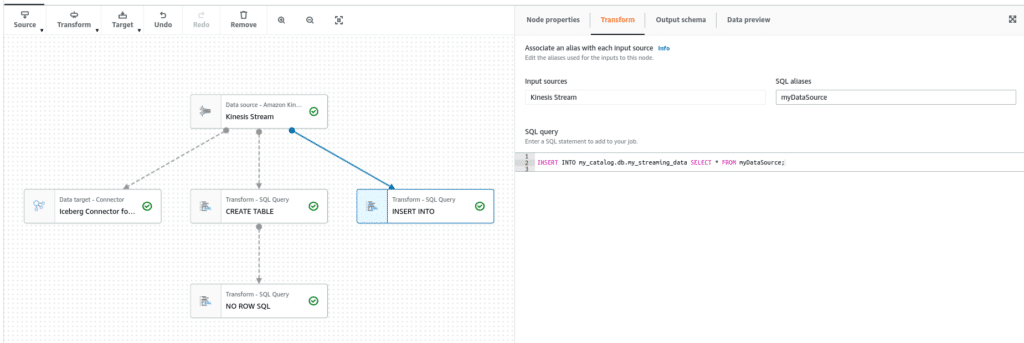
Then make the Iceberg Connector the child of “No Row SQL” and “INSERT INTO” a second parent of “No Row SQL” which should look like this:
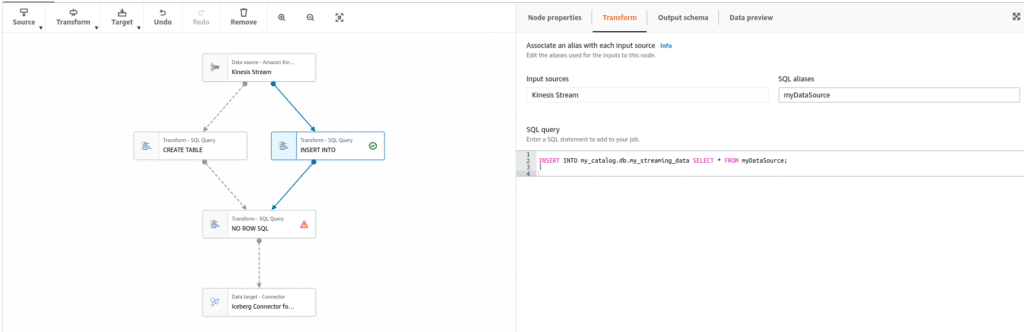
Update “NO ROW SQL” to give a name to the second incoming source.
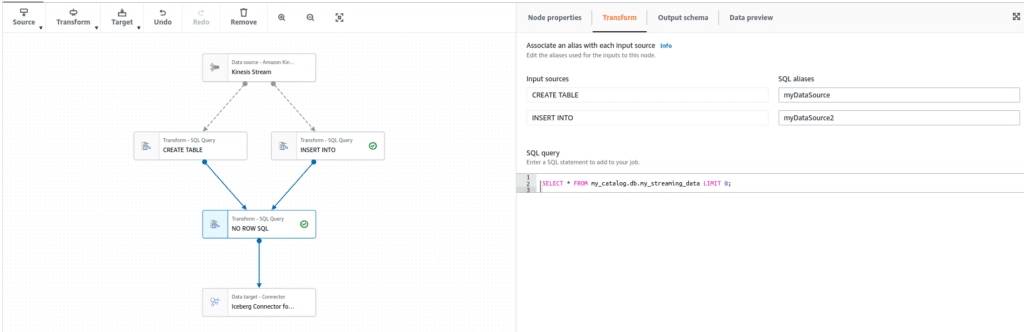
Now let’s configure the Iceberg Connector.
Add Iceberg Configurations to the Job
With the Iceberg Connector as the target, it automatically loads all the Iceberg libraries when it runs the script. Simply follow these steps:
- Select the “Iceberg Connector” box in the visual editor pane on the left.
- In the “Data target properties” tab, choose the Iceberg connection configured earlier for the “Connection” property.
- Under “Connection options,” click “Add new option” and set the “Key” as “path” and the “Value” as “my_catalog.db.my_streaming_data” (again, replace “db” with the name you chose for your Glue database). This path variable specifies the Iceberg table that the connector will try to write to.
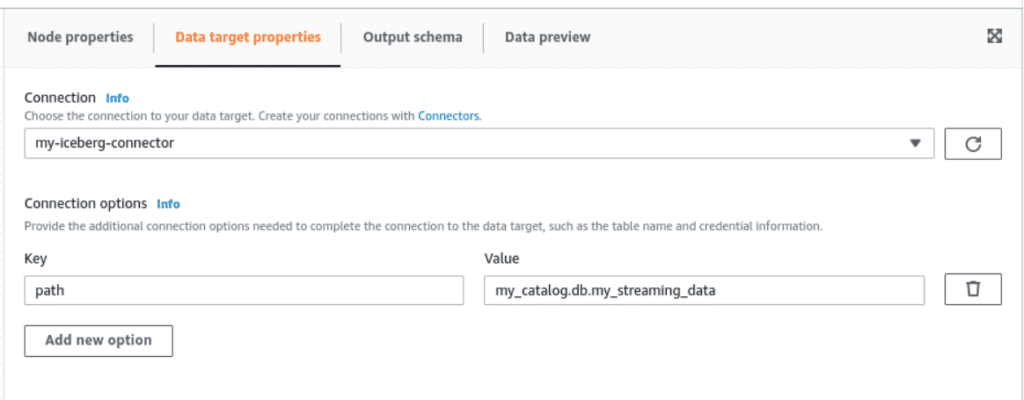
Under the jobs details tab in the upper left just above the visual canvas, input a job name, assign the role you created earlier under “IAM Role,” set the language to your preferred language (Scala or Python), and make sure to select Glue version 3.0 as shown below:
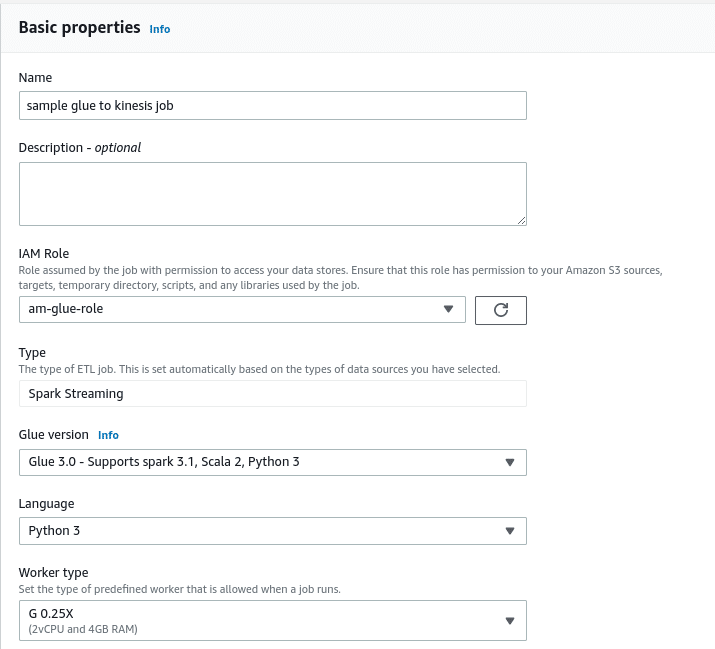
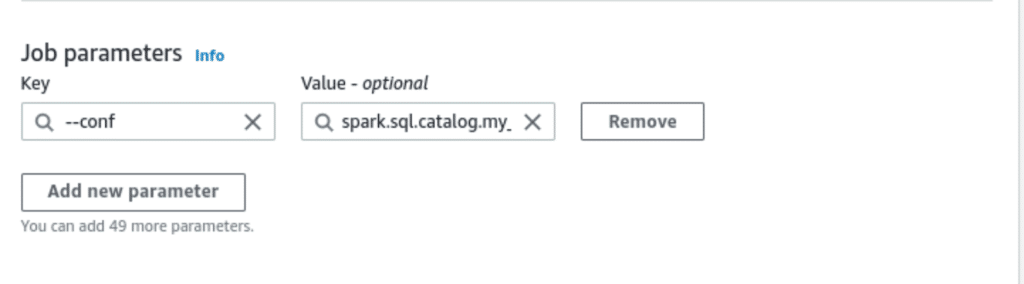
On the job parameters section located at the bottom of the advanced properties section, which is at the bottom of the job details tab, you need to add one “--conf” job parameter.
The value for this parameter should be the following, make sure to replace certain values based on the directions below the snippet:
spark.sql.catalog.my_catalog=org.apache.iceberg.spark.SparkCatalog --conf
spark.sql.catalog.my_catalog.warehouse=s3://my-output-directory --conf
spark.sql.catalog.my_catalog.catalog-impl=org.apache.iceberg.aws.glue.GlueCatalog --conf
spark.sql.catalog.my_catalog.io-impl=org.apache.iceberg.aws.s3.S3FileIO --conf
spark.sql.extensions=org.apache.iceberg.spark.extensions.IcebergSparkSessionExtensions
Here is a breakdown of what these configurations are doing and what can be edited or changed:
- Sets the sparkSQL catalog to be an Iceberg Catalog
- Sets the warehouse where the data and metadata will be stored to
s3://my-output-directory; make sure this value reflects the desired location without a trailing slash, and this bucket needs to be in us-east-1 - Sets the implementation of the catalog to the AWS Glue catalog so it can add the Iceberg table metadata pointer in the Glue Catalog
- Sets the IO implementation to S3 so it knows to use the native S3 IO implementation for interaction with S3
- Enables the Iceberg Spark Extension in the Spark session
Note: my_catalog is an arbitrary name for the catalog for sparkSQL; this can be changed to any name. If the name is changed, make sure to replace all references to my_catalog in this tutorial with the new name.
While it is beyond the scope of this tutorial, it is recommended that you use DynamoDB as a lock table if you're writing to this table with multiple concurrent jobs. This lock table ensures data isn’t lost when multiple jobs write to the same table at the same time.
If you want to set the lock table, just add the following configurations (make sure to set the DynamoDB table name, which must be an existing DynamoDB table that may need to be created). These would be appended to the job parameter value set above.
--conf spark.sql.catalog.my_catalog.lock.table=<DynamoDB_TABLE_NAME>
--conf
spark.sql.catalog.my_catalog.lock-impl=org.apache.iceberg.aws.glue.DynamoLockManager
Run the Glue Job
Now, click “Save” in the top right corner, and you’re ready to run the job!
AWS Glue is not free but is inexpensive, and each run of this job w costs about 15 cents. For this demonstration, you can reduce the number of workers to 3 and the number of retries to 0 to really minimize the cost (under the job details tab).
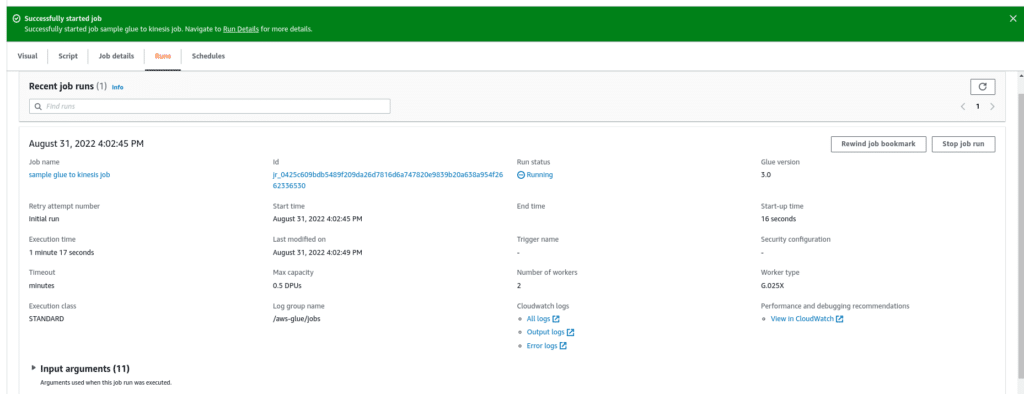
After all the previous steps have been configured and saved, click “Run” in the top right corner. Since this is a streaming job it will be continuous, so long as it says it's running without error you are in good shape.
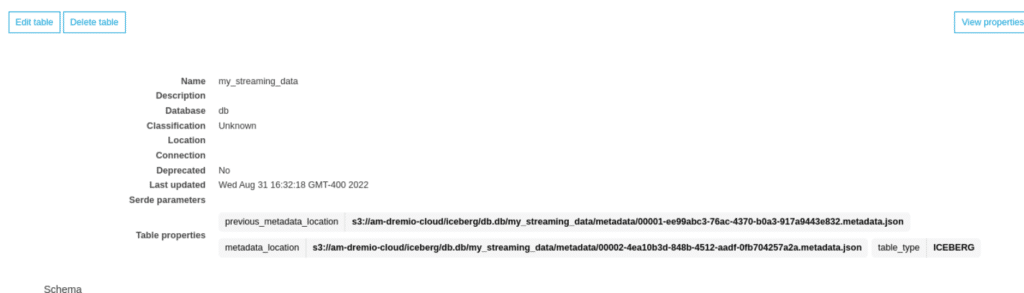
Once the job is complete, on the Glue dashboard you should see the table with the location of the current metadata file.
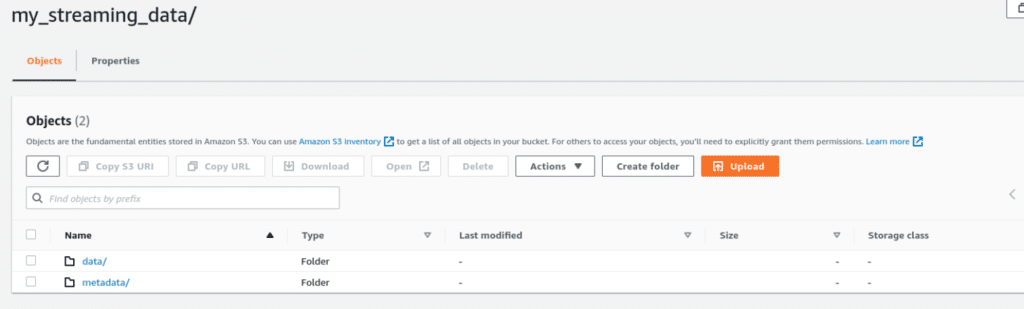
In the output S3 directory, a folder for the database is shown which has a folder for each table that includes the data and metadata for that table.
Now, you want to actually view and analyze the data in the Iceberg table you just created. To do so, let’s use Dremio.
Note: The jobs name is used as the Spark application name which affects how streaming jobs will run. If you want to process a different stream do not modify an existing job as you’ll get an error that looks like it is pulling data from both streams (because of the unchanged application name).
Caused by: com.amazonaws.services.kinesis.model.InvalidArgumentException:
StartingSequenceNumber 0000000000000000000000000000000000000000000000000000 used in
GetShardIterator on shard shardId-000000000000 in stream my-example-stream under
account 00000000000000 is invalid because it did not come from this stream.
To avoid this error, clone the job or create a new one with a different name.
Analyze the Iceberg Table with Dremio
Now that the Iceberg tables are in your data lake you can use them with any engine that supports Iceberg, like Dremio Sonar. The amazing benefit of working with open tools is that you can always use the tools that are best for the job on your data.
For example, you may need to build a BI dashboard based on a 50TB dataset which traditionally requires making extracts (copies of data subsets or aggregations) to keep it performant. Instead, you can use Dremio to create a virtual dataset of the data needed for the BI dashboard and use Dremio’s data reflections feature to quickly load data without having to worry about copies or maintenance.
Using your Iceberg tables with Dremio is just as easy as connecting AWS Glue as your data source.
Deploy Dremio
Dremio Cloud is the easiest and fastest way to get up and running with Dremio. Here is a video that shows you how to get up and running with Dremio Cloud in 5 minutes.
It’s recommended that you deploy it in or near AWS’s us-east-1 (N. Virginia) region because the Iceberg Connector only works in us-east-1. Plus it’s best practice to deploy compute closest to the data gravity.
Connect the Table to Dremio
To connect the table to Dremio is the same as adding any AWS Glue table to a Dremio account.
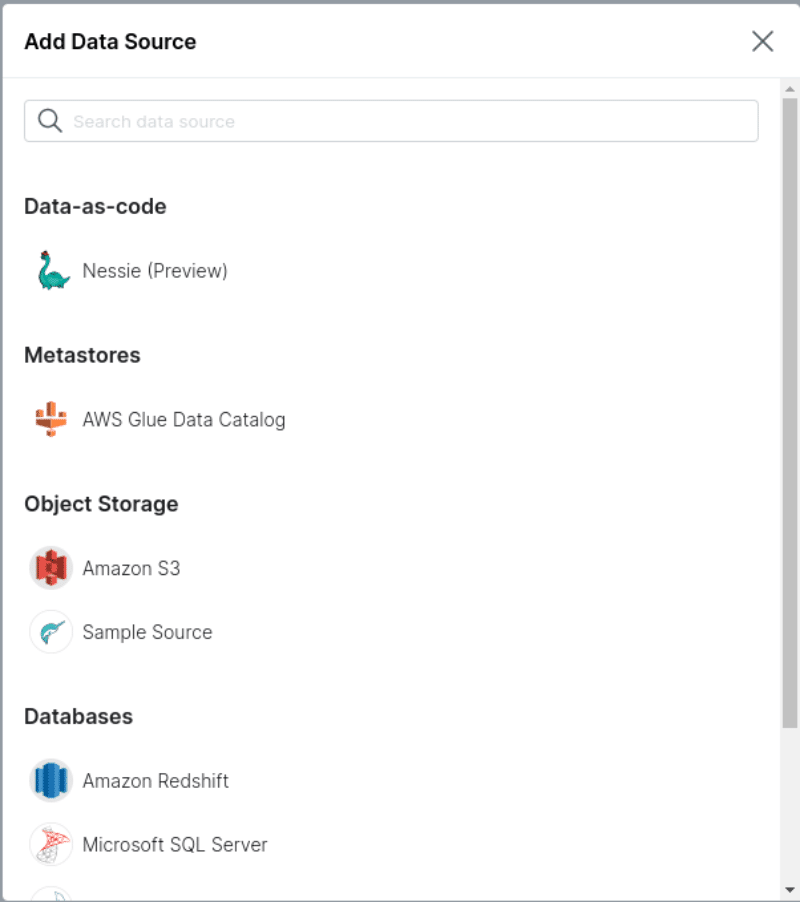
First, click on “Add Source.”

Select AWS Glue Catalog.
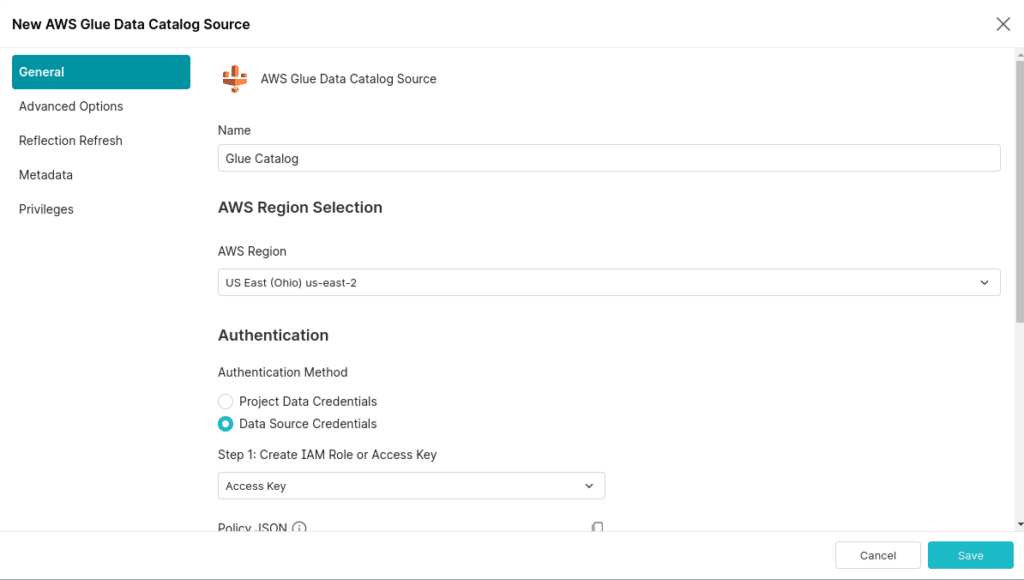
Then, fill in the authentication details (either EC2 metadata if Dremio is running on EC2s with IAM roles that have the necessary permissions, or AWS Access Key and Secret of your AWS user) and then click “Save.”
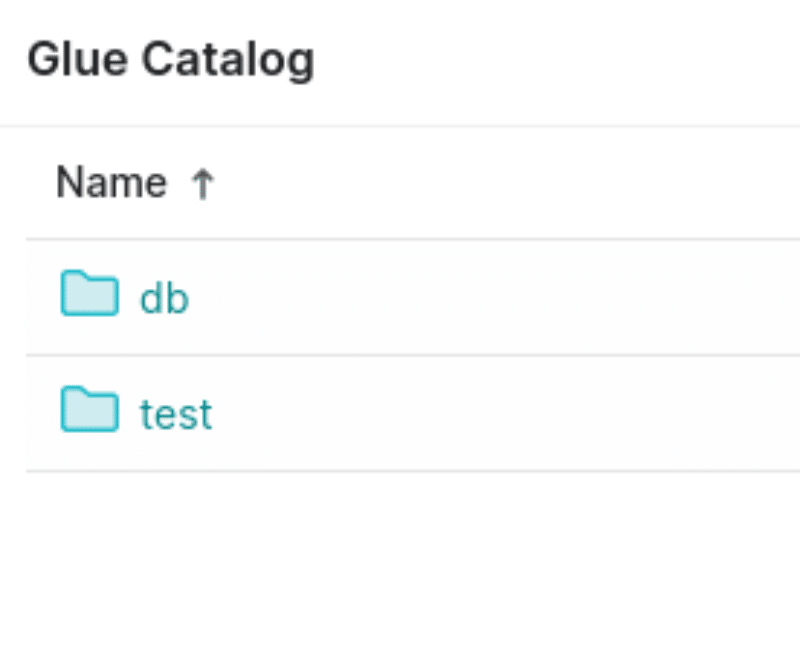
After connecting the Glue account, the databases from the Glue catalog should be visible as folders with the tables within them as physical datasets.
Each database shows up as a folder:
In those folders, the database tables can be seen as physical datasets:
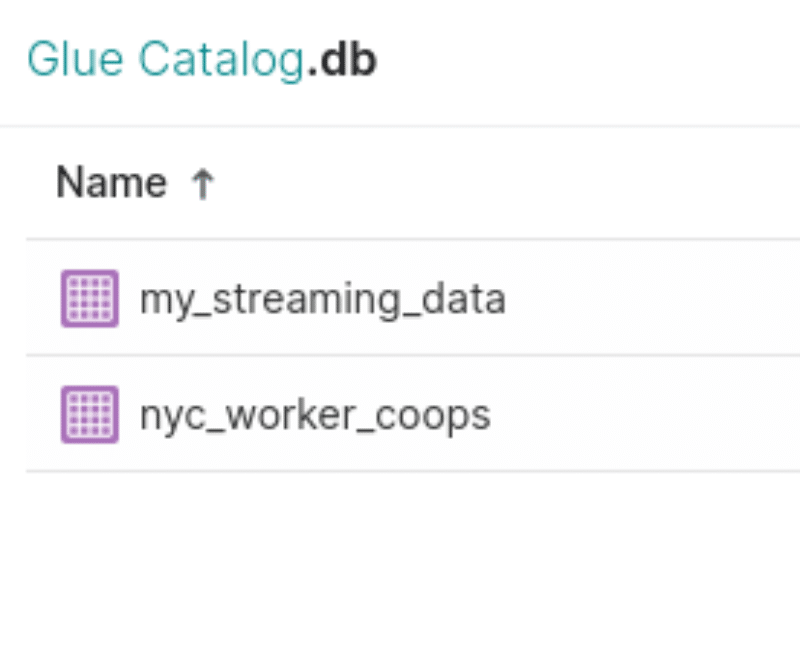
You can then click on and work with the datasets like any other dataset in Dremio!
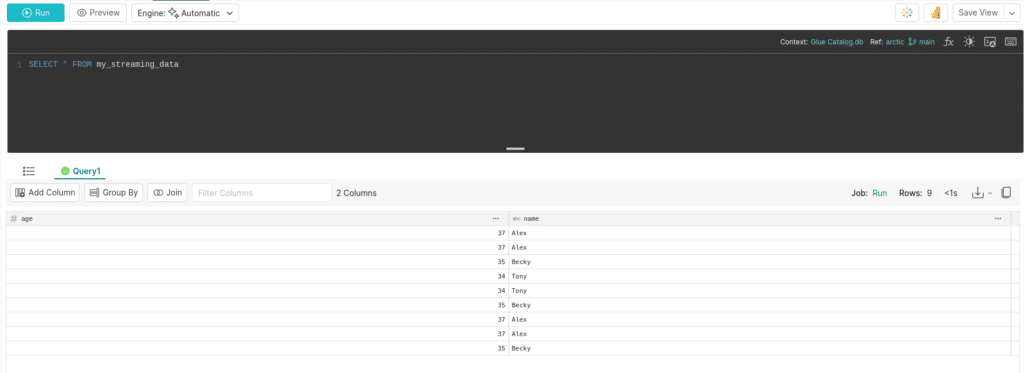
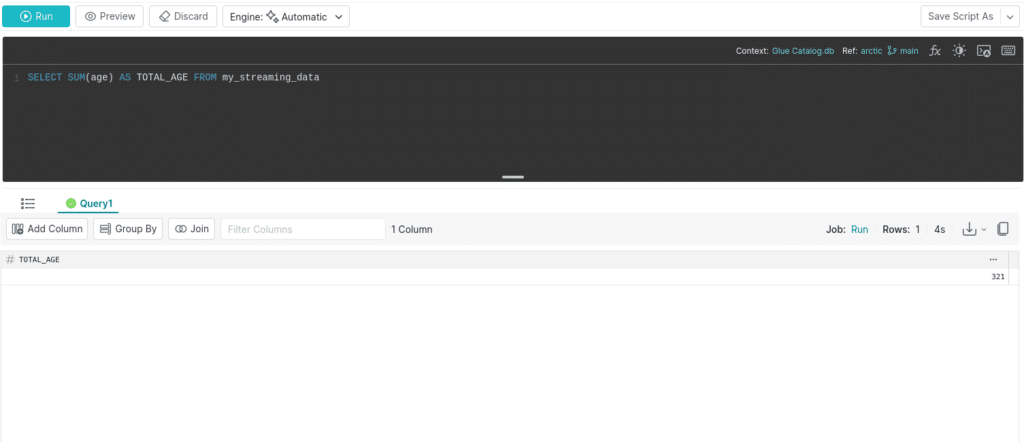
After loading up the table, try the following query:
SELECT SUM(age) AS TOTAL_AGE FROM my_streaming_data;
Conclusion
Now you’ve seen one possible path to ingesting streaming data into an Apache Iceberg table and running analytics on that data, being an open format Iceberg enables you to use any tool for ingestion and analytics you’d like which is why it’s key to open lakehouse architecture.
Sign up for AI Ready Data content
Additional Resources

BLOG
Ingesting Data Into Apache Iceberg Tables with Dremio: A Unified Path to Iceberg
By unifying data from diverse sources, simplifying data operations, and providing powerful tools for data management, Dremio stands out as a comprehensive solution for modern data needs. Whether you are a data engineer, business analyst, or data scientist, harnessing the combined power of Dremio and Apache Iceberg will undoubtedly be a valuable asset in your data management toolkit.
Product Insights from the Dremio Blog,
Learn More ->
BLOG
The Why and How of Using Apache Iceberg on Databricks
Dremio Blog: Open Data Insights,
Learn More ->

BLOG
Intro to Dremio, Nessie, and Apache Iceberg on Your Laptop
Dremio Blog: Open Data Insights,
Learn More ->