42 minute read · January 24, 2022
Getting Started with Apache Iceberg Using AWS Glue and Dremio
· Head of DevRel, Dremio

Note: Now AWS natively supports Apache Iceberg when using Glue by adding a --datalake-formats job parameter to the glue job. Read more here.
For more on implementing a data lakehouse with Dremio + AWS check out this joint blog on the AWS Partner Nework blog.
Adding the Dremio and Iceberg Advantage to Data Lakes
The Open Table Format
In the early days of data lakes, before using cloud object storage and many modern data processing tools, using HDFS for storage and MapReduce to carry out processing was the norm. To reduce the friction of writing MapReduce jobs, Hive was created with the promise of being able to use SQL-like expressions that can be converted into MapReduce jobs for data processing on the data lake. SQL relies on the concept of a “table,” so an approach to defining tables on the data lake was needed. Hive tables were introduced to address this challenge.
Hive tables worked by using file directories as the unit for defining a table. While this alleviated the immediate problem of enabling Hive to have a “table” that can be used for SQL expressions, it had several limitations:
- Full table scans were not efficient so partitioning was introduced, also based on directories. You would choose a column to base partitions on, creating a subdirectory for each possible value. Partitions that resulted in many subdirectories slowed down query planning and execution to iterate through the created directories.
- Oftentimes, you would have to create a new column to partition by a certain time frame (converting a timestamp field into one that tracks year, month, or day). This meant all users of the table would have to understand the table's partitioning, because if the partition column isn’t part of the query, the partitioning isn’t used.
- To change the partitioning of the data, such as when data sizes or business requirements change, meant a complete rewrite of the data to a new table, which can be lengthy and intrusive.
Bottom line, changing the structure of the table after creation was tenuous and even the best partition planning could result in unnecessary full table scans and slower full table scans from too many partition directories.
The solution was to create a better way of tracking tables that was not based on directories. This insight led to the creation of the Apache Iceberg table format which tracks tables through metadata. The approach has many benefits:
- No more partition subdirectories slowing down query planning and execution.
- Query planning and execution speed increases because the query engine can use the metadata files and the statistics in them to create the best plan.
- Changing the partitioning scheme doesn’t require rewriting the data or making a copy, it’s just a metadata transaction that makes updating your partition scheme much less expensive. (Partition Evolution)
- Schema changes are also metadata transactions, which makes schema evolution more flexible and less expensive, as well as the behavior being consistent independent of the underlying file types. (Schema Evolution)
- The partitioning scheme can be based on multiple factors like a column and a transformation on that column. So instead of writing a new physical month column that you have to worry about because it’s based on a timestamp column, the partition can be based on a month transformation on a timestamp column. Therefore, if a data consumer uses the timestamp column, the partitioning will benefit the query without the consumer having to know the details of how the table is partitioned. (Hidden Partitioning)
- ACID transactions provide snapshot isolation as query execution is based on the newest metadata and won’t be affected by any concurrent transactions since the new metadata file for those transactions isn’t written until it is completed.
- Concurrent transactions can be done safely. If multiple transactions attempt to create a new metadata file, the first one to do so will complete and the second transaction will merge its changes with what happened in the first transaction, if possible. If not, it will be aborted and restarted based on the new metadata file. (Optimistic Concurrency Control)
Apache Iceberg tables not only address the challenges that existed with Hive tables but bring a new set of robust features and optimizations that greatly benefit data lakes.
Let’s explore how to create an Iceberg table in an AWS-based data lake using AWS Glue.
Creating an Iceberg Table on AWS
The first step is to make sure you have an AWS user with the following permissions in place. If your user is the admin of the AWS account, there’s no need to explicitly grant these.
- Write files to a bucket or your path of choice in S3.
- Create databases and tables on AWS Glue.
- GetAuthorizationToken for ECR.
- Optionally, write and view logs in CloudWatch. This is not necessary but can help with debugging if you run into issues.
Setting Up the Iceberg Connector for AWS Glue
To set up the Iceberg Connector for AWS Glue, visit this link to subscribe to the free image in the AWS marketplace. This will allow you to use the Iceberg Connector in your AWS Glue jobs, which makes the Iceberg libraries available to your Glue script to do operations on Iceberg tables.
Upon landing on the page linked above and shown below, click “Continue to Subscribe.”

Accept the terms on the next page, and when the “Continue to Configuration” button in the upper right activates by turning orange (which can take a minute or two), click it. Then, on the next screen (pictured below), select Glue 3.0 as the fulfillment option, and the latest version as the software version, and click “Continue to Launch”:

Note that even though it says “Review the launch configuration details and follow the instructions to launch this software,” you don’t need to do anything else on this screen — it’s now available for you to use.
After clicking “Continue to Launch” you’ll be on the following screen:

From this screen click on “Usage Instructions,” which will pop up the connector documentation. At the top there is a link to "Activate the Glue Connector" which will allow you to create a connection.

Another way to create a connection with this connector is from the AWS Glue Studio dashboard. Simply navigate to the Glue Studio dashboard and select “Connectors.”
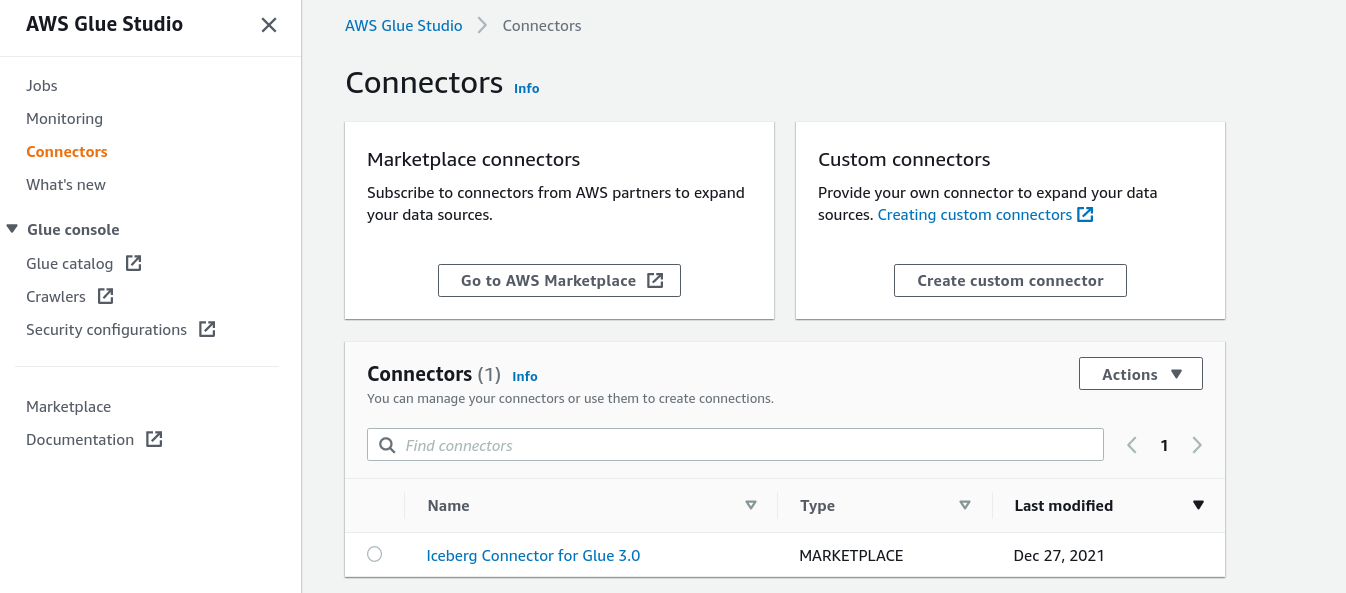
Click on the “Iceberg Connector for Glue 3.0,” and on the next screen click “Create connection.”

On the screen below give the connection a name and click “Create connection and activate connector.” If working with a VPC (virtual private cloud), this screen is where those details can be entered in the optional “Network options” section at the bottom:

Creating the Glue Job to Write to an Iceberg Table
Creating Glue Database and Role
Before you create the Glue job, you need a database in your Glue catalog in which your job can create a table inside of as well as an IAM Role so Glue can have access to the necessary resources (Glue, ECS, CloudWatch).
Glue Database
On the Glue dashboard click on “Databases” and create a database. You can give it any name you like, the directions in this tutorial assume a database called “db”.

IAM Role
Head over to the IAM dashboard, click “Roles” on the left sidebar, then click “Create Role” in the upper right. Select “AWS Service” as the type of trusted entity, select Glue, then click “Next: Permissions.”
On the next page, click “Create Policy” and paste the JSON shown below in the JSON tab of the “Create policy” screen. Then proceed through the wizard steps to add any tags, give it a name, and create the policy.
Note: If you don’t have permissions to do this, you’ll need to request these steps to be done by someone who does have permission to do this on the account.
- This JSON permissions policy limits everything to only in a users account, so you MUST replace any instance of “############” with a user account number. The only thing that is not limited is retrieval of connectors from ECR since the Iceberg Connector exists outside of the account. After copying this policy you can use the visual editor if you want to limit permissions to particular buckets, databases, and so forth.
{
    "Version": "2012-10-17",
    "Statement": [
        {
            "Sid": "VisualEditor0",
            "Effect": "Allow",
            "Action": [
                "logs:CreateLogDelivery",
                "logs:PutDestinationPolicy",
                "ecr:GetDownloadUrlForLayer",
                "ecr:DescribeRegistry",
                "ecr:BatchGetImage",
                "ecr:GetAuthorizationToken",
                "s3:CreateJob",
                "ecr:BatchCheckLayerAvailability"
            ],
            "Resource": "*"
        },
        {
            "Sid": "VisualEditor1",
            "Effect": "Allow",
            "Action": [
                "glue:GetDatabase",
                "s3:PutObject",
                "s3:GetObject",
                "glue:GetConnections",
                "glue:GetConnection",
                "glue:CreateTable",
                "glue:UpdateTable",
                "s3:DeleteObject",
                "logs:PutLogEvents",
                "glue:GetTable"
            ],
            "Resource": [
                "arn:aws:glue:*:############:database/*",
                "arn:aws:glue:*:############:table/*/*",
                "arn:aws:glue:*:############:catalog",
                "arn:aws:glue:*:############:connection/*",
                "arn:aws:logs:*:############:log-group:*:log-stream:*",
                "arn:aws:s3:::*/*"
            ]
        },
        {
            "Sid": "VisualEditor2",
            "Effect": "Allow",
            "Action": [
                "s3:PutBucketNotification",
                "logs:PutMetricFilter",
                "logs:CreateLogStream",
                "s3:PutBucketLogging",
                "s3:CreateBucket",
                "logs:CreateLogGroup"
            ],
            "Resource": [
                "arn:aws:s3:::*",
                "arn:aws:logs:*:############:log-group:*"
            ]
        }
    ]
}
After creating the policy on the IAM dashboard click on “Roles” and select “create role.”

On the following screen you want to select Glue as your trusted entity.

After selecting Glue click on “Next: Permissions.”

On the Permissions page search for the permissions policy you just created, select it, and click “Next: Tags.”


Add any tags you like, and when you’re done click “Next: Review.”


Give the role a name and optional description and then click “Create role.”

Creating the Glue Job
Now you can make your way to the AWS Glue Studio dashboard.
Essentially, the flow of the process involves:
- Create a new job on Glue Studio using the Visual Job Editor.
- Configure your source.
- Use the Iceberg connection as the data target.
- Use the visual editor to run a few SQL statements to create your table.
- Add Iceberg configurations to the job.
- Run the job.
Create a New Job on Glue Studio Using the Visual Job Editor
Head over to the jobs page of the AWS Glue Studio dashboard in us-east-1 (it needs to be in us-east-1 due to limitations in the Glue Iceberg Connector) and begin creating a new job.

- Select the use of the visual editor by selecting “Visual with a source and target.”
- Select S3 as the source and the Iceberg Connector as the target. Then click “create.” You will see the following:

Configure Your Source
Click on the “S3 bucket” box at the top of the flow, select “S3 location” under “S3 source type,” and input the S3 location of the data you want to ingest into an Iceberg table. If a sample data source is needed, use this sample data from NYC OpenData using this S3 url — s3://alex-m-dremio/dremio_datasets/Worker_Coops.csv — and be sure to uncheck the “Recursive” checkbox depending on the source data you selected.

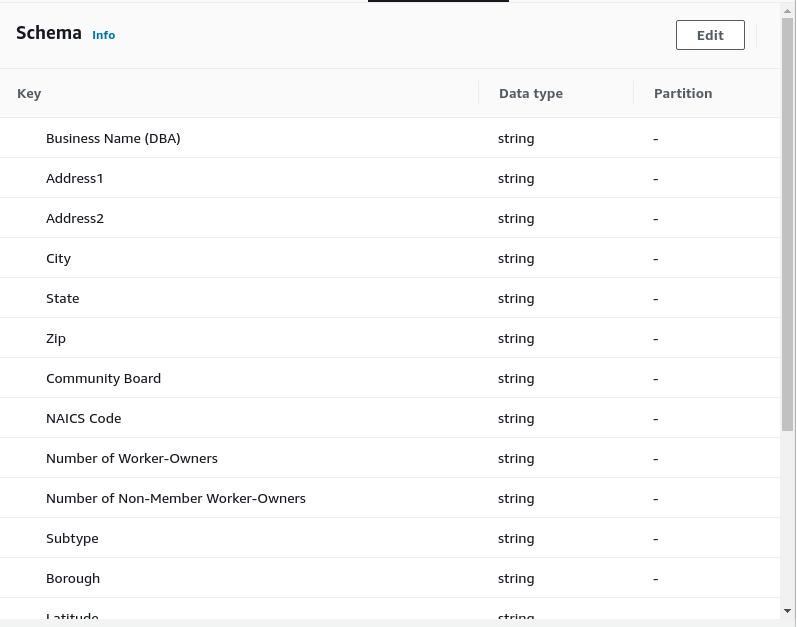
There are a few quirks when Glue tries to infer the schema, and Glue’s ApplyMapping node will be used to make the proper adjustments. Before doing so, go into the S3 Bucket nodes “Output Schema” tab and make sure all fields that are not strings are marked to the string data type.
The ApplyMapping Node
The ApplyMapping node allows you to make updates to your column names and column types. You will want to make sure of the following:
- Change the two Number of Worker-Owner fields to the Int data type
- Change Latitude and Longitude to the float data type

Understanding the Iceberg Connector
The Glue Iceberg Connector doesn’t allow creating new tables with the connector, so you need to use SparkSQL to create the table. In theory you could just use the SQL transform in Glue and remove the Iceberg Connector, however, if you do that, the Glue job won’t have the necessary Iceberg libraries.
So, you need the Iceberg Connector to remain in your job as this will make sure the Iceberg libraries are present when the Glue job is run. This arises in a bit of a weird workaround that you’ll see shortly.
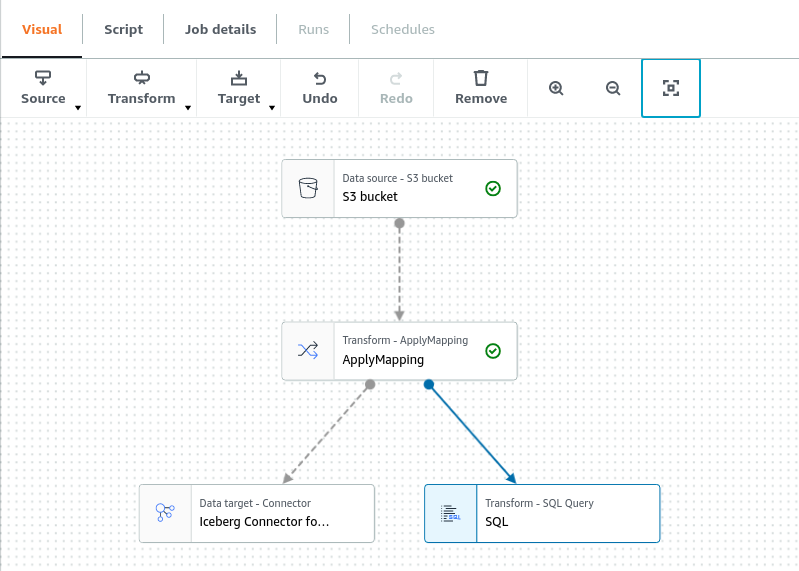
After the ApplyMapping node, you will add a SQL query. To do so make sure S3 Bucket is highlighted and select SQL option under transform.

This should result in the following:
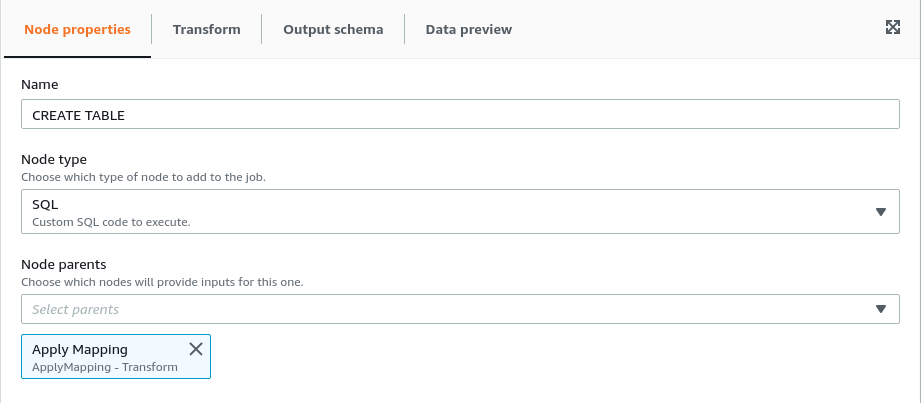
Select the SQL node and, under the node properties tab, rename it to “CREATE TABLE.”
Creating the Iceberg Table
In the settings for the SQL transform you are able to create a SQL alias for the incoming data from the previous step (the ApplyMapping which loaded your data and passed it to this SQL node). Here the alias of myDataSource is used in the query to create the new Iceberg table from the incoming data:
CREATE TABLE my_catalog.db.nyc_worker_coops AS (SELECT * FROM myDataSource);
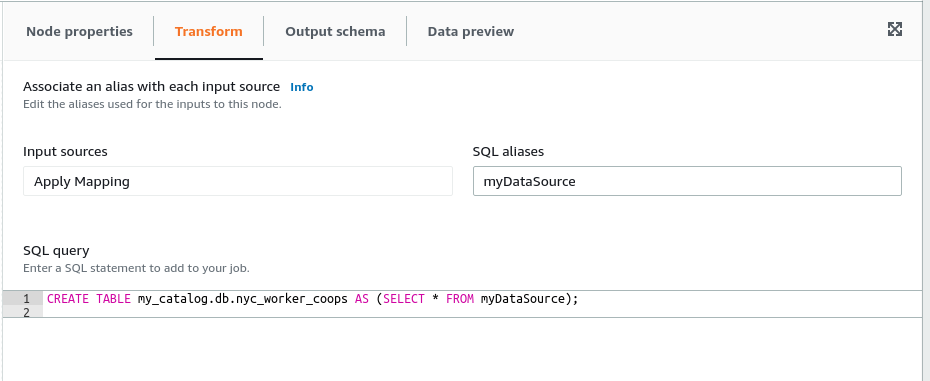
Let’s take a moment to review the path my_catalog.db.nyc_worker_coops and where it’s coming from.
my_catalogis an alias for the Glue catalog; this will be declared in the configurations that you’ll pass to your job in a later step.dbis one of the Glue databases from your catalog which should’ve been created earlier. If the Glue database you created earlier has a different name, replace “db” with the name you chose.nyc_worker_coopsis the table being created, so this name can be whatever you want your table name to be.
When this step runs your table will be created but the Iceberg Connector will receive all the records from the ApplyMapping node that the SQL operator receives, resulting in either the dataset being duplicated or it failing, depending on which happens to execute first at runtime. So, you need to move the Iceberg Connector to be downstream of the SQL operator. However, the SQL operator will send no data to the Iceberg Connector operator, which expects to receive at a minimum the right schema of the target table, even if there are no rows. This means that the final step will fail even if this earlier step succeeds.
To make sure that the connector will receive the right schema to satisfy its requirements, you can query the table you just made with a limit of 0 and send the 0 records to the Iceberg Connector. (This is done to make sure all steps succeed, and is a simple workaround of some of the limitations of the Glue Iceberg Connector.)
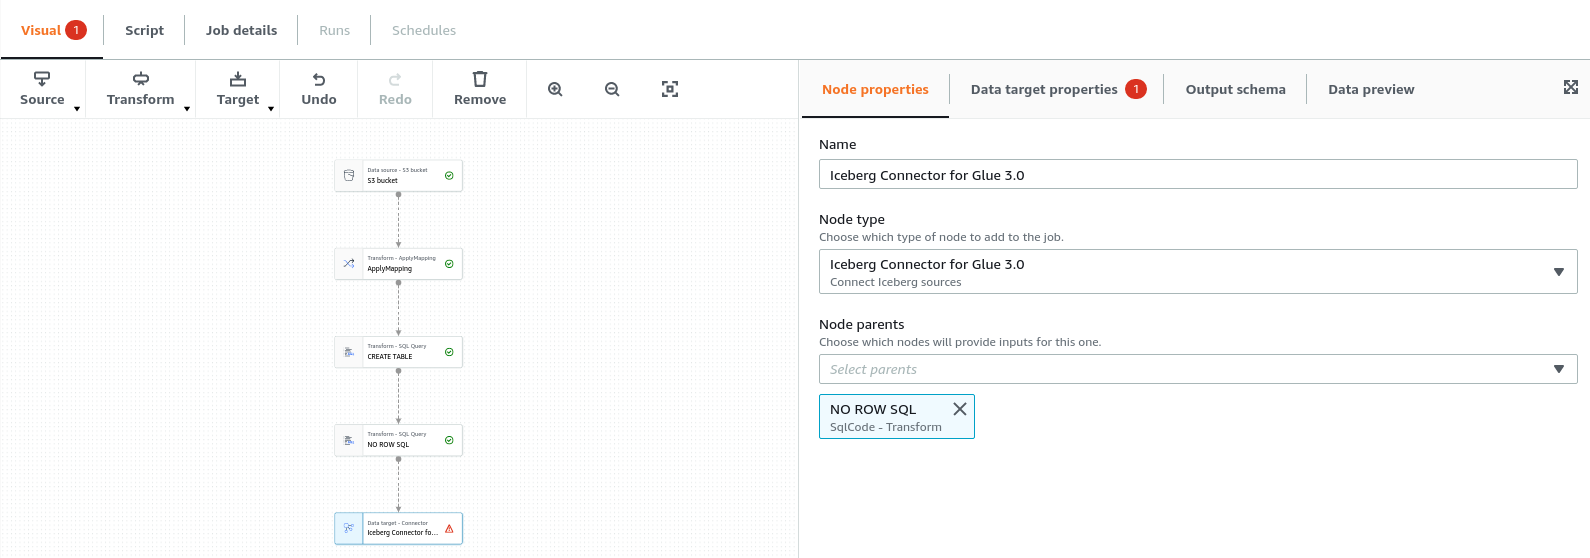
Add another SQL transform as a step after the current SQL transform and select this new SQL operator. Under the “Node properties” tab, name it “NO ROW SQL”.

Add the following SQL query to this step, and same as above, if you named your Glue database something other than “db”, replace that name in the SQL statement:
SELECT *
FROM my_catalog.db.nyc_worker_coops
LIMIT 0;

The Iceberg Connector Step
The Iceberg Connector needs to be the final step after the second SQL transform, so select the Iceberg Connector and under node properties, add the “NO ROW SQL” node as the parent and remove ApplyMapping as the parent, as shown below:
Add Iceberg Configurations to the Job
With the Iceberg Connector as the target it will automatically load all the Iceberg libraries when it runs the script. Simply follow these steps:
- Select the “Iceberg Connector” box in the visual editor pane on the left.
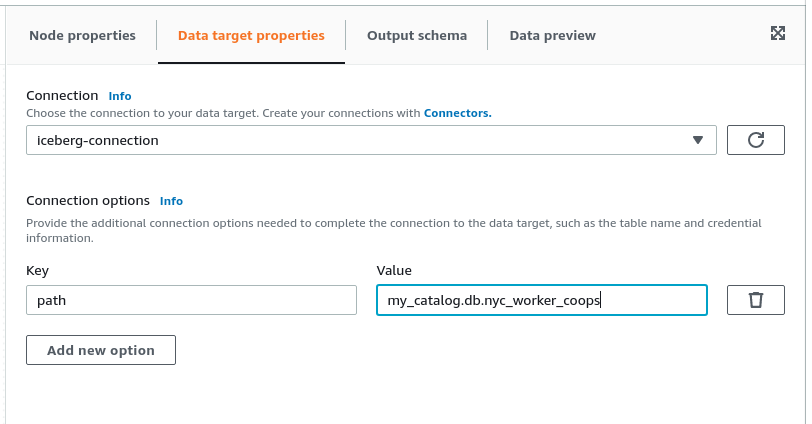
- In the “Data target properties” tab, choose the Iceberg connection configured earlier for the “Connection” property.
- Under “Connection options,” click “Add new option” and set the “Key” as “path” and the “Value” as “my_catalog.db.nyc_worker_coops” (again, replace “db” with the name you chose for your Glue database). This path variable specifies the Iceberg table that the connector will try to write to.
Under the jobs details tab in the upper left just above the visual canvas, input a job name, assign the role you created earlier under “IAM Role,” set the language to your preferred language (Scala or Python), and make sure to select Glue version 3.0 as shown below:

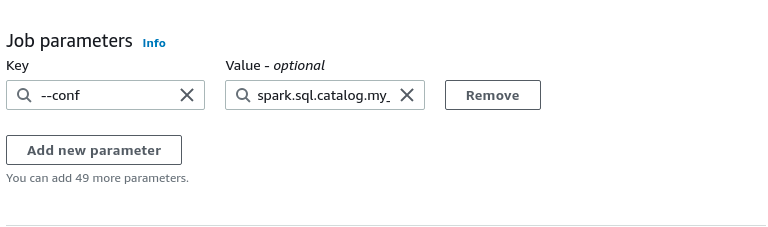
On the job parameters section located at the bottom of the advanced properties section, which is at the bottom of the job details tab, you need to add one “--conf” job parameter.
The value for this parameter should be the following, make sure to replace certain values based on the directions below the snippet:
spark.sql.catalog.my_catalog=org.apache.iceberg.spark.SparkCatalog --conf spark.sql.catalog.my_catalog.warehouse=s3://my-output-directory --conf spark.sql.catalog.my_catalog.catalog-impl=org.apache.iceberg.aws.glue.GlueCatalog --conf spark.sql.catalog.my_catalog.io-impl=org.apache.iceberg.aws.s3.S3FileIO --conf spark.sql.extensions=org.apache.iceberg.spark.extensions.IcebergSparkSessionExtensions
Here is a breakdown of what these configurations are doing and what can be edited or changed:
- Sets the sparkSQL catalog to be an Iceberg Catalog
- Sets the warehouse where the data and metadata will be stored to
s3://my-output-directory; make sure this value reflects the desired location WITHOUT a trailing slash, and this bucket needs to be in us-east-1 - Sets the implementation of the catalog to the AWS Glue catalog so it can add the Iceberg table metadata pointer in the Glue Catalog
- Sets the IO implementation to S3 so it knows to use the native S3 IO implementation for interaction with S3
- Enables the Iceberg Spark Extension in the Spark session
Note: my_catalog is an arbitrary name for the catalog for sparkSQL; this can be changed to any name. If the name is changed make sure to replace all references to my_catalog in this tutorial with the new name.
While it is beyond the scope of this tutorial, it is recommended that you use DynamoDB as a lock table if you're writing to this table with multiple concurrent jobs. This lock table ensures data isn’t lost when multiple jobs write to the same table at the same time.
If you want to set the lock table, just add the following configurations (make sure to set the DynamoDB table name, which must be an existing DynamoDB table that may need to be created). These would be appended to the job parameter value set above.
--conf spark.sql.catalog.my_catalog.lock.table=<DynamoDB_TABLE_NAME>
--conf spark.sql.catalog.my_catalog.lock-impl=org.apache.iceberg.aws.glue.DynamoLockManager
Run the Glue Job
Now, click “Save” in the top right corner, and you’re ready to run the job!
AWS Glue is not free but is inexpensive, and each run of this job with the mentioned sample data costs about 15 cents. For this demonstration, you can reduce the number of workers to 3 and the number of retries to 0 to really minimize the cost (under the job details tab).
After all the previous steps have been configured and saved, click “Run” in the top right corner. In about 2 minutes, your Iceberg table should be created! While it’s running you can click the “Runs” tab to watch its status.
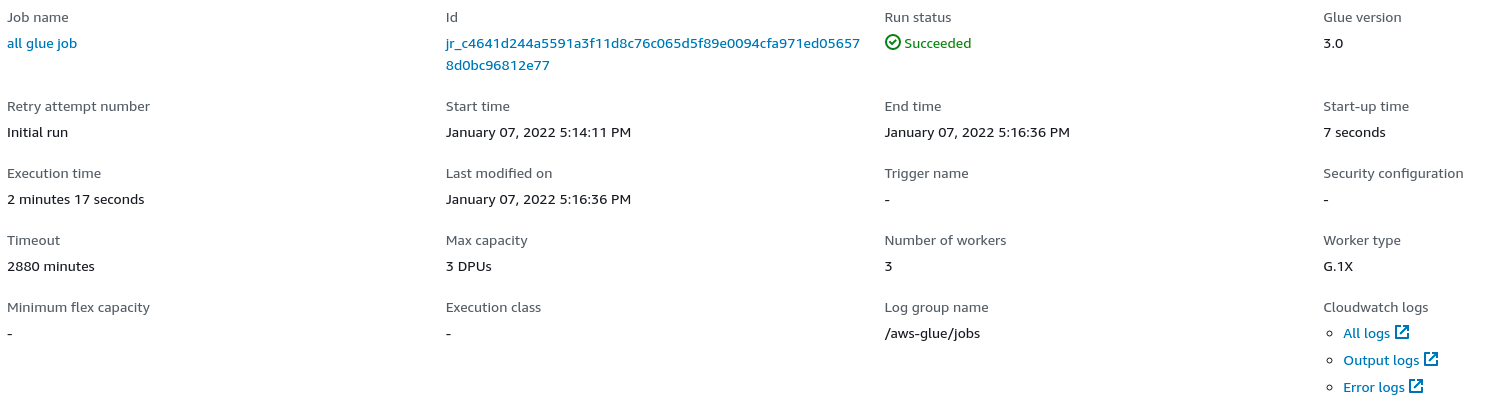
Once the job is completed, on the Glue dashboard you should see the table with the location of the current metadata file.

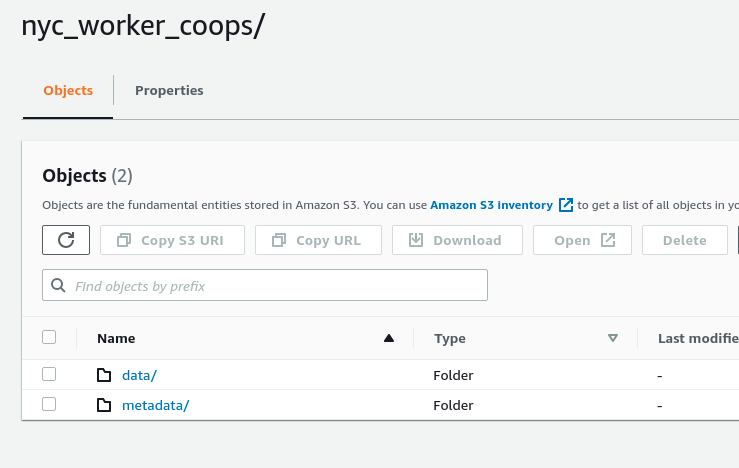
In the output S3 directory, you’ll see the folder for the database which has a folder for each table that includes the data and metadata for that table.
Now, you want to actually view and analyze the data in the Iceberg table you just created.
Analyzing the Iceberg Table with Dremio
Now that the Iceberg tables are in your data lake you can use them with any engine that supports Iceberg, like Dremio. The amazing benefit of working with open tools is that you can always use the tools that are best for the job on your data.
For example, you may need to build a BI dashboard based on a 50TB dataset which traditionally would require making extracts (copies of data subsets or aggregations) to keep performant. Instead, you can use Dremio to create a virtual dataset of the data needed for the BI dashboard and use Dremio’s data reflections feature to quickly load data without having to worry about copies or maintenance.
Using your Iceberg tables with Dremio is just as easy as connecting AWS Glue as your data source.
Deploying Dremio
Dremio Cloud is the easiest and fastest way to get up and running with Dremio. Here is a video showing you how to get up and running with Dremio Cloud in 5 minutes.
It’s recommended that you deploy it in or near AWS’s us-east-1 (N. Virginia) region because the Iceberg Connector only works in us-east-1. Plus it’s best practice to deploy compute closest to the data gravity.
Connecting the Table to Dremio
To connect the table to Dremio it will be the same as adding any AWS Glue table to a Dremio account.
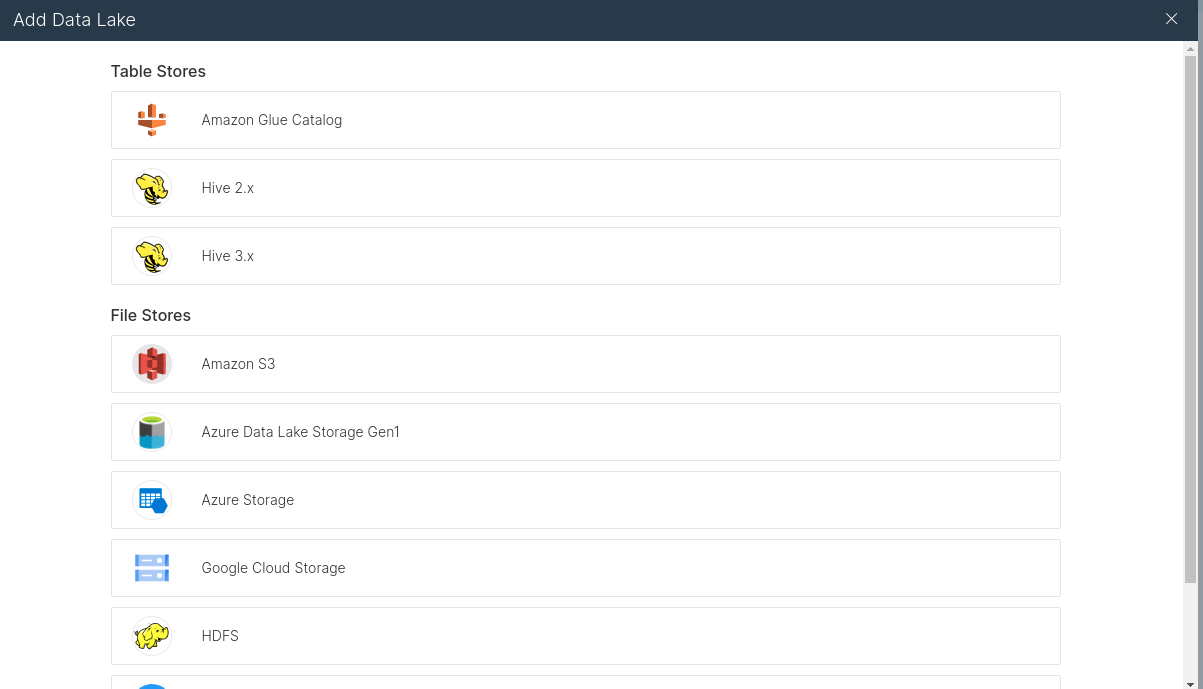
First, click on “Add Data Lake.”
Select Amazon Glue Catalog.
Then, fill in the authentication details (either EC2 metadata if Dremio is running on EC2s with IAM roles that have the necessary permissions, or AWS Access Key and Secret of your AWS user) and then click “Save.”

After connecting the Glue account, the databases from the Glue catalog should be visible as folders with the tables within them as physical datasets.
Each database will show up as a folder:

In those folders, the database tables can be seen as physical datasets:

You can then click on and work with these datasets like any other dataset in Dremio!

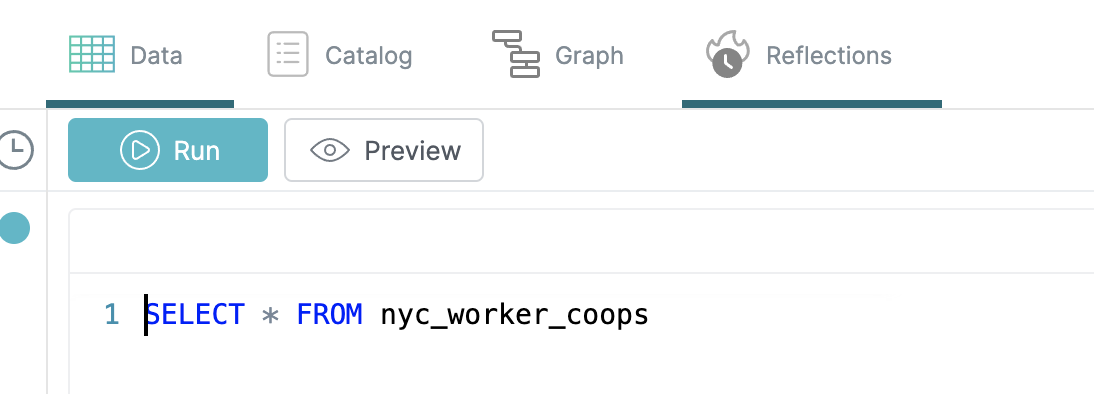
After loading up the table, try the following query:
SELECT *
FROM nyc_worker_coops
WHERE Subtype = 'Coaching'

Dremio Data Reflections
When working with big datasets, queries such as aggregations can take quite a bit of time. Dremio’s data reflections feature allows you to automatically optimize the high-value datasets and queries.
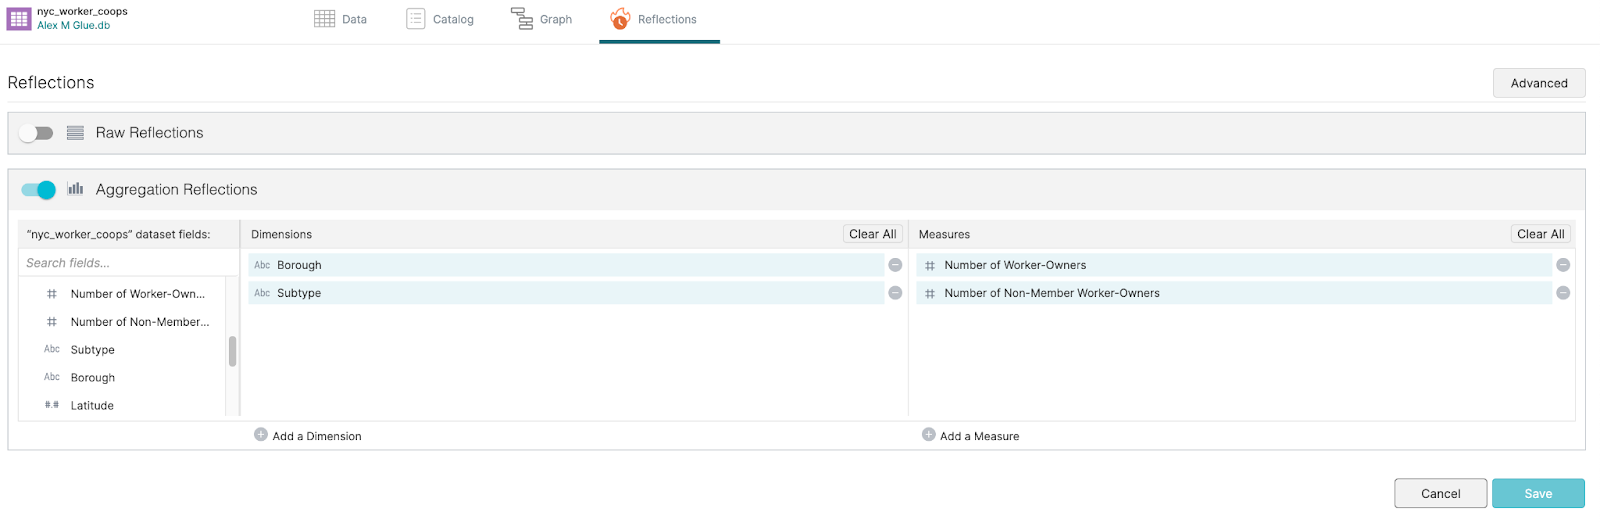
If you want to enable reflections on a particular physical dataset (original data) or virtual dataset (curated non-copy views of the data) then all you have to do is click on reflections on the top menu.
On the reflections screen, you’ll see toggles for two types of reflections: raw reflections, which are for optimizing normal queries, and aggregation reflections for optimizing aggregation queries. To turn on aggregation reflection, make sure to add Subtype and Borough as dimensions and the two number of worker fields into the measures section. (It will optimize for aggregations using these dimensions and measures). Once you’re done making those changes, click the “Save” button.
Head back to the data section (click data on the top menu) and enter the following aggregation query. (This query will tell you how many owner and non-owner workers are at each worker-coop in NYC, and is broken down by borough and subtype for the purpose of identifying any boroughs or subtypes that should get further scrutiny on compliance of owner to non-owner ratios.)
SELECT Borough, Subtype, SUM("Number of Worker-Owners") AS Total_Worker_Owners,
SUM("Number of Non-Member Worker-Owners") AS Total_Non_Worker_Owners
FROM nyc_worker_coops
GROUP BY Borough, Subtype
Then run the query by clicking on “Run.” Because of data reflections, the query will run at a fraction of the time than it would have without them. To learn more about Dremio data reflections watch this video.

Notice that the query was completed in less than 1 second. These kinds of gains are made possible by turning on the data reflections feature. While this is a small dataset, Dremio users leverage data reflections to provide sub-second response times at massive scale.
Conclusion
Creating Iceberg tables with AWS is a straightforward process using AWS Glue, and connecting the table to Dremio is as simple as connecting Glue to your Dremio account. Empower your data with Iceberg and Dremio and take Dremio out for a free test drive today.
Try Dremio’s Interactive Demo
Explore this interactive demo and see how Dremio's Intelligent Lakehouse enables Agentic AI


