Intro
This tutorial provides detailed instructions on how to setup Azure Kubernetes Service (AKS), setup Kubernetes packaging utility Helm, and deploy Dremio. We start with a brief intro on Kubernetes and the benefits it provides.
Assumptions
This tutorial assumes the following:
- You have Azure account with enabled billing.
- You know the basics of git.
- You are working in a Linux environment.
Containers as a new standard
If you want to keep up with the modern standard of deployment and DevOps, you should ship your product using containers which are isolated environments that can be run inside an operating system. Containers share their host OS kernel and do not require a separate guest OS, opposed to virtual machines. Their main benefits are:
- They are lightweight
- They are isolated. Containers do expose ports to provide a connection and may have access to host OS file system.
- They can be packaged with arbitrary dependencies like languages, frameworks, databases.
The main thing is, you should deploy your product using containers as they are here to stay.
Unfortunately, containers on their own do not solve all the problems of a modern era software deployment. Machines both physical and virtual that host our code may crash, updates may introduce a downtime, scaling can be inefficient due to unused resources. And here where Kubernetes comes into play.
What is Kubernetes
Kubernetes is an open source container management tool. Basically, all you need is to provide it with a configuration file (called manifest) where you describe what containers to run, how many replicas you want to have, how they should be accessed from the outside. Kubernetes will figure out how to deploy it to use available resources efficiently, track containers state and redeploy them if something goes wrong.
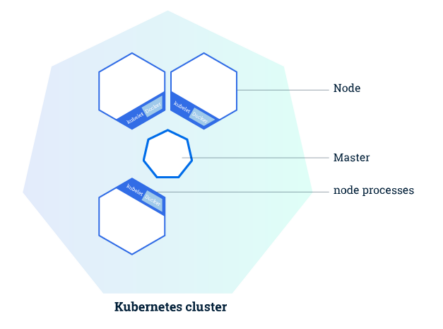
Kubernetes consists of the following parts:
Cluster
Cluster is a top-level component which represents product as a whole. It consists of Nodes.
Master and worker nodes
Master is principal node of the cluster. It is a brain center of Kubernetes that supervises all the process, keeps track of containers, schedules deployments.
Worker node is a physical or a virtual machine that communicates with master via kubelet (process that uses Master API to communicate). Node can host one or more pods.
Pods
Pod is the smallest unit in Kubernetes. It is basically an object that encapsulates other containers. It is a good idea to stick with only tight coupled containers in a single pod.

Kubernetes benefits
Product developed on Kubernetes cluster has the following benefits:
- It is resilient and self-healing. Whenever something goes wrong with individual pod or even the whole node, Kubernetes will instantly spin up a new pod on a different node.
- It has a built-in load balancer and supports auto-scaling.
- It makes updates and rollbacks seamless for users, as pods are updated gradually with no downtime.
- It makes use of all available resources both overall cluster resources like nodes and individual nodes resources like CPU and ram.
- It provides users with monitoring.
Why use AKS
Remember when we said that all you need is to provide configuration file and Kubernetes will do everything else? Well, with Azure Kubernetes Cluster (AKS) you still need to provide it, but you can skip all other steps like minikube, kubectl, hypervisor, and other dependencies on your local computer. So, you don’t need to be Kubernetes savvy to deploy your product to AKS.
Still, there are some steps that should be performed. So let’s do it!
Create an AKS cluster from Azure portal
Go to Azure portal and sign in with your Microsoft account. Create an AKS cluster:

- 1. On portal’s main page select + Create a resource at the top left corner. Then select Containers from the Azure Marketplace column, and finally select Kubernetes Service.
- 2. Select Basics tab and fill in the required fields. IMPORTANT: make sure you have selected an appropriate Primary node pool configuration. VM storage size and hardware configuration effects billing and hardware settings cannot be changed later. However, Node count can be changed later. The number of nodes should be set to the number of Dremio executors plus one for the Dremio master-coordinator.
- 3. Select Authentication tab and enable Role-based access control (RBAC) under Kubernetes authentication and authorization.
- 4. Click on Review + create button on the bottom, wait for validation to complete, and then Create.
Install Helm and Tiller
Before we start the actual deployment, we need to install and configure Helm which is packaging utility we are going to use to manage the lifecycle of the Dremio application. It consists of 2 components client-side utility (Helm) and server-side (Tiller part). You need to install Helm locally and configure Tiller using Cloud Shell.
To install Helm on your local machine, use the following commands:
curl -LO https://git.io/get_helm.sh
chmod 700 get_helm.sh
./get_helm.sh
Also, you need to create a role binding for Tiller.
The step below can be skipped if you didn’t enable RBAC during initial AKS setup. Helm’s server-side component Tiller is pre-installed in Cloud Shell, so the only thing left is to configure it.
First, go back to Azure portal. At the top of the screen on the right of the search bar, click on the Cloud Shell icon >_ . Select a preferred shell and wait for the initial configuration.

Repeat the authentication step for the Cloud Shell:
az aks get-credentials --resource-group <RESOURCE_GROUP> --name <CLUSTER_NAME>
- 1. Copy the following configuration file:
apiVersion: v1
kind: ServiceAccount
metadata:
  name: tiller
  namespace: kube-system
---
apiVersion: rbac.authorization.k8s.io/v1
kind: ClusterRoleBinding
metadata:
  name: tiller
roleRef:
  apiGroup: rbac.authorization.k8s.io
  kind: ClusterRole
  name: cluster-admin
subjects:
  - kind: ServiceAccount
    name: tiller
namespace: kube-system- 2. Open a new file in Cloud Shell using nano, paste the content of the file (you can save the file using ctrl-o shortcut, and to exit it using ctrl-x):
nano helm-rbac.yaml
- 3. Create service account using kubectl:
kubectl apply -f helm-rbac.yaml
Connect to the cluster using Azure CLI and kubectl
To manage any Kubernetes cluster, you can use Kubernetes command-line client kubectl. It comes pre-installed on Azure Cloud Shell, and you need to install it on your local computer. However, first, you need to install Azure CLI. You can check Microsoft official docs on how to do it. If you’re running Ubuntu 16.04+ it can be installed with a single command:
curl -sL https://aka.ms/InstallAzureCLIDeb | sudo bash
It is worth noting that generally you don’t want to download something and immediately run it (pipe to bash). It’s better to download it first, inspect it, and only then run it.
Next step is to log in using your Azure account. This part is simple as you are redirected to browser sign-in page:
az login
You need to install kubectl to interact with your AKS. One of the options is to install it using Azure CLI:
sudo az aks install-cli
You can make sure kubectl is installed by checking its version:
kubectl version
Now it’s time to store credentials for authentication. You only need to do it one time per cluster. Use RESOURCE_GROUP and CLUSTER_NAME you have set up when you created the cluster. NOTE: AKS deployment may take up some time. Make sure it is ready.
az aks get-credentials --resource-group <RESOURCE_GROUP> --name <CLUSTER_NAME>
After that, make sure you are connected and your cluster is up and running:
kubectl get nodes
You should see the list of nodes with Ready status:
NAME                       STATUS   ROLES   AGE     VERSION
aks-agentpool-23460778-0   Ready    agent   2d12h   v1.12.8
The last thing left is to initialize Helm. Go back to the shell on your local computer and use the following command:
helm init --service-account tiller --history-max 200
Deploy Dremio using git and Helm
We’re going to deploy Dremio from Helm chart which is a package that contains all the necessary Kubernetes manifests. First, obtain dremio-cloud-tools using git:
git clone https://github.com/dremio/dremio-cloud-tools.git
It’s a good idea to have a look at Dremio chart README.md file located inside dremio-cloud-tools/charts/dremio directory.
Next, step is to provide a custom configuration for Dremio chart. In order to do it, modify dremio-cloud-tools/charts/dremio/values.yaml file. You need to, at least, look at nodes CPU, and memory values and make sure configuration would work with VMs you’ve chosen when initialized AKS.
You can also change things like Dremio image, storage, and enable TLS. By default, image is the latest version of Community Edition. You can obtain Enterprise Edition by contacting Dremio. Default storage location is local storage. You can change it to Amazon Web Service (AWS) or Azure Data Lake.
Finally, deploy Dremio using the following command:
helm install dremio-cloud-tools/charts/dremio
Verify your deploy
To make sure your deploy is working, you can try to connect to Dremio UI via public IP. Deploy takes some time. First, make sure all the pods are ready:
kubectl get pods
The output should look like this:
NAME               	  READY    STATUS 	RESTARTS   AGE
dremio-coordinator-0   1/1      Running    0      	8m26s
dremio-executor-0  	  1/1 	Running 	0      	8m26s
dremio-master-0    	  1/1 	Running	2      	8m26s
zk-0               	  1/1 	Running	0      	8m25s
If all your pods show status Running proceed to the next step.
Get the external IP of load balancer:
kubectl get services dremio-client
NAME        	TYPE       	CLUSTER-IP	EXTERNAL-IP	PORT(S)                              AGE
dremio-client   LoadBalancer   10.0.79.229   13.68.229.20   31010:30050/TCP,9047:32110/TCP   13m
For the above output we can use external-ip:port like so: http://13.68.229.20:9047
Conclusion
As you can see, deploying Dremio on AKS can be easy and straightforward, especially with the help of such a powerful tools like Helm, and of course thanks to Dremio’s well documented Helm chart. By the way, it is generic and can be used with any cloud provider that supports Kubernetes.
Sign up for AI Ready Data content


