24 minute read · July 1, 2020
Data Preprocessing in Amazon Kinesis
· Senior Solutions Architect, Dremio

More and more companies today are modernizing their data infrastructures to work with data streams in the cloud. Amazon Kinesis is a tool for working with data streams that enables the collection, processing and analysis of real-time data. One of its capabilities is Amazon Kinesis Data Analytics, a cloud-based solution designed to get actionable insights from streaming data. It is important for today’s data engineers to know how to work with this tool and be able to identify use cases where it can be helpful. To that end, this article explores Amazon Kinesis and demonstrates an example of how it can be used.
Assumptions
The article relies heavily on AWS; therefore, in order to follow along it is recommended you have an Amazon Web Services account. Python will be used for generating and sending data to the Amazon Kinesis Data Stream. Further, an AWS SDK is needed to interact with AWS from Python. The SDK is called Boto3 and can be installed using pip:
pip install boto3
Amazon Kinesis Data Analytics Overview and Use Cases
Amazon Kinesis deals with real-time data and streaming applications. To some extent, it is similar to Apache Kafka®; however, they have a range of differences. One of the most obvious is that Amazon Kinesis is a cloud solution; you don’t need to deploy it like Kafka on your servers. Simply use the AWS Management Console to enable the Kinesis service and you’re ready to go.Amazon Kinesis Data Analytics uses SQL to process and transform streaming data on the fly. So, the most common use case is when you need to not only send data from the data source (producer) and receive it by the consumer but also perform some operations along the way. With Amazon Kinesis Data Analytics, data engineers can, for example, aggregate metrics, process other time-series data or build real-time dashboards for monitoring purposes. If you need to apply more powerful data processing techniques, you may find Dremio AWS Edition useful. It supports easy integration between Dremio and AWS services, which means that you can persist streaming data on AWS S3 and then access that data from Dremio deployed in the same AWS account.To store data from Amazon Kinesis Data Analytics in the AWS S3 bucket, you first need to create the Amazon Kinesis Data Firehose delivery stream and connect it with Amazon Kinesis Data Analytics. Then Amazon Kinesis Data Analytics will be able to read the data stream (Amazon Kinesis Data Stream), process and transform it, and pass the data to the delivery stream (Amazon Kinesis Data Firehose), which will save it into the AWS S3 bucket. The starting point in the pipeline is the data producer, which could be, for example, the IoT device or the script for collecting metrics on the web server. See the example data flow on the diagram below:
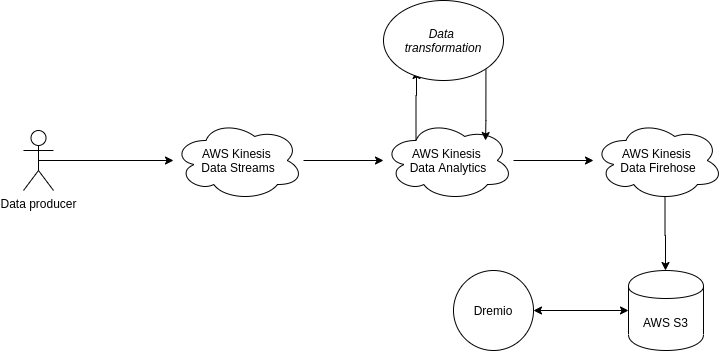
Amazon Data Firehose can also pass data to Amazon Redshift, AWS Elasticsearch Service or Splunk. Alternatively, instead of passing data from Amazon Kinesis Data Analytics to Amazon Kinesis Data Firehose, you can pass it to AWS Lambda or another Amazon Kinesis Data Stream.
Working with Data in Amazon Kinesis Data Analytics
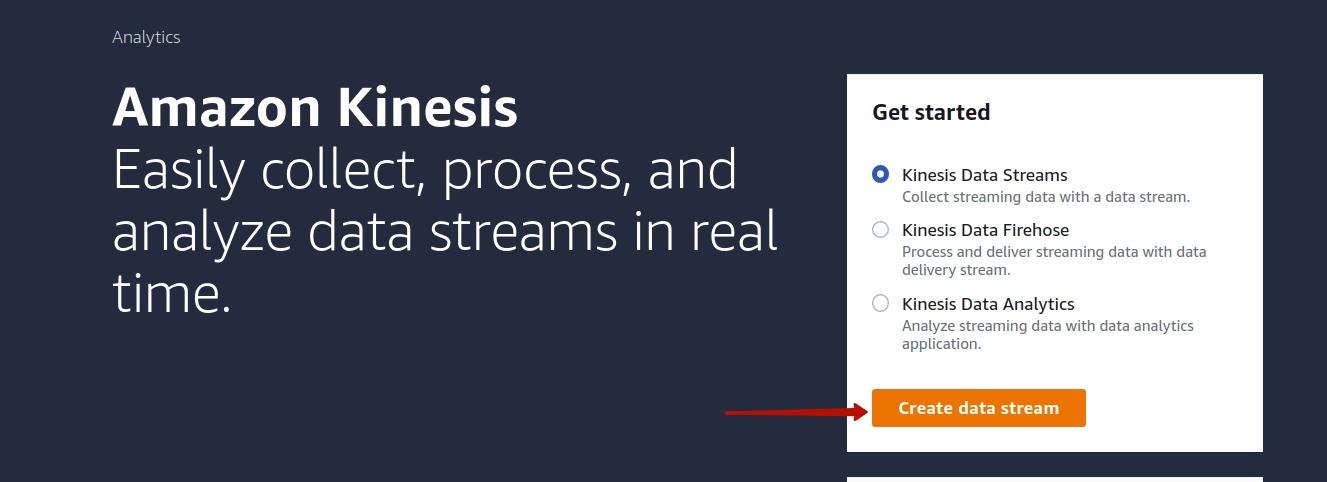
The following is an example of a data pipeline built with the help of Amazon Kinesis. First, go to the Amazon Kinesis service homepage. Select the option to create the Kinesis Data Stream, and click the corresponding button:
In the next window, specify the name of the new data stream (metrics_stream) and select one as the number of shards:
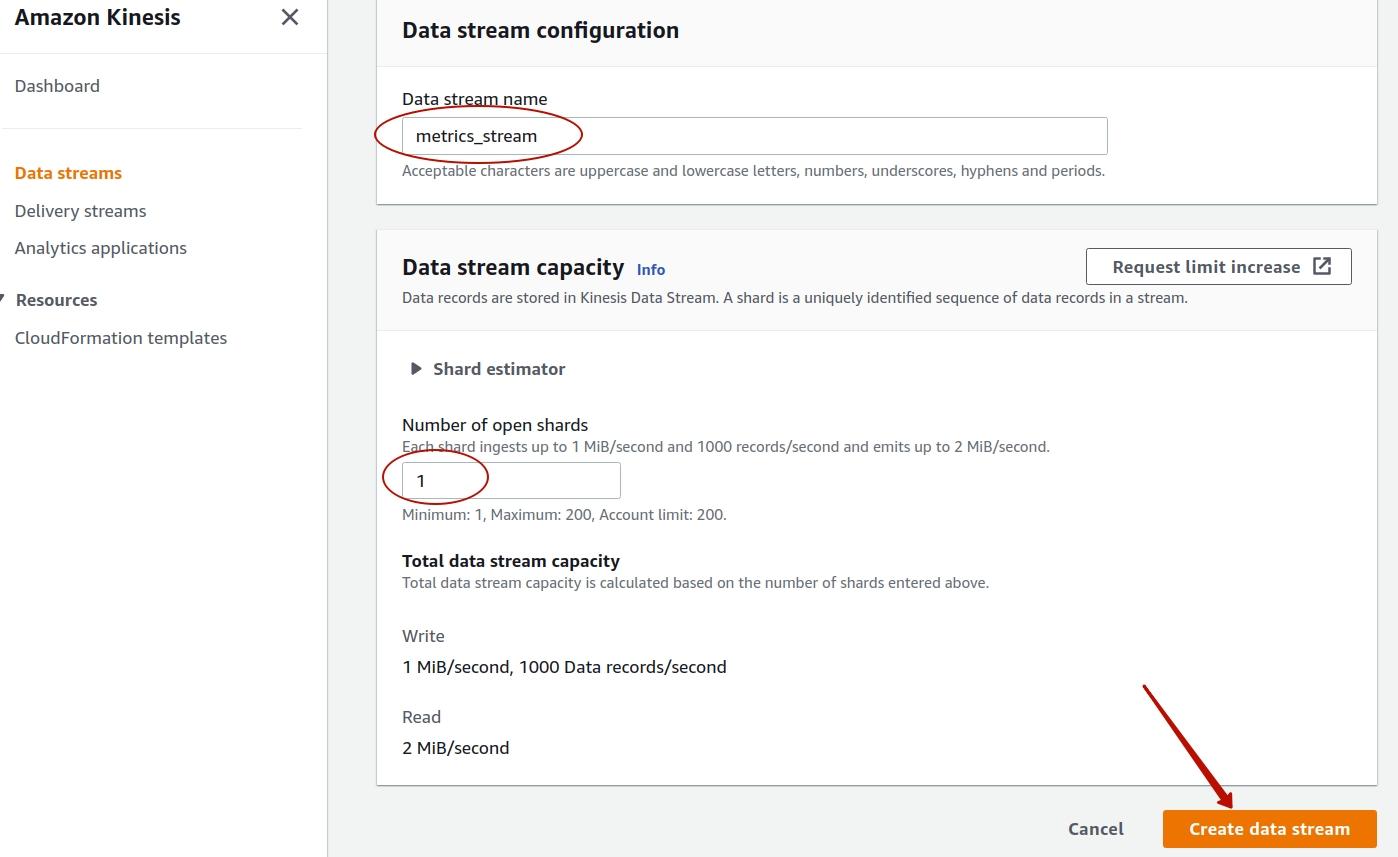
Click the Create data stream button, and the new data stream is created:

Now it is time to write the code of the producer, which will constantly generate and send data to the created data stream. For this example, suppose that it is the script that collects data about the operations made by users of an online shop. The top of the producer.py file is shown below. There you import the needed libraries and define the AWS credentials: the access key and the secret key. Also, you create the object of the boto3 client, and pass the credentials, region, and name of the service you want to work with (“kinesis”) as the parameters to the client constructor.
import json
import boto3
import random
import time
import datetime
ACCESS_KEY = "<AWS_ACCESS_KEY>"
SECRET_KEY = "<AWS_SECRET_KEY>"
kinesis = boto3.client('kinesis',
                        aws_access_key_id=ACCESS_KEY,
                        aws_secret_access_key=SECRET_KEY,
                        region_name="eu-central-1")
Now take a look at the function called generate_metrics() that should generate random data. You want to generate and send information to the Kinesis about the metrics: requests, newly registered users, new orders and users churn over some period of time. The metrics are generated randomly, but they all are sent to Kinesis as comma-separated values in a single field called ‘requests_newUsers_newOrders_churnUsers’. Another field is the timestamp.
def generate_metrics():
    num_requests = random.randint(1, 100)
    num_new_users = random.randint(0, 10)
    num_new_orders = random.randint(0, 5)
    num_churn_users = random.randint(0, 3)

    data = {}
    data['timestamp'] = datetime.datetime.now().isoformat()
    data['requests_newUsers_newOrders_churnUsers'] = f"{num_requests},{num_new_users},{num_new_orders},{num_churn_users}"
    return data
The final part of the producer.py file is the loop where you generate metrics using the function described above. Then you put the generated record into the Kinesis metrics_stream that was created earlier. The script then sleeps for 10 seconds and proceeds to the next iteration of the loop.
while True:
    data = json.dumps(generate_metrics())
    kinesis.put_record(
            StreamName="metrics_stream",
            Data=data,
            PartitionKey="partitionkey")
    time.sleep(10)
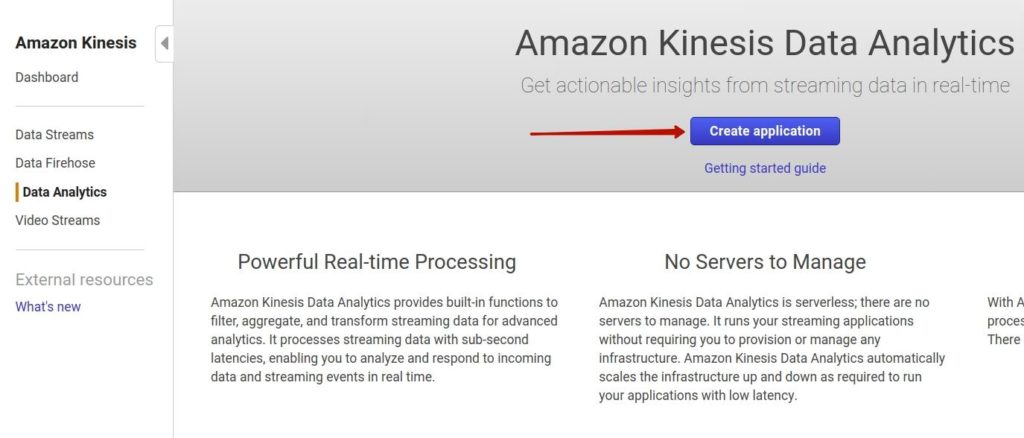
Now you need to create the AWS Kinesis Data Analytics application to process data from the AWS Kinesis Data Stream service. On the Amazon Kinesis homepage select the Data Analytics section and click the Create application button:
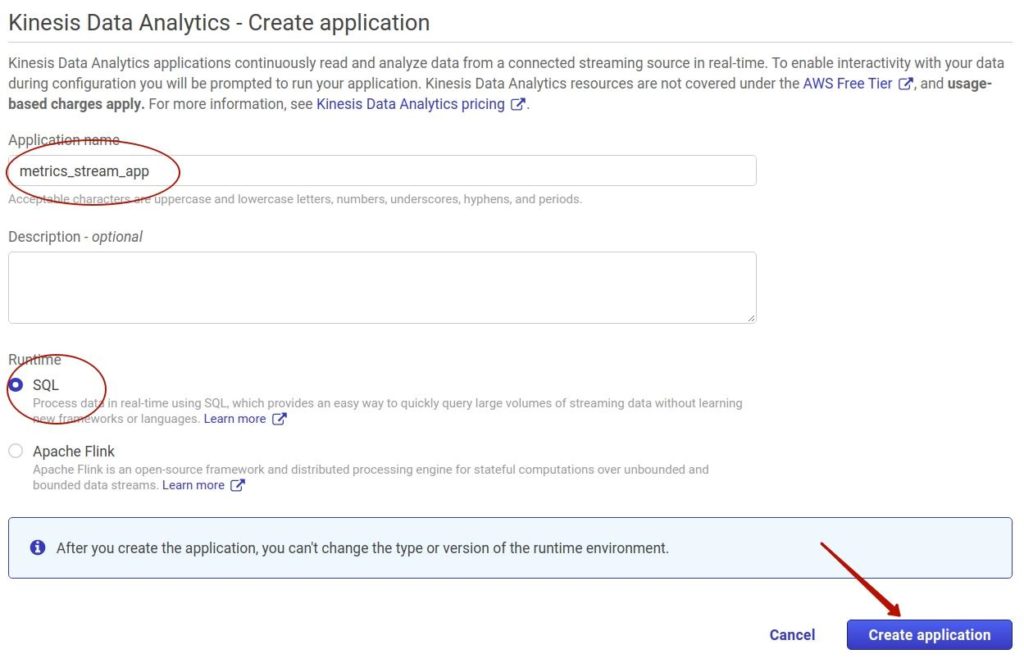
In the next window, specify the arbitrary name of the application (metrics_stream_app) and select the runtime (SQL). Then, click the Create application button again:
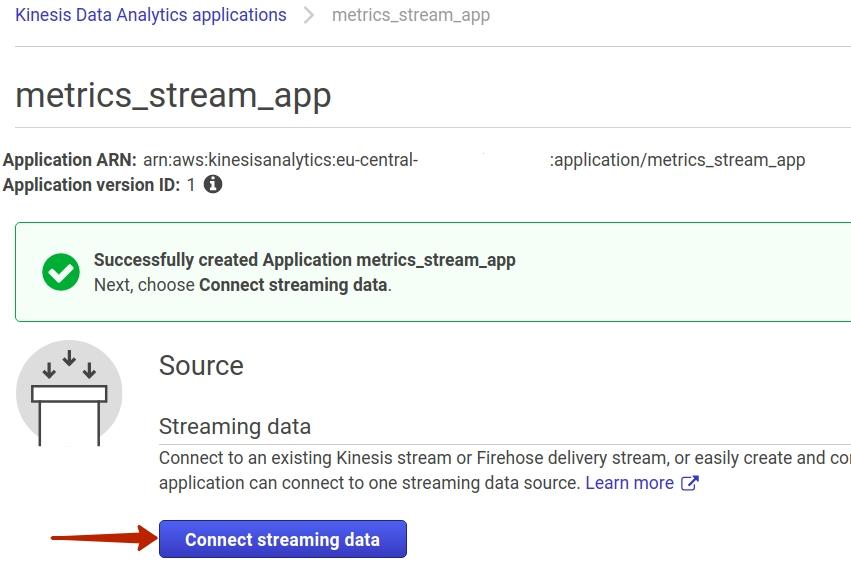
After the metrics_stream_app application is created, you should connect it with the streaming data. To do this, you need to press the corresponding button on the application page:
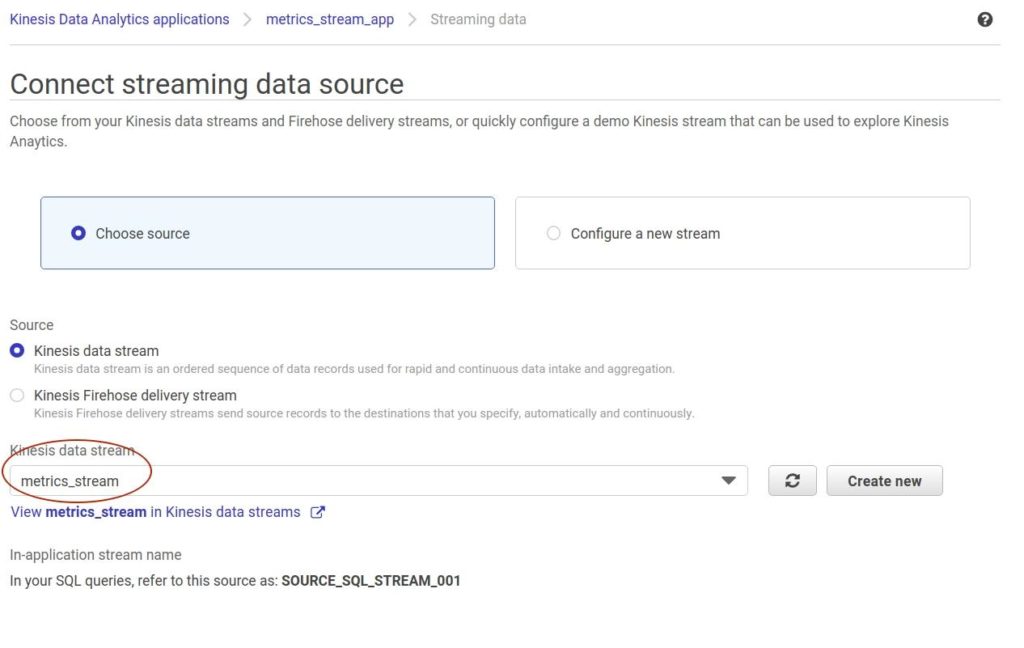
Now you need to run the code of the producer to fill the metrics_stream. On the next window in the Amazon console, select the option to use the Kinesis data stream as the source of data for the analytics application. Then select the name of the needed data stream (metrics_stream), which was created earlier:
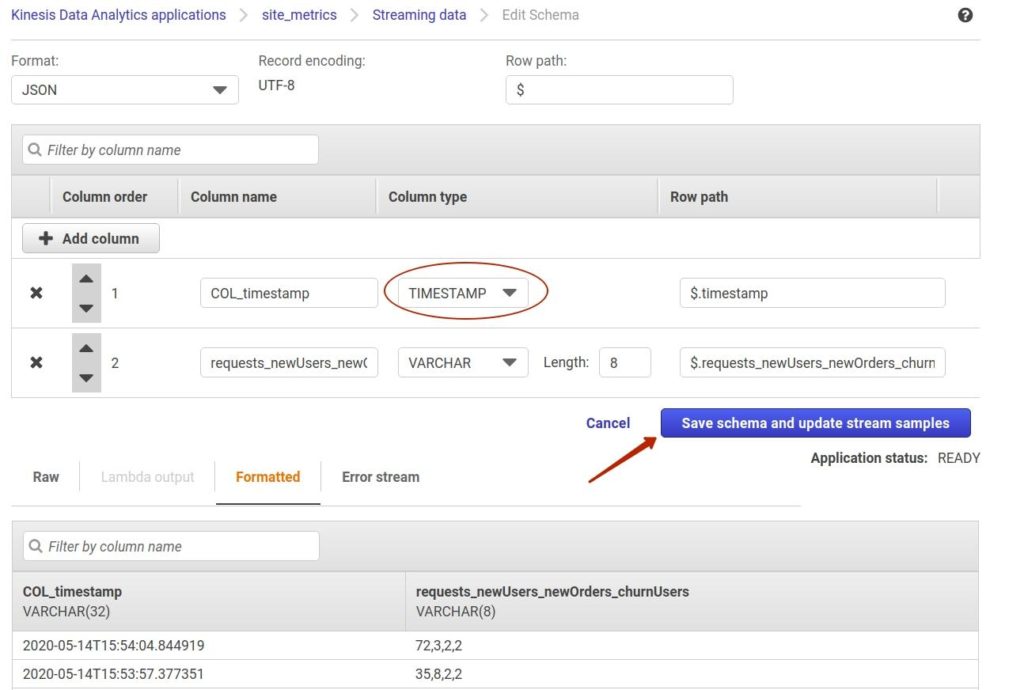
At the bottom of the same page, press the Discover schema button, wait until the schema of the stream is discovered, and then click the Edit schema button:

Further, you must change the type of the COL_timestamp column to TIMESTAMP and click the Save schema and update stream samples button:
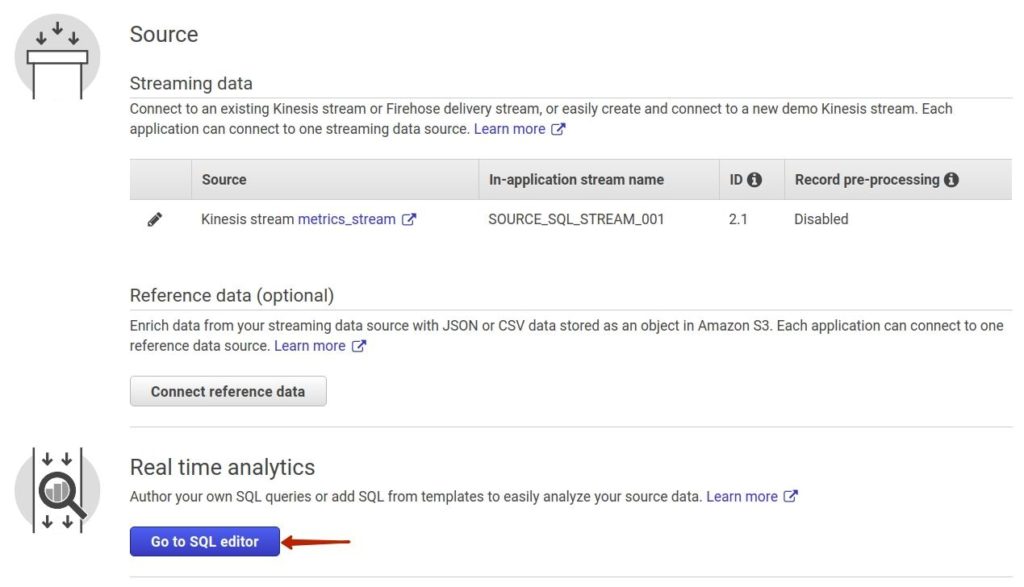
At this point you need to write a SQL query that will be used to transform the input stream. To do this, on the application page click the Go to SQL editor button. Note that the data source is already connected to the application and has the SOURCE_SQL_STREAM_001 in the application stream name:
On the next page, write the SQL query into the corresponding text area, and then click the Save and run SQL button:
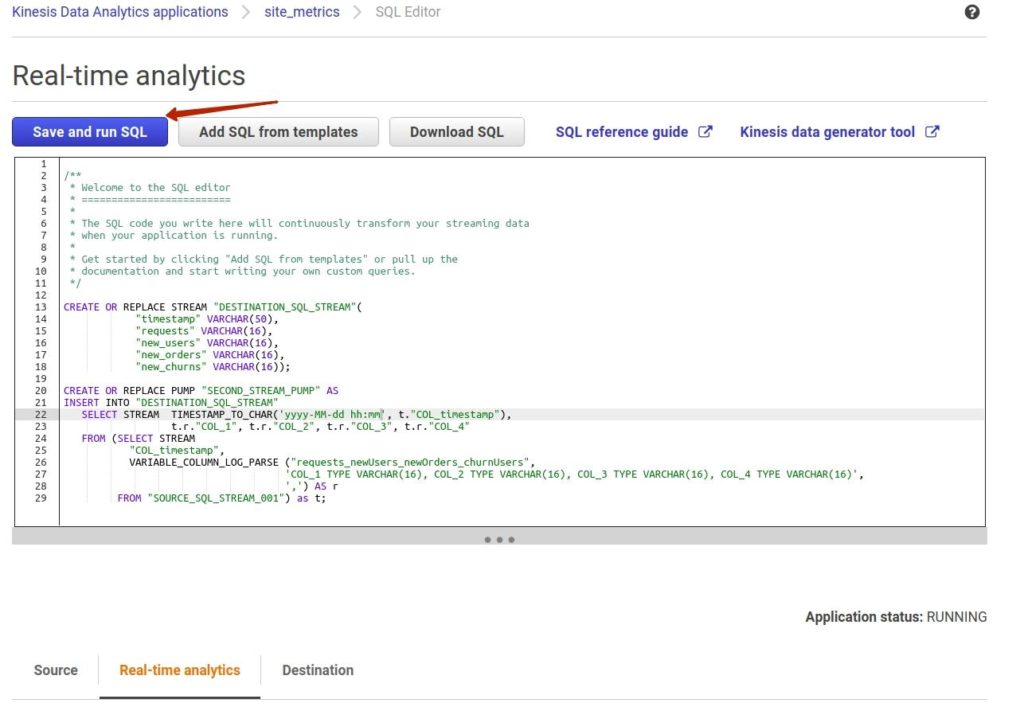
The next step is to explore the SQL query that was used (as shown below). The DESTINATION_SQL_STREAM is the resulting stream that was needed as the result of the transformation. It should have the timestamp in the varchar(50) format, and should also have a separate column for each metric type (requests, new users, new orders and new churns). The structure of this stream is described in a manner very similar to the creation of a standard relational database table using SQL:
CREATE OR REPLACE STREAM "DESTINATION_SQL_STREAM"(
            "timestamp" VARCHAR(50),
            "requests" VARCHAR(16),
            "new_users" VARCHAR(16),
            "new_orders" VARCHAR(16),
            "new_churns" VARCHAR(16));
CREATE OR REPLACE PUMP "SECOND_STREAM_PUMP" AS
INSERT INTO "DESTINATION_SQL_STREAM"
   SELECT STREAM  TIMESTAMP_TO_CHAR('yyyy-MM-dd hh:mm:ss', t."COL_timestamp"),
                  t.r."COL_1", t.r."COL_2", t.r."COL_3", t.r."COL_4"
   FROM (SELECT STREAM
           "COL_timestamp",
           VARIABLE_COLUMN_LOG_PARSE ("requests_newUsers_newOrders_churnUsers",
                                     'COL_1 TYPE VARCHAR(16), COL_2 TYPE VARCHAR(16), COL_3 TYPE VARCHAR(16), COL_4 TYPE VARCHAR(16)',
                                     ',') AS r
         FROM "SOURCE_SQL_STREAM_001") as t;
The SOURCE_SQL_STREAM_001 is the name of the data stream that is connected to the analytics application. From this stream, take the COL_timestamp column, as well as the requests_newUsers_newOrders_churnUsers column. The last column is immediately passed as an argument to the VARIABLE_COLUMN_LOG_PARSE() function. This function should split the column into four separate columns using a comma as a separator.
The SECOND_STREAM_PUMP is the name of the pump that will take data from the output of the query described above and insert data into the DESTINATION_SQL_STREAM. Along the way, it also converts the format of the COL_timestamp column from TIMESTAMP to CHAR using the TIMESTAMP_TO_CHAR function.
Note, when using Dremio you can interact with data from different data sources in a similar manner. There are a lot of functions for processing and transforming data available in Dremio, and it also supports the SQL syntax that is familiar to many data engineers .
The focus now shifts to the AWS console. After saving and running the SQL query, you are able to see the results of stream processing using the query:
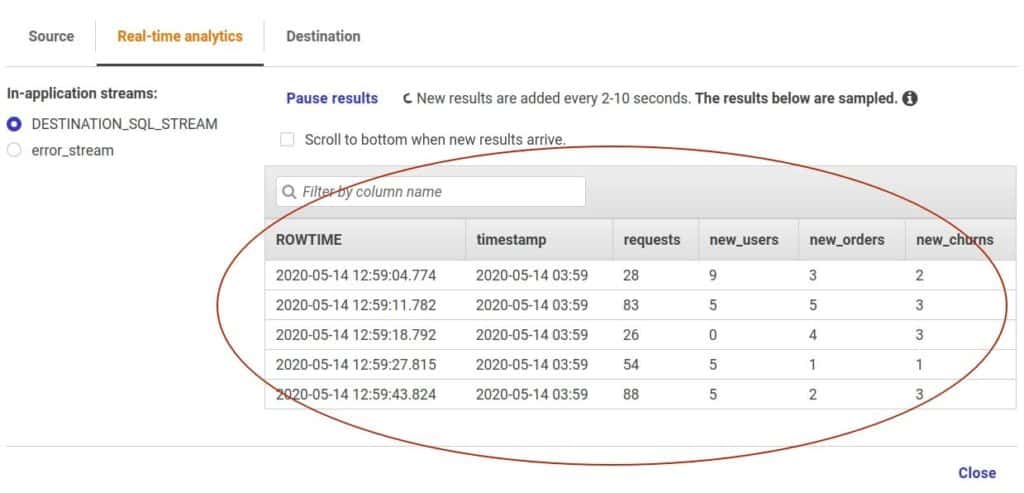
That’s all that is required for the analytics application. Now you need to add one more element to the pipeline — the results of the data processing need to be saved in the AWS S3 bucket. To implement this, you should create the Amazon Data Firehose delivery stream, which can be done on the Amazon Kinesis dashboard page by clicking on the Create delivery stream button:

Next, specify the delivery stream name, called metrics_delivery_stream:
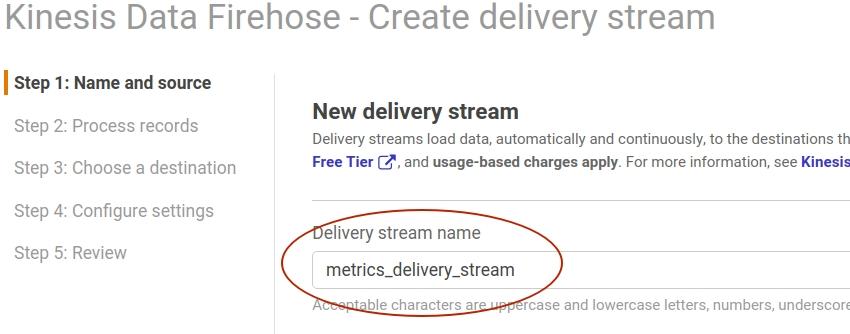
On this step, you also need to select the source (direct PUT or other sources — because you want to save the results in the AWS S3 bucket). Then click the Next button:
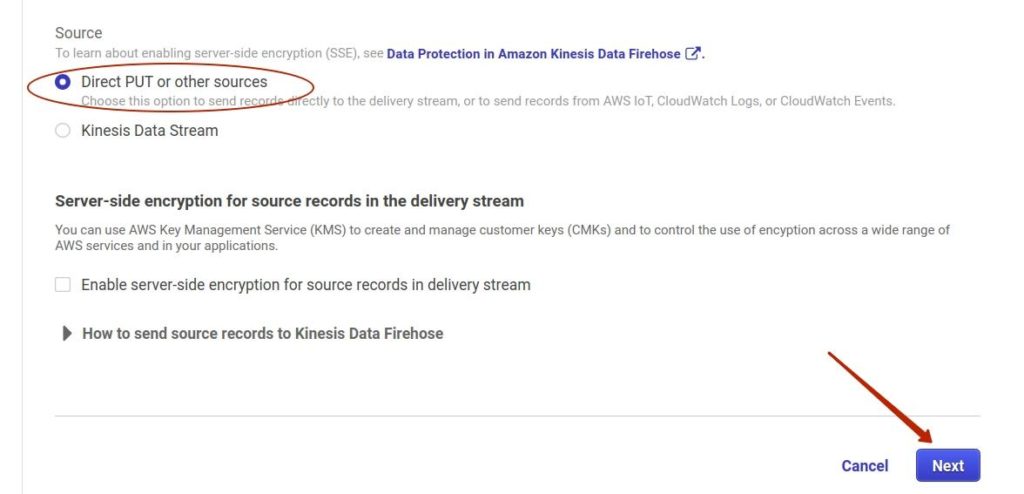
On the next step (Step 2: Process records) you can set up some data transformations or format conversions. But in this case, you don’t need to do this, so just click the Next button again.
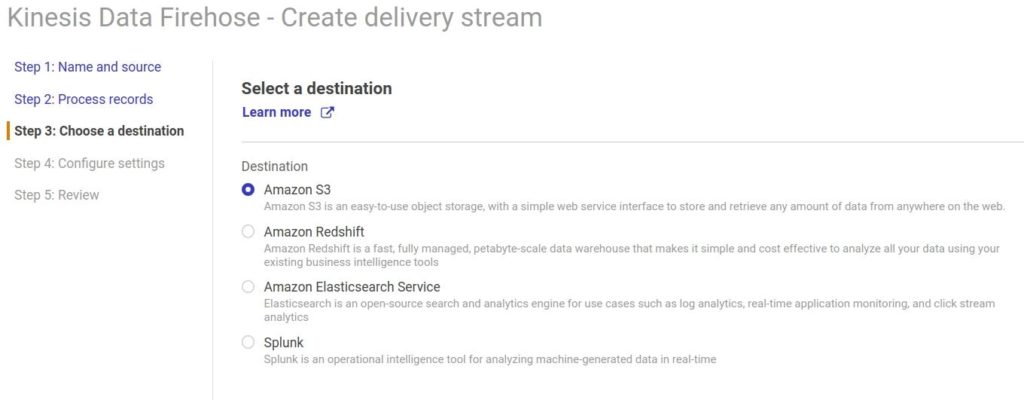
In the next step of the sequence (Step 3: Choose a destination), you should specify the data destination. There are options for Amazon Redshift, Amazon Elasticsearch Service, Amazon S3 and Splunk. For this exercise, select Amazon S3.
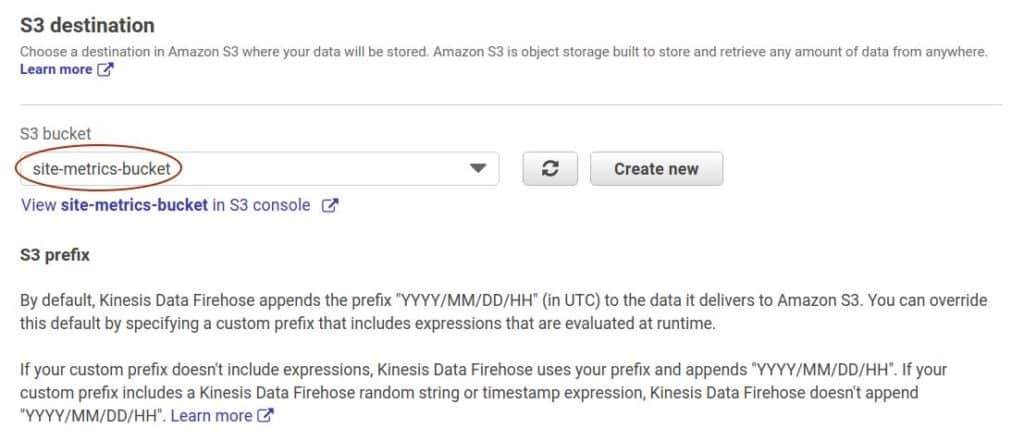
You must specify that you want to save data into the site-metrics-bucket bucket created earlier. It is also possible to create a new bucket at this stage without switching to the AWS S3 service in the console. To proceed to the final step (Step 4: Configure settings), use the Next button again.
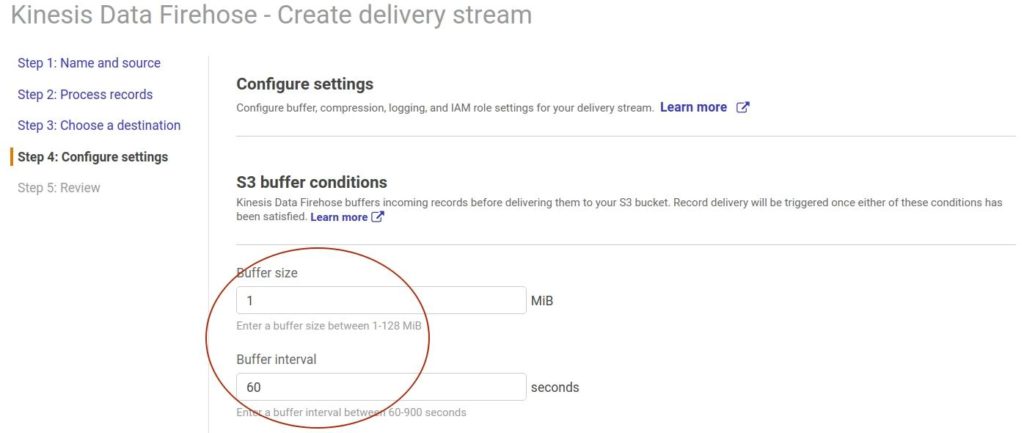
At this step, you should configure some settings. Set the buffer size parameter to 1 MiB and buffer interval to 60 seconds, which means that the data will be written into the bucket by chunks, every 60 seconds.
Also, be sure to specify the permissions. Click the Create new or choose button first:

On the next window, select the option Create a new IAM role and specify the name for the new role (firehose_delivery_role). Then click the Allow button:
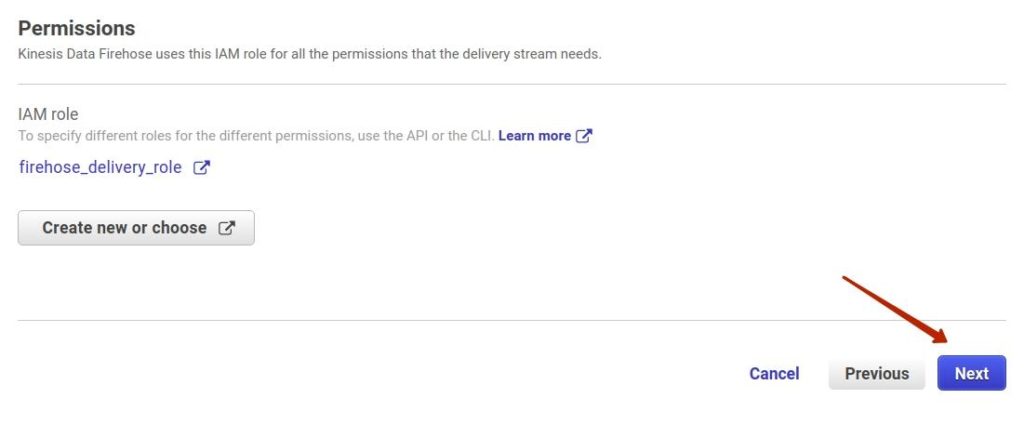
At this point, the AWS console returns to the previous window (Step 4), where you can see the created role is selected. Then press the Next button:
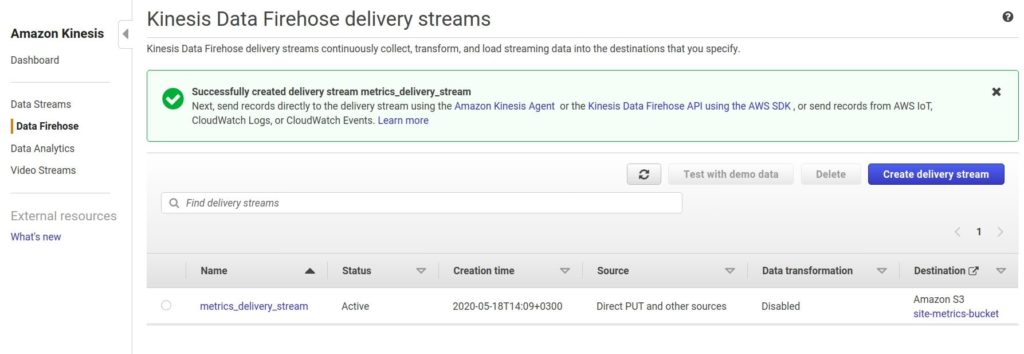
Finally, to review all the parameters and settings, click the Create delivery stream button. After some time, the delivery stream should be ready for usage and it can be seen in the list of created delivery streams:
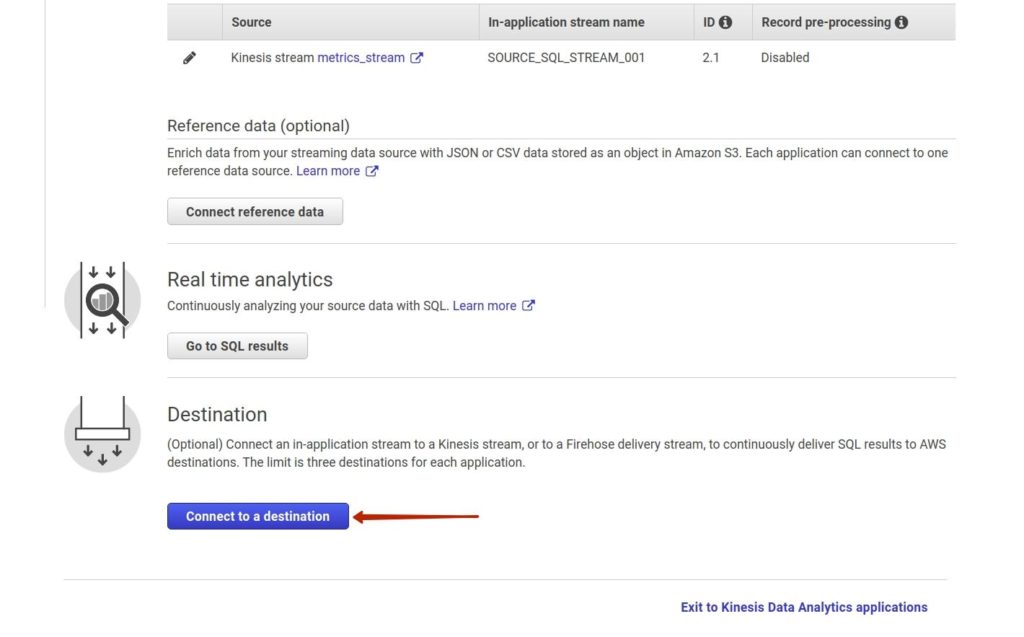
Now, you need to set the created delivery stream as a destination for the Kinesis Data Analytics application, which is the place where the analytics application will send the results of its operation. So, return back to the page of the analytics application (metrics_stream_app) and click the Connect to a destination button:
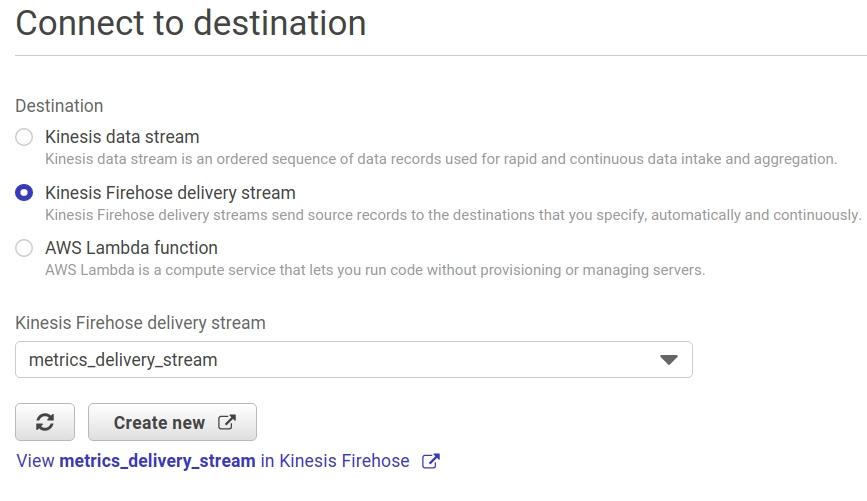
The next step is to specify the destination, and there are three options: Kinesis Data Stream (to continue data processing and transformation, if needed), Kinesis Firehose delivery stream or AWS Lambda function. For this exercise, select the Kinesis Firehose delivery stream to send data to AWS S3. After selecting this option, you also need to specify the name of the existing delivery stream or create a new one. To keep it simple, select the metrics_delivery_stream that was created earlier:
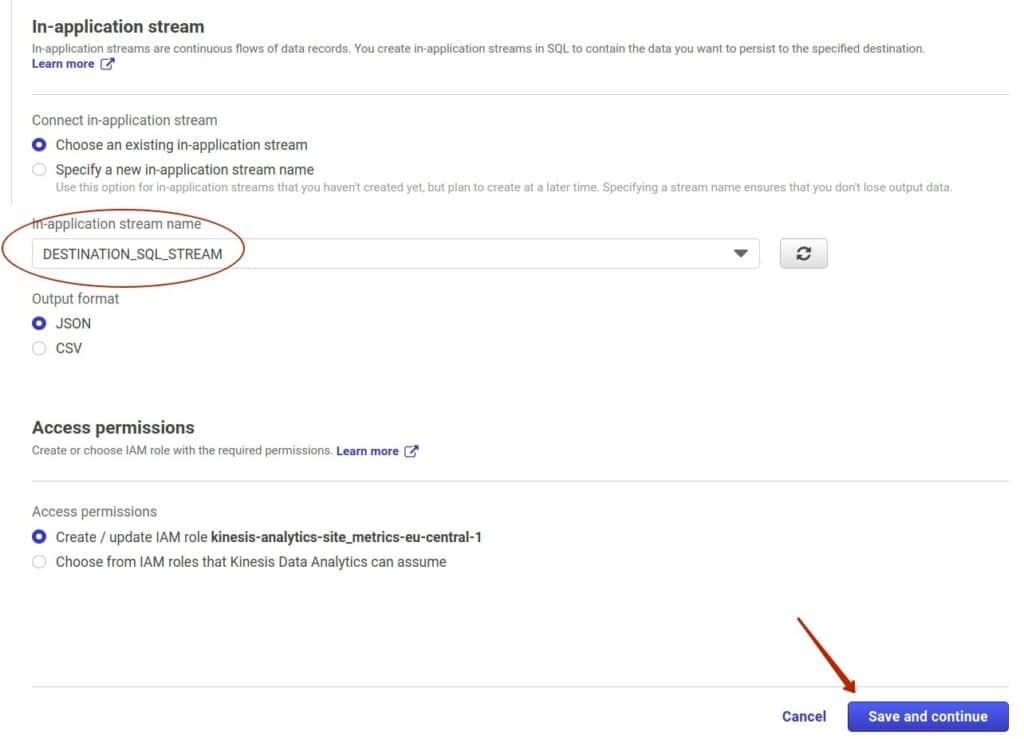
On this page, you also need to specify the in-application stream that will be used. You already have the DESTINATION_SQL_STREAM as the stream with the processed data, so, select this stream. Among other options that can be set at this location are the output format (JSON or CSV) and the permissions settings. To complete the connection to the destination, click the Save and continue button:
Now, on the page of the Kinesis Analytics application, you can see that the destination to the Kinesis Firehose delivery stream is established:
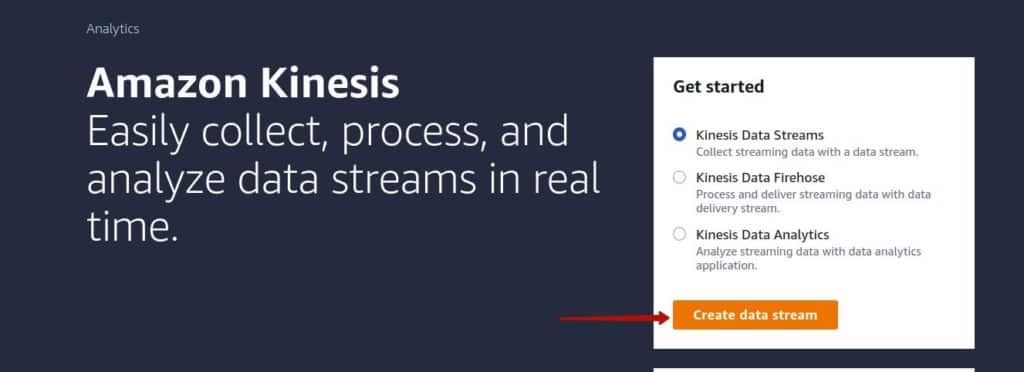
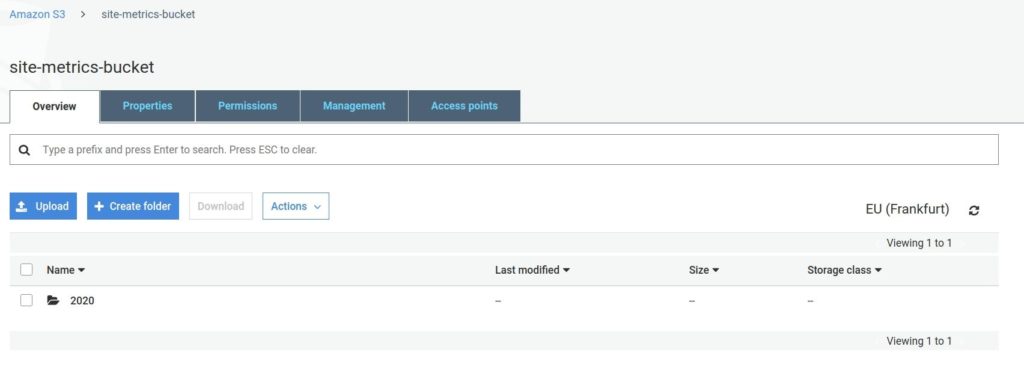
At this moment, everything should work as initially planned. The producer should generate data and send it to the Kinesis Data Stream. The Kinesis Data Analytics application should take the data stream as input, transform the data and send it to the Kinesis Data Firehose delivery stream. Finally, the delivery stream should save the processed data in the AWS S3 bucket. To check whether the data is actually in S3, go to the AWS S3 service and open the bucket selected as the data destination (site-metrics-bucket). You should see that there is a folder named 2020:
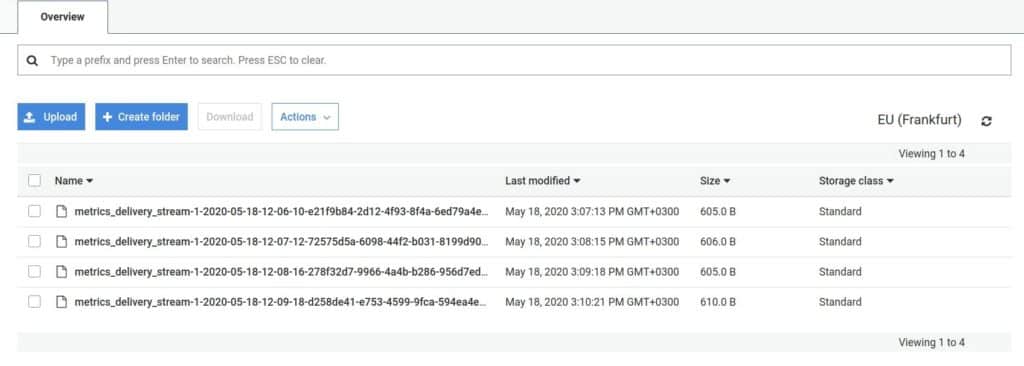
Inside this folder, there are other folders (Note: you could set up the behavior regarding the path to the files when you create the delivery stream). Inside those folders are JSON files. Each file is created once per minute and it represents the data for that minute (you can see that the information about time is denoted in the name of the file):
If you open one of the files, you will see the following content:

The content of the file is the result of data processing by the Kinesis Analytics application (timestamp is transformed into the CHAR format and fields with metrics are separated from each other).
This is the end of the pipeline related to the AWS platform. But once you have the data in the AWS S3 bucket, you can use Dremio to access it and perform additional processing and then visualize it with your favorite BI tool. Dremio AWS Edition enables easy integration with AWS. To learn more about using Dremio on AWS, read this article.
Conclusion
This article focused on the Amazon Kinesis service, including Kinesis Data Streams, Kinesis Data Analytics, and Kinesis Data Firehose, and showed an example of how a data engineer can use it to build a typical data pipeline and access it from Dremio to accelerate data insights.With Dremio, you can curate and seamlessly manage all of your data in one place. It is also possible to merge datasets from different sources and then work with the data using SQL directly in Dremio (even if a data source doesn’t support interaction with it using SQL, like AWS S3). Dremio is also good for the preparation of data before analyzing it in Tableau or Qlik Sense. Similarly, Dremio can be used as the intermediary layer before building machine learning models (for example, see our tutorials about Gensim Topic Modeling with Python, Dremio and S3, Unlocking Data Science on the Data Lake Using Dremio, NLTK and Spacy, or Multi-Source Time Series Data Prediction with Python). If you are new to Dremio, the Getting Oriented to Dremio and Working With Your First Dataset tutorials are a great place to get started.
More and more companies today are modernizing their data infrastructures to work with data streams in the cloud. Amazon Kinesis is a tool for working with data streams that enables the collection, processing and analysis of real-time data. One of its capabilities is Amazon Kinesis Data Analytics, a cloud-based solution designed to get actionable insights from streaming data. It is important for today’s data engineers to know how to work with this tool and be able to identify use cases where it can be helpful. To that end, this article explores Amazon Kinesis and demonstrates an example of how it can be used.
Sign up for AI Ready Data content

