21 minute read · February 23, 2024
Git for Data with Dremio’s Lakehouse Catalog: Easily Ensure Data Quality in Your Data Lakehouse
· Head of DevRel, Dremio

When it comes to data, there are several challenges that may impact the quality of data you provide consumers, which can result in complex and fragile pipelines and sometimes make the visibility of issues worse.
Luckily, the data lakehouse comes to the rescue. The combination of Dremio and Apache Iceberg allows you to simplify many modern data challenges so you can focus on producing insights, not fixing pipelines. Today, we’ll focus on the role of Dremio' Arctic's Lakehouse Management Features in ensuring data quality in your Apache Iceberg Lakehouse.
Dremio's integrated catalog is a data catalog for your data lakehouse that can be accessed with any engine (Dremio, Apache Spark, Apache Flink, etc.). It uniquely enables data teams to use isolation to ensure data quality, recover from mistakes quickly, and audit the data from one place. It is powered by the open-source Project Nessie, which enables Git-like semantics at the data catalog level.

First, we’ll discuss a few data quality use cases that Dremio can assist with, and then we’ll detail a hands-on exercise so you can try it out for yourself.
Data Quality Problems and Solutions
I’m ingesting data and not catching substantial quality issues before the data is queried.
Problem: You ingest the data, and the results look great upon first inspection. Unfortunately, you hear from your data consumers (analysts or data scientists) that there is missing data resulting from transformations that didn’t play out correctly. Now you're in a high-pressure race to fix the problem.
Solution: With Dremio you can create a branch and have your ETL pipelines land the new data in the branch to isolate the data. This allows you to test the data, make changes, and then merge the branch back into the “main” branch that all your data consumers query against.
-- Creating a new branch for data integration
CREATE BRANCH etl_02_23_2024;

-- Switching to the dataIntegration branch
USE BRANCH etl_02_23_2024;

-- At this point do your ingestion and validation
INSERT INTO ...
MERGE INTO ...

-- Assuming checks have passed, switch back to the main branch and merge changes from dataIntegration
-- This step should be executed after confirming that the checks have passed
USE BRANCH main;
MERGE BRANCH etl_02_23_2024 INTO main;
I ran a faulty update, and now I’m in for the lengthy process of discovering and fixing impaired data.
Problem: You complete an upsert and realize there is a typo in your SQL statement that affects the entire job and now you have to figure out how to repair all the tainted records.
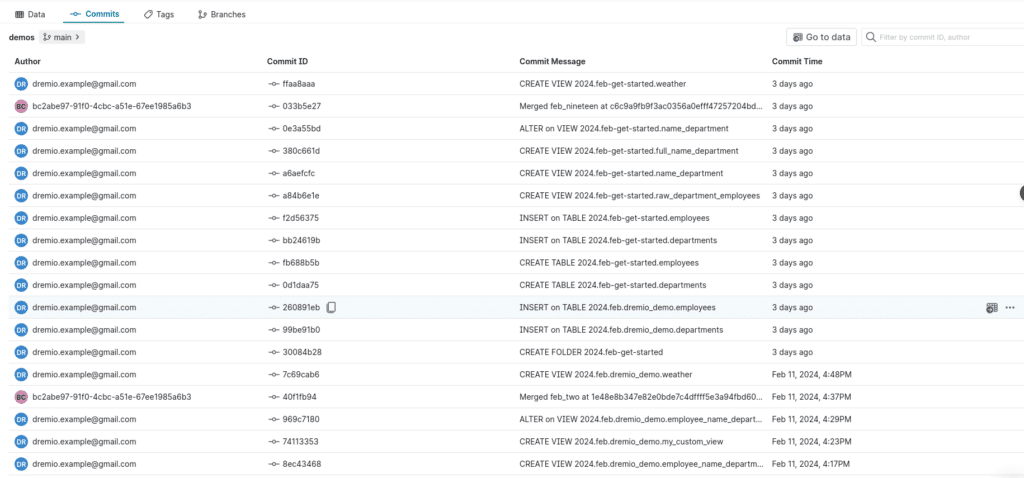
Solution: With Dremio, every change is tracked as a commit, and you can easily revert the state of your data lake, so all you have to do is correct the typo and rerun your job.
Data consumers depend on the joining of several tables, and if I update them one by one, concurrent queries may work off partially updated data.
Problem: You have a fact table that depends on several dimension tables that all need updates. You update them back to back, but in the time between each update, queries may join updated tables with yet-to-be-updated tables.
Solution: With Dremio, you can update all the tables in a branch. When you’re done, you merge the branch, and all the tables simultaneously become live on the main branch for querying.
Hands-On Exercise Setup
The first step is to sign up for a free Dremio Cloud account. The process should only take a few minutes. Follow the docs if you have any questions. You can also follow a tour through the signup process and UI by watching these videos:
Once you have your Dremio account up and running with your initial project, let's begin!
From your Dremio project, to add a Catalog to work with, click “Add Source” in the bottom left. Keep in mind all project start with a default catalog integrated in the project which you can use for this exercise.
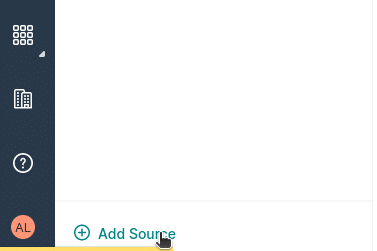
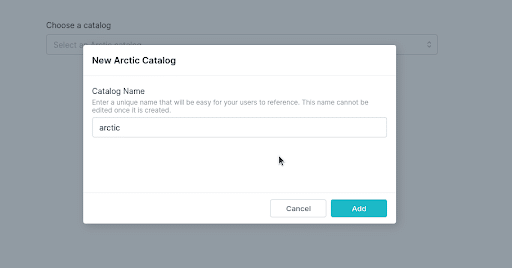
Then select Arctic as your source, which gives you an option to select an existing catalog or to create a new one. Let’s create a new catalog.
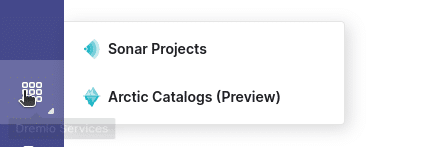
Once the source is added, you can always switch between projects (sonar) and catalogs (arctic) by clicking on an icon in the menu on the left.
Setting Up Your Example Data
Now head over to the SQL Runner by clicking on it within the sidebar menu of the left of the screen. In the SQL runner we will run the following SQL to create our sample tables.
CREATE TABLE IF NOT EXISTS departments (
    department_id INT,
    name VARCHAR(255),
    location VARCHAR(255),
    budget DECIMAL(10, 2),
    manager_id INT,
    founded_year INT
);

CREATE TABLE IF NOT EXISTS employees (
    employee_id INT,
    first_name VARCHAR(255),
    last_name VARCHAR(255),
    email VARCHAR(255),
    department_id INT,
    salary DECIMAL(10, 2)
);

INSERT INTO departments (department_id, name, location, budget, manager_id, founded_year) VALUES
(1, 'Human Resources', 'New York', 500000.00, 1, 1990),
(2, 'Research and Development', 'San Francisco', 2000000.00, 2, 1985),
(3, 'Marketing', 'Chicago', 750000.00, 3, 2000),
(4, 'IT', 'Austin', 1000000.00, 4, 2010),
(5, 'Sales', 'Boston', 850000.00, 5, 1995);

INSERT INTO employees (employee_id, first_name, last_name, email, department_id, salary) VALUES
(1, 'John', 'Doe', '[email protected]', 1, 75000.00),
(2, 'Jane', 'Smith', '[email protected]', 2, 85000.00),
(3, 'Emily', 'Jones', '[email protected]', 3, 65000.00),
(4, 'Michael', 'Brown', '[email protected]', 4, 95000.00),
(5, 'Sarah', 'Davis', '[email protected]', 5, 70000.00),
(6, 'James', 'Wilson', '[email protected]', 1, 80000.00),
(7, 'Linda', 'Garcia', '[email protected]', 2, 90000.00),
(8, 'Robert', 'Miller', '[email protected]', 3, 62000.00),
(9, 'Patricia', 'Taylor', '[email protected]', 4, 93000.00),
(10, 'David', 'Anderson', '[email protected]', 5, 68000.00);
Before running this SQL make sure to set the context to your catalog or a subfolder within your catalog so it creates the tables in that location.

Once these queries have run we can use these tables to illustrate how to use these versioning features to your advantage.
Isolating, Validating, and Reverting
Isolation
The first benefit of Dremio's Lakehouse Catalog is that you can isolate your ETL work. Since any engine can communicate with an Dremio's Catalog, engines like Dremio, Apache Spark and Apache Flink could land the data in your catalog in an ETL branch instead of landing it in the main branch, thereby preventing downstream consumers from querying the data before you’ve run quality checks.
To simulate this, create an ETL branch and change our tables. Set the context to catalog or subfolder where you initially created the tables. Also make sure "mycatalog" is changed to whatever the name of your catalog is.
-- QUERY TABLE ON MAIN BRANCH
SELECT COUNT(*) FROM departments;
SELECT COUNT(*) FROM employees;

-- CREATE AND SWITCH TO NEW BRANCH
CREATE BRANCH feb_nineteen FROM BRANCH main IN mycatalog;
USE BRANCH feb_nineteen IN mycatalog;

-- INGEST NEW DATA
INSERT INTO departments (department_id, name, location, budget, manager_id, founded_year) VALUES
(6, 'Customer Support', 'Denver', 400000.00, 6, 2005),
(7, 'Finance', 'Miami', 1100000.00, 7, 1998),
(8, 'Operations', 'Seattle', 950000.00, 8, 2003),
(9, 'Product Development', 'San Diego', 1200000.00, 9, 2015),
(10, 'Quality Assurance', 'Portland', 500000.00, 10, 2012);

INSERT INTO employees (employee_id, first_name, last_name, email, department_id, salary) VALUES
(11, 'Carlos', 'Martinez', '[email protected]', 6, 72000.00),
(12, 'Monica', 'Rodriguez', '[email protected]', 7, 83000.00),
(13, 'Alexander', 'Gomez', '[email protected]', 8, 76000.00),
(14, 'Jessica', 'Clark', '[email protected]', 9, 88000.00),
(15, 'Daniel', 'Morales', '[email protected]', 10, 67000.00);

-- QUERY TABLES ON ETL BRANCH
SELECT COUNT(*) FROM departments;
SELECT COUNT(*) FROM employees;
In this SQL we do the following:
- We do a count on both tables to see the initial count for each table
- We create a branch where we will do our ingestion work
- We switch to that branch so future queries in this session will run from that branch
- We insert records into our two tables
Now let’s switch to the catalog UI so you can see the result of these queries from the Arctic UI. Here, you'll be able to view commits, see what datasets exist on different branches, and more.

At this point, we would want to validate our data by checking for nulls, outliers, data that doesn't match business rules. Here is a few resources on way to validate your data from common data problems.
- BLOG: 10 Data Quality Checks in SQL, Pandas and Polars
- VIDEO: Checking for Null Values
- VIDEO: Using a Business Constraints Table
After you've made all validations you want on your data and you know all your data is good, you can publish ALL changes to ALL tables simultaneously by merging our etl branch back into the main branch which is as simple as:
-- SWITCH TO MAIN BRANCH
USE BRANCH main IN mylakehouse;

-- QUERY TABLES ON MAIN BRANCH BEFORE MERGE
SELECT COUNT(*) FROM departments;
SELECT COUNT(*) FROM employees;

-- MERGE CHANGES
MERGE BRANCH etl_02232024 INTO main IN mycatalog;

-- QUERY TABLES ON MAIN BRANCH AFTER MERGE
SELECT COUNT(*) FROM departments;
SELECT COUNT(*) FROM employees;
In this SQL we:
- Switch back to the main branch
- Do a count to show that the tables on do not have the new records
- Merge our etl branch back into our main branch
- Run a count to confirm the tables have been updated.
Here is a video running through a similar example using branching in Dremio Cloud.
Automating your Branching and Merging
As you can see, all this branching and merging can quickly be done via SQL, making it easy to automate via:
- In any language, you can use Dremio's REST API, JDBC/ODBC and Arrow Flight interfaces to write scripts you can automate to run and send SQL to Dremio.
- Use Dremio's dbt integration to integrate ingestion, transformations and semantic layer curation in your Dremio instance.
- Use any other orchestration tool to automate SQL to Dremio
If using a Dremio Self-Manage deployment, you can run your own Nessie server to get many similar benefits; you can follow this tutorial to build a lakehouse on your laptop and see what this would look like.
Connecting to Your Arctic Catalog with Spark
One of the best features of Dremio catalog being built on top of open-source Nessie is that it works with any engine. Let’s connect to our catalog using Apache Spark and query the data to demonstrate this.
The first step is to generate a personal access token for authentication. Click to access your account settings where you can create a token. You should find this on the bottom left corner of the screen.

Create a new personal token and write it somewhere safe so you can refer to it in the coming steps.
Next step, let’s start a Docker container running Spark with the following command:
docker run -p 8888:8888 --env AWS_REGION=us-east-1 --env AWS_ACCESS_KEY_ID=XXXXXXXXXXXXXXX --env AWS_SECRET_ACCESS_KEY=xxxxxxx --env TOKEN=xxxxxx --env WAREHOUSE=s3://bucket/ --env CATALOG_URI=https://nessie.dremio.cloud/v1/repositories/xxx --name spark-notebook alexmerced/spark35-notebook
To successfully connect to Dremio you need to define a few environmental variables you see above with the following:
TOKEN: This is your personal access token from Dremio that will authorize Spark to read your Arctic catalog.
WAREHOUSE: If you plan on doing any writing to your catalog, Spark will want to know where it should be writing the files to. Make sure the URI includes the trailing slash. The warehouse should be the bucket your Arctic catalog is configured to on Dremio Sonar. To double-check this from Sonar, right-click on the Arctic catalog and select “edit details” and navigate to the storage section where you’ll find the bucket under the property “AWS Root path.” You can also use any AWS S3 path your credentials have access to read and write.
AWS credentials: To read and write to your S3 account, you need to define the AWS_REGION, AWS_SECRET_ACCESS_KEY, and AWS_ACCESS_KEY_ID to provide Spark AWS credentials.
CATALOG_URI: This is the endpoint for your Arctic catalog. On the UI of your Arctic catalog click on the gear to bring up the project settings and you’ll find the URI there.
After running the previous docker run command you'll see some output in your terminal and you'll want to look for this output here to find the link to open up jupyter notebook.
   To access the server, open this file in a browser:
        file:///home/docker/.local/share/jupyter/runtime/jpserver-8-open.html
    Or copy and paste one of these URLs:
        http://1777564bd55b:8888/tree?token=4586b64fcbad4f22759bfab887ba1daba77fd96a58436046
        http://127.0.0.1:8888/tree?token=4586b64fcbad4f22759bfab887ba1daba77fd96a58436046
Paste in the URL that uses "127.0.0.1" into your local browser, and you'll be in the notebook UI, so you can create a new notebook with the following code.
import pyspark
from pyspark.sql import SparkSession
import os


## DEFINE SENSITIVE VARIABLES
CATALOG_URI = os.environ.get("CATALOG_URI") ## Nessie Server URI
TOKEN = os.environ.get("TOKEN") ## Authentication Token
WAREHOUSE = os.environ.get("WAREHOUSE") ## S3 Address to Write to

print(CATALOG_URI, TOKEN, WAREHOUSE)


conf = (
    pyspark.SparkConf()
        .setAppName('app_name')
  		#packages
        .set('spark.jars.packages', 'org.apache.iceberg:iceberg-spark-runtime-3.5_2.12:1.4.3,org.projectnessie.nessie-integrations:nessie-spark-extensions-3.5_2.12:0.77.1,software.amazon.awssdk:bundle:2.24.8,software.amazon.awssdk:url-connection-client:2.24.8')
  		#SQL Extensions
        .set('spark.sql.extensions', 'org.apache.iceberg.spark.extensions.IcebergSparkSessionExtensions,org.projectnessie.spark.extensions.NessieSparkSessionExtensions')
  		#Configuring Catalog
        .set('spark.sql.catalog.dremio', 'org.apache.iceberg.spark.SparkCatalog')
        .set('spark.sql.catalog.dremio.uri', CATALOG_URI)
        .set('spark.sql.catalog.dremio.ref', 'main')
        .set('spark.sql.catalog.dremio.authentication.type', 'BEARER')
        .set('spark.sql.catalog.dremio.authentication.token', TOKEN)
        .set('spark.sql.catalog.dremio.catalog-impl', 'org.apache.iceberg.nessie.NessieCatalog')
        .set('spark.sql.catalog.dremio.warehouse', WAREHOUSE)
        .set('spark.sql.catalog.dremio.io-impl', 'org.apache.iceberg.aws.s3.S3FileIO')

)

## Start Spark Session
spark = SparkSession.builder.config(conf=conf).getOrCreate()
print("Spark Running")

spark.sql('SELECT * FROM dremio.employees')
In this code:
- Pull the needed environment variables
- Configure the spark session
- In our configurations, we configure a custom iceberg catalog called "dremio"
- Start the Spark Session
- Run an SQL Statement, "dremio" takes the place of the name of your catalog from the Dremio UI
Refer to this article for more details on configuring a Spark Catalog
Other Exercises:
Conclusion
By following this exercise, you have experienced firsthand how Dremio can isolate workloads, enable data auditing, and revert mistakes to make your data quality workflows more effective and less stressful. Everything you just did can be done from other engines like Spark and Flink, allowing multiple users to work on multiple tables with multiple engines.
Get a Free Early Release Copy of "Apache Iceberg: The Definitive Guide".
Sign up for AI Ready Data content
