Welcome to the cutting-edge world of the Dremio Lakehouse, where the convergence of data lakes and data warehouses forms a powerful platform for data management and analytics. In this blog, we'll dive into how Dremio, in collaboration with Nessie, Apache Iceberg, and tools like dbt, revolutionizes data handling by providing a cohesive environment that supports both the vast scalability of data lakes and the refined performance of data warehouses. We’ll take you through a hands-on exercise that showcases the full breadth of Dremio’s capabilities and integrations. From seamless data ingestion to sophisticated data-as-code management, you'll experience how to construct and manage a performant, easy-to-maintain data lakehouse. Whether you're a data engineer, scientist, or analyst, prepare to unlock new insights and efficiencies in your data workflows.
For this exercise, we will be creating an environment on our laptops using Docker, so make sure you have Docker installed to do this exercise, if using Docker Desktop you may have to make sure you have at least 6GB of memory allocated to Docker. Open up your preferred IDE or text editor and create a docker-compose.yml in an empty folder with the following:
After running these queries, we can leave the Mongo Shell with the command:
exit
Setting Up our Minio Data Lake and Nessie Catalog
Now it is time to spin up our Minio object storage-based data lake and create a bucket to store our Apache Iceberg tables, which a Nessie catalog will catalog. We can spin up these services with the command:
docker compose up -d minio nessie
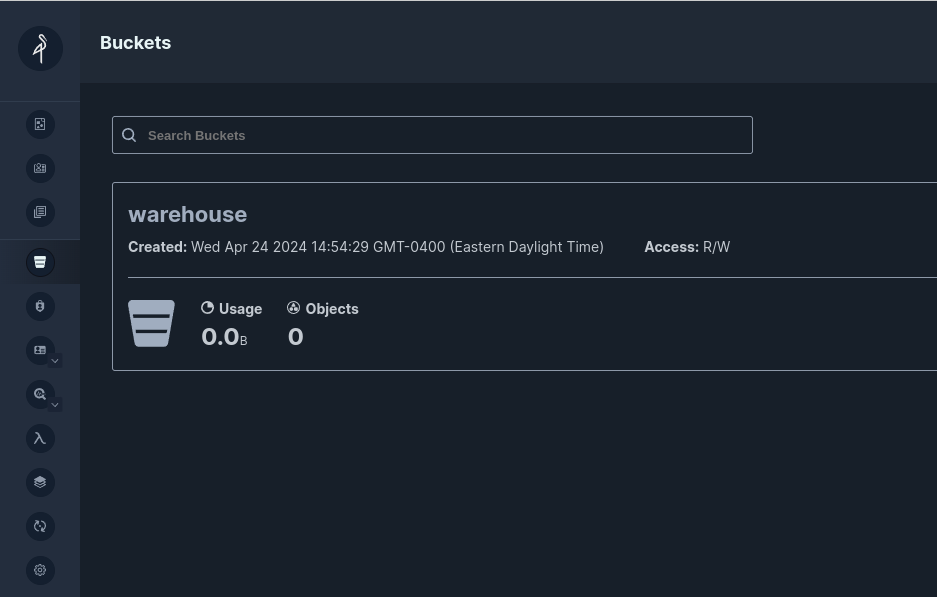
Head over to localhost:9001 in your browser and log in to the Minio dashboard with the username "admin" and password "password."
Once you are logged in, create a bucket called "warehouse," and we have everything we need. Feel free to visit this dashboard after we make some Apache Iceberg tables to see the created files.
Connecting Our Data Sources to Dremio
Next, it is time to start Dremio and get our data sources connected. Let's get Dremio started with the following command:
docker compose up -d dremio
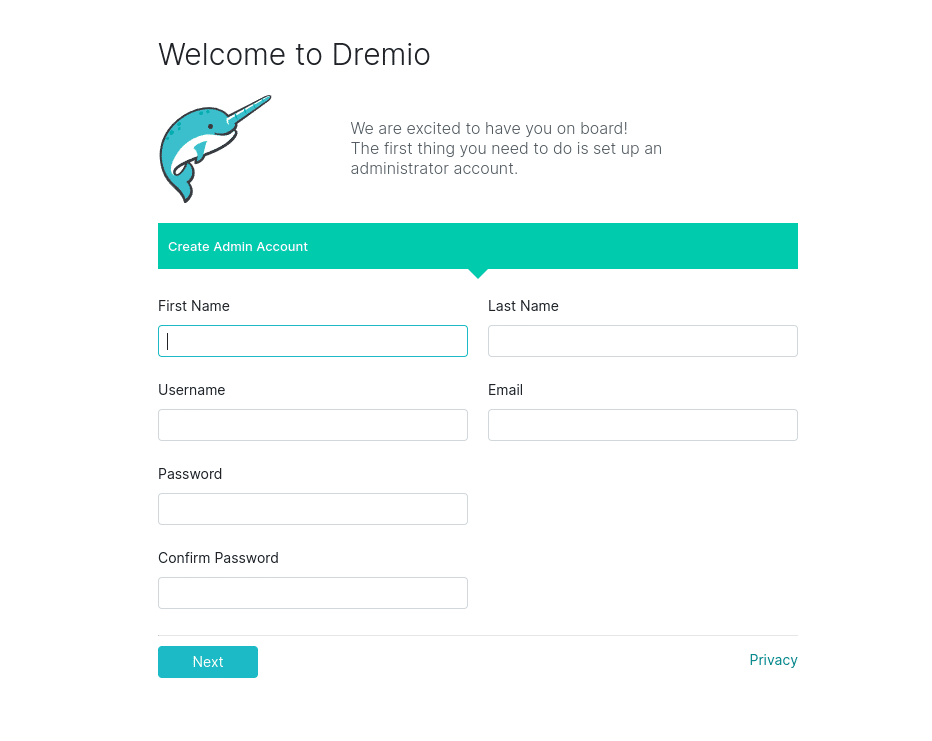
After a minute or two, Dremio should be up and running and we can visit it in the browser at localhost:9047 where we'll have to create our initial user account:
Once you are inside Dremio, we can begin adding our data sources by clicking the "Add Source" button in the bottom left corner.
Add Our Nessie Source
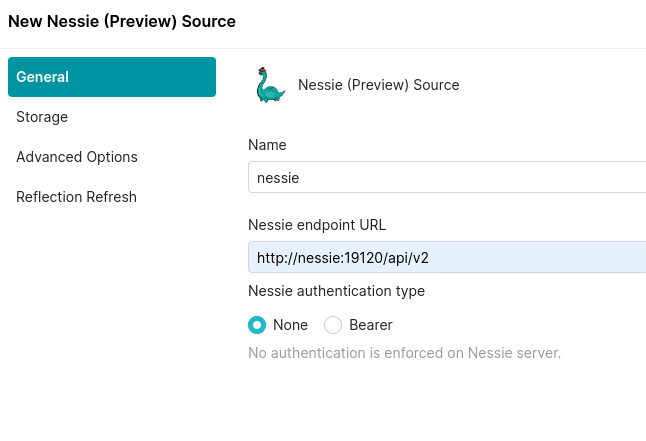
Select Nessie from "Add Source"
On the General Tab
name: nessie
URL: http://nessie:19120/api/v2
auth: none
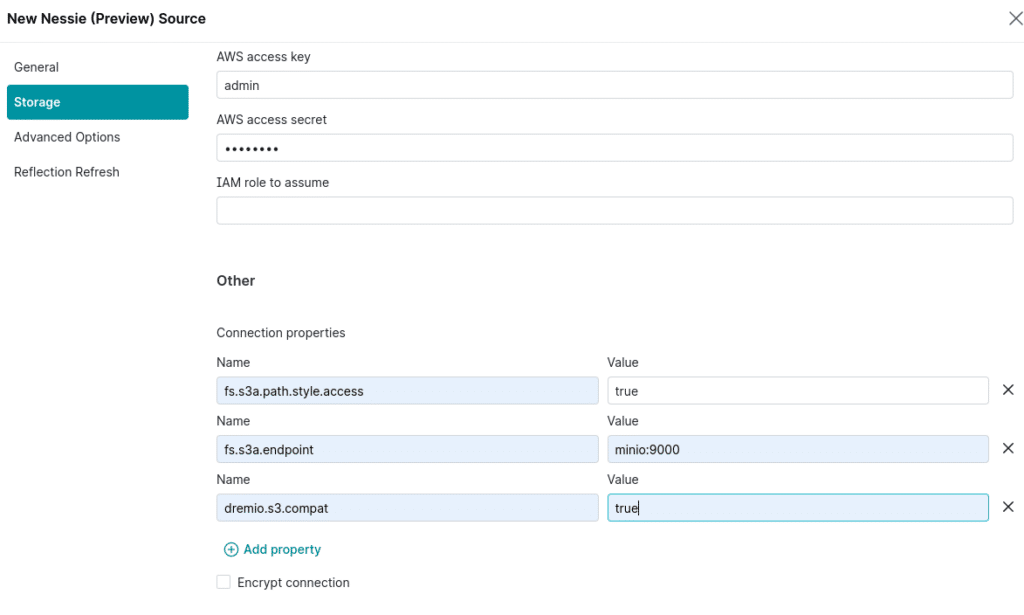
On the Storage tab:
root path: warehouse
access key: admin
secret key: password
connection properties:
fs.s3a.path.style.access : true
fs.s3a.endpoint : minio:9000
dremio.s3.compat : true
Encrypt Connection: false
Add Our Postgres Source
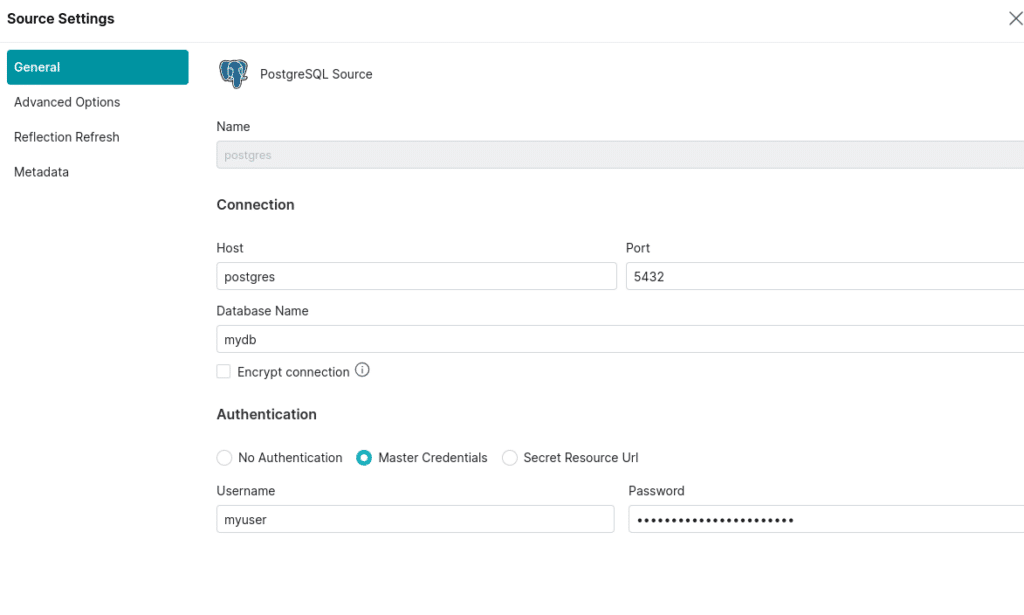
Now let’s add a Postgres source with the following settings:
Name: postgres
Host: postgres
Port: 5432
Database Name: mydb
Username: myuser
Password: mypassword
Add Our MongoDB Source
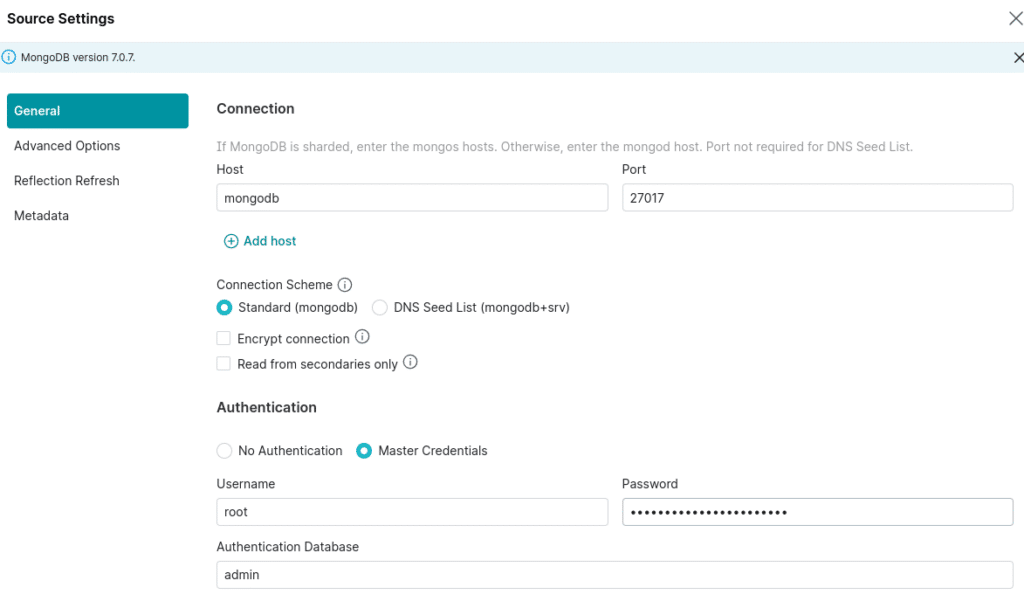
Now let’s add a MongoDB source with the following settings:
Name: mongodb
Host: mongodb
Port: 27017
Auth Database Name: admin
Username: root
Password: example
Creating Our Apache Iceberg Tables
Now that our data sources are connected to Dremio a few things are now possible:
Dremio has full DDL/DML capabilities with Apache Iceberg catalog sources like Nessie, Apache Hive and Glue.
Dremio can federate queries between all connected sources
CREATE TABLE AS (CTAS) for creating new Iceberg tables from existing data sources
INSERT INTO SELECT to add records or do incremental appends to our Apache Iceberg tables from other sources
MERGE INTO to run upserts into that update and insert records into our Apache Iceberg tables
COPY INTO to insert data from Parquet, CSV and JSON files on your data lake into APache Iceberg tables
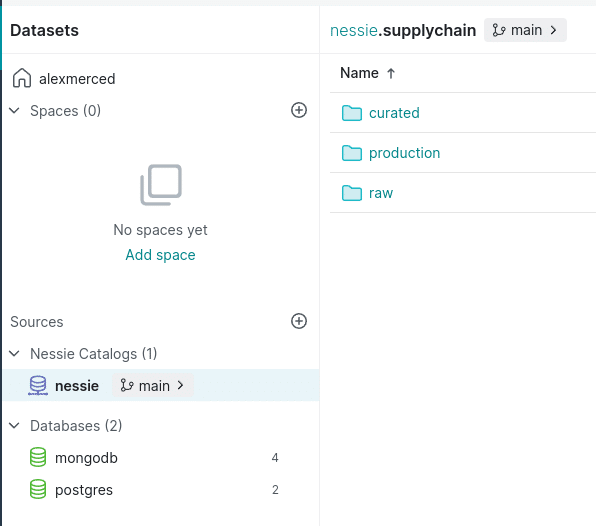
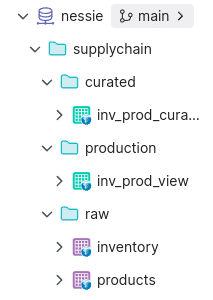
We will take our "products" and "inventory" tables and make them Apache Iceberg tables cataloged by Nessie and stored in Minio. But before we do that, we want to organize the data in our catalog into different "Data Products," so in the Nessie catalog, create a "supply chain" folder. We could apply any three-layer pattern we like inside the folder, such as bronze/silver/gold, raw/business/application, etc. In this case, I will use Raw/Curated/Production semantics, making a folder for each layer.
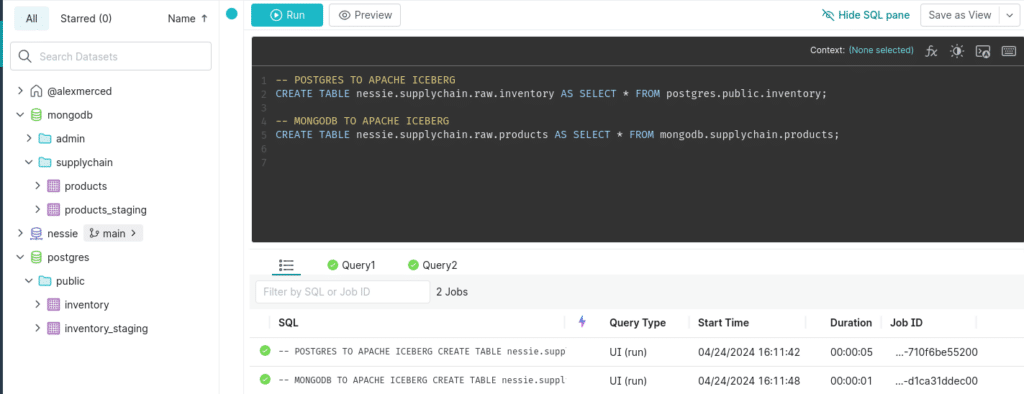
We can head to the Dremio SQL editor and run the following SQL.
-- POSTGRES TO APACHE ICEBERG
CREATE TABLE nessie.supplychain.raw.inventory AS SELECT * FROM postgres.public.inventory;

-- MONGODB TO APACHE ICEBERG
CREATE TABLE nessie.supplychain.raw.products AS SELECT * FROM mongodb.supplychain.products;
Run the SQL:
You will now find the raw Apache Iceberg tables in your Nessie catalog supplychain.raw folder signified by purple table icons that signal a physical dataset. You can additionally head back to minio to find the files stored in the warehouse bucket we created earlier. Congrats, you've just ingested data into Apache Iceberg.
Keep in mind that while we are using the Dremio UI to enter this SQL manually, Dremio has JDBC, ODBC, Apache Arrow Flight, and a REST API interface that can be used to send SQL to Dremio externally via Orchestration tools, BI Tools, Python Notebooks, or any other tool that can leverage these open interfaces. This makes it easy to automate work to Dremio via SQL, including administrative tasks like creating users, setting permissions, and more.
Ingesting Data using Nessie's Data as Code Capabilities
Let's assume the data in our staging tables has been coming over time and that we now need to ingest into our existing tables. In this scenario, we will assume our dataset is append-only, so only new records should be added, and no old records need to be updated. This means we should probably use INSERT INTO over MERGE INTO for this work.
It isn't just any old catalog tracking our Apache Iceberg tables; it is a Nessie catalog, meaning we can use catalog-level versioning to isolate the work on our tables from our user's querying production data.
Let's create a branch, ingest the new data, and confirm that the changes only appear on the Branch.
-- Create the Branch
CREATE BRANCH IF NOT EXISTS ingest IN nessie;
-- Switch to Branch
USE BRANCH ingest IN NESSIE;

-- Update Inventory
INSERT INTO nessie.supplychain.raw.inventory
SELECT *
FROM postgres.public."inventory_staging"
WHERE product_id > (SELECT COALESCE(MAX(product_id), 0) FROM nessie.supplychain.raw.inventory);
-- Update Products
INSERT INTO nessie.supplychain.raw.products
SELECT *
FROM mongodb.supplychain."products_staging"
WHERE product_id > (SELECT COALESCE(MAX(product_id), 0) FROM nessie.supplychain.raw.products);

-- Compare Tables Between Branches
SELECT * FROM nessie.supplychain.raw.inventory AT BRANCH "main";
SELECT * FROM nessie.supplychain.raw.inventory AT BRANCH ingest;
SELECT * FROM nessie.supplychain.raw.products AT BRANCH "main";
SELECT * FROM nessie.supplychain.raw.products AT BRANCH ingest;
If you look over the results of each query, you'll see more records in the ingest branch than in the main branch. The where clause in our insert into statements facilitates incremental appends, only adding records with IDs that don't yet exist in the target table.
We can run data quality checks using raw SQL or tools like Great Expectations without worrying that production queries are seeing the yet-to-be-validated data. Once the data is validated to your liking, we can merge and publish the changes to all our tables in the catalog from the ingest branch
-- Merge Branches
MERGE BRANCH ingest INTO main IN nessie;

-- Confirm that it worked
SELECT * FROM nessie.supplychain.raw.inventory AT BRANCH "main";
SELECT * FROM nessie.supplychain.raw.inventory AT BRANCH ingest;
SELECT * FROM nessie.supplychain.raw.products AT BRANCH "main";
SELECT * FROM nessie.supplychain.raw.products AT BRANCH ingest;
That's all it takes, again any SQL can be externally sent to Dremio so you can use Orchestration tools to orchestrate CI/CD pipelines that:
Create a Branch
Ingest Data
Run Validation and Quality Checks
If Validations are successful, merge the branch publishing the data
If Validations fail, do not merge and deliver an error report to the engineer
Curating Our Semantic Layer with dbt
On top of our raw data, we will want to create layers of virtual views of the data to serve the different needs of our data consumers. This can be done by the Data Engineer or by Data Analysts/Scientists using dbt to efficiently orchestrate the SQL needed to craft your layers of views.
To use dbt you'll need to have Python installed and install the following Python library:
pip install dbt-dremio
Once this is installed in the activated Python environment, you can run the following command to create our debt project.
dbt init supplychainviews
This will begin a series of questions to configure your dbt profile:
Select Dremio as the Database
Choose software with username and password
host is 127.0.0.1
port is 9047
enter your username
enter your password
false for using SSL
put down nessie for object storage source (can be any object storage or apache iceberg catalog source)
put supplychain.raw as the schema (the sub namespace in the source, where tables will materialize by default)
put down nessie for space (this can be any nessie catalog or dremio software space)
put supplychain.raw for schema (sub namespace within the space where views will be created by default)
choose the default for threads
Your dbt profile is now configured and should be ready to go. If you ever need to update it you should find the yaml file with the different dbt profiles in the ~/.dbt folder.
We want to edit this section of the dbt_project.yaml file:
# In this example config, we tell dbt to build all models in the example/
# directory as views. These settings can be overridden in the individual model
# files using the `{{ config(...) }}` macro.
models:
  supplychainviews:
    # Config indicated by + and applies to all files under models/example/
    example:
      +materialized: view
This is the section where we define how our models will be categorized (a model is an SQL statement whose results will be made into a table or view in Dremio). So write no, we only have one category of views, for example. This means it will look for SQL files in the models/example folder whenever we run debt; let's create something more aligned with our data products structure.
models:
  supplychainviews:
    # Config indicated by + and applies to all files under models/#####
    raw:
      +database: nessie
      +schema: supplychain.raw
      +materialized: table
    curated:
      +database: nessie
      +schema: supplychain.curated
      +materialized: view
    production:
      +database: nessie
      +schema: supplychain.production
      +materialized: view
So, the +database and +schema determine where a view or table will be created with models in a certain category, and the +materialized determines whether the model's result will be a view (no copying data) or a table (writing new data copies).
So, as we have it, I only want tables to materialize in my raw layers and for my curated and production layers to be views created in their respective locations.
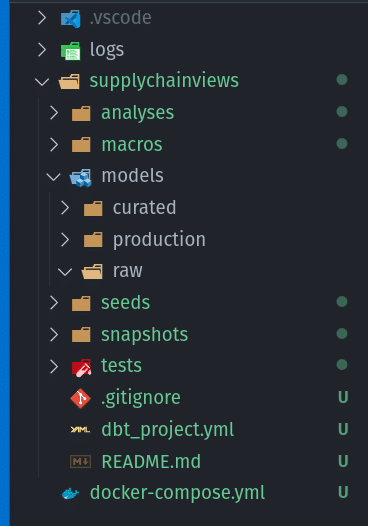
We need to create a raw, curated, and production folder within the models folder to house my dbt models.
We are going to make two views, so we'll need two models:
models/curated/inv_prod_curated_join.sql (this will be the raw join of our product and inventory table)
models/production/inv_prod_view.sql (this will be the join only showing the columns we want end users to see)
The inv_prod_curated_join.sql file should look like:
SELECT * FROM nessie.supplychain.raw.inventory as i INNER JOIN nessie.supplychain.raw.products as p ON i.product_id = p.product_id;
Then the inv_prod_view.sql file should look like:
SELECT
    product_id,
    location_name,
    product_name,
    price
FROM
    {{ ref('inv_prod_curated_join') }}
You may notice the odd-looking {{ ref('inv_prod_curated_join') }} which uses a templating syntax called "jinja." This syntax allows us to call Python functions in our SQL expressions. In this case, the "ref" function will enable us to refer to another model by its filename. When dbt sees this, it knows that this model depends on the referenced model being run first, and this ensures that dbt runs all your SQL models in the correct order every time. There are many other functions that DBT makes available for all sorts of use cases, such as one-time configurations and so on.
We can now run these models by simply running the command:
dbt run
* Make sure to run this command in the same folder at your dbt_project.yml
When you run this command, dbt will assess all your models to determine the order they need to be run in, then establish a connection using the profile we created when we ran "dbt init" and run the SQL, creating views and tables in the order we specified. When it is done, we should be able to head back to Dremio and see our views in the curated and production folders.
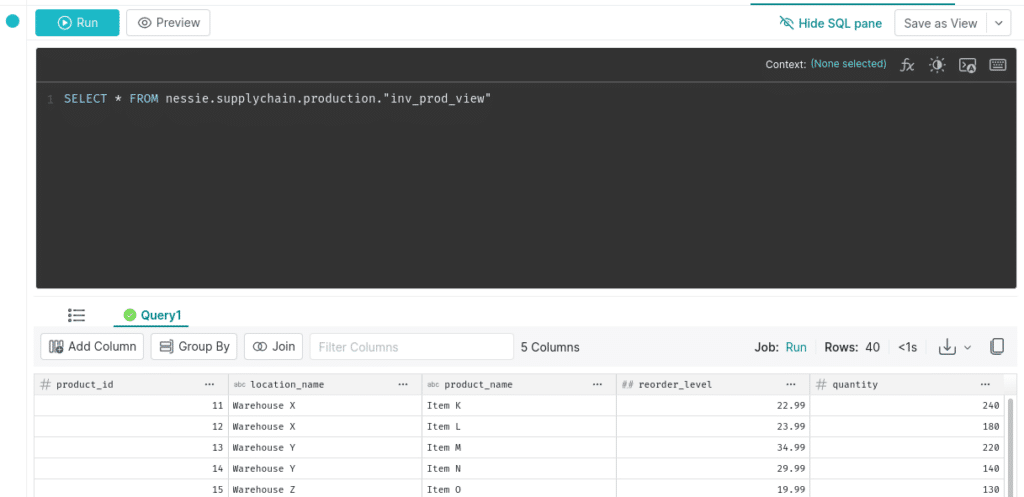
We've now curated the views and can query them from Dremio. What if, later on we decided we wanted a few more columns in my production views, we can just update our inv_prod_view dbt model to something like this:
SELECT
    product_id,
    location_name,
    product_name,
    price
    reorder_level,
    quantity_available as quantity
FROM
    {{ ref('inv_prod_curated_join') }}
Then, we can just run our dbt models, and the additional columns will be available the next time we query the view; this makes it very easy to make requested updates to your modeling.
The great thing about using dbt to track all your SQL is you can check your dbt project into version control with git. This gives you two layers of observability into changes.
All changes to your tables and views in a Nessie catalog create commits, allowing you to time travel the catalog and see who made what changes.
git can track changes to the raw SQL code, giving you another layer of visibility into your historical modeling and where changes are coming from.
Accelerating Our Datasets with Reflections
Now that we have our data connected, ingested, and curated in Dremio, we can begin delivering a BI Dashboard from our data. BI Dashboards are usually the result of running process-intensive aggregation queries against our data. While Dremio provides performance equal to or faster than the top data warehousing solution, our BI Dashboards and compute bills will be better served by pre-computing these aggregate computations. Traditionally, analysts would accomplish this by creating BI Cubes or Extracts that would usually be housed within the BI tool, which wouldn't be helpful to other teams using a different BI tool with the same data. Also, extracts and cubes would require much maintenance and configuration, making them not a perfect solution.
With Dremio, acceleration on the raw or aggregate level can be done to benefit any team using the same data in any tool and requires much less effort on behalf of the engineer or the analyst. This acceleration feature is called reflections; essentially, Dremio will create managed materializations as Apache Iceberg tables in your data lake and swap them out when it accelerates a query on the source table/view or child views of the source. This can be done as easy as flipping a switch.
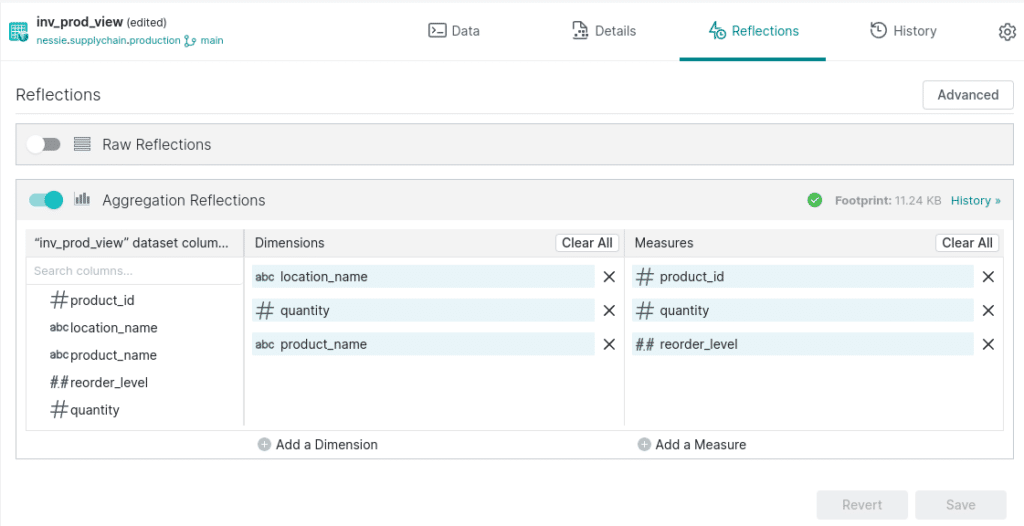
Let's enable reflections on our production views by opening them and clicking on the "edit" button. This will take us to a screen where we can edit things like the dataset's wiki page and reflections.
Once we are in the edit view of the dataset, click on the reflections tab at the top to go to the reflections screen. Here, we can enable aggregate reflections and select which measures and dimensions we want to optimize for.
Once we see the green checkmark confirming the reflection is created, Dremio will use these reflections to accelerate any aggregate queries on these dimensions and measures. Reflections are refreshed on a cadence to reflect the most up-to-date information. Dremio also has reflection recommendations, which will identify opportunities to speed up queries and lower costs using reflections and suggest them to you.
Building our BI Dashboard
So now, nothing is standing between us and building performant BI dashboards from which we can get valuable business insights. We will be using the open-source Apache Superset to build our dashboards which we can start with (if you need to free up memory, feel free to spin down MongoDB and postgres at this point):
docker compose up -d superset
This will spin up the docker container with Superset which will still need to be initialized with the following command:
docker exec -it superset superset init
After a few minutes, you should be able to login to superset at localhost:8080 using the username "admin" and the password "admin" to login (rebuild the underlying image to change these).
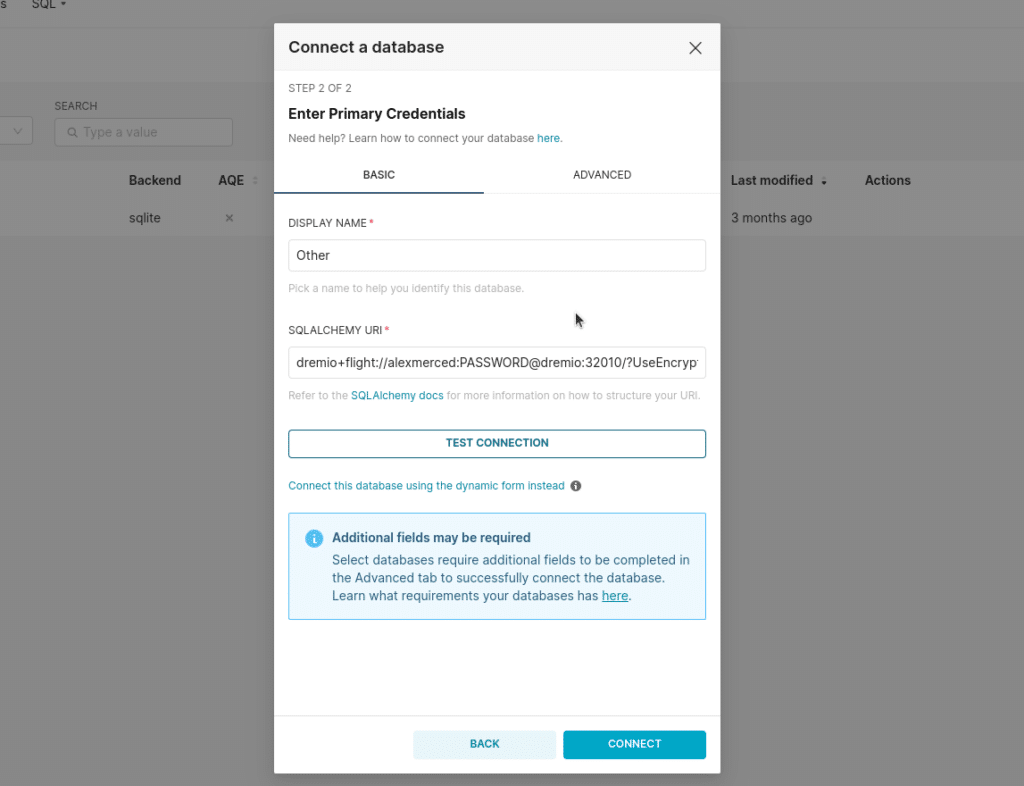
Click on "settings" and select "database connections." We will create a new connection. From the create connection modal, select "Other" as your database. To connect Apache Superset to Dremio, pass in the following URL with your Dremio username and password.
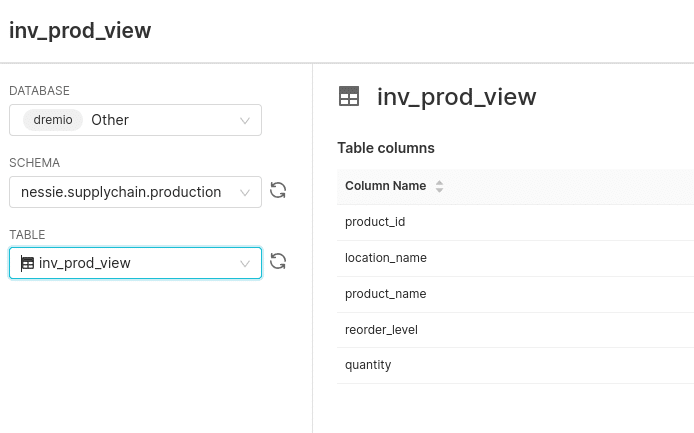
Once the connection is created, we can click the + sign at the top right corner, and next, we will add a dataset, adding our production dataset.
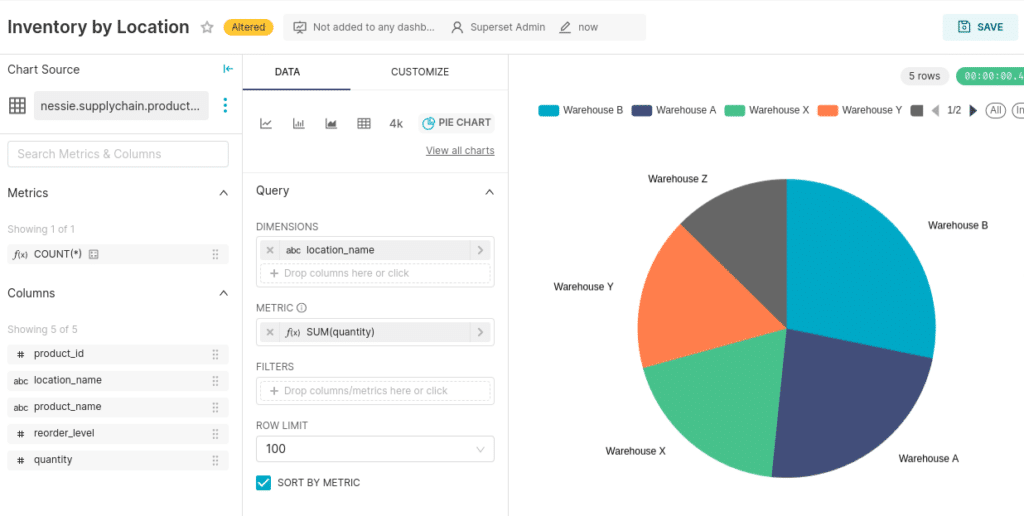
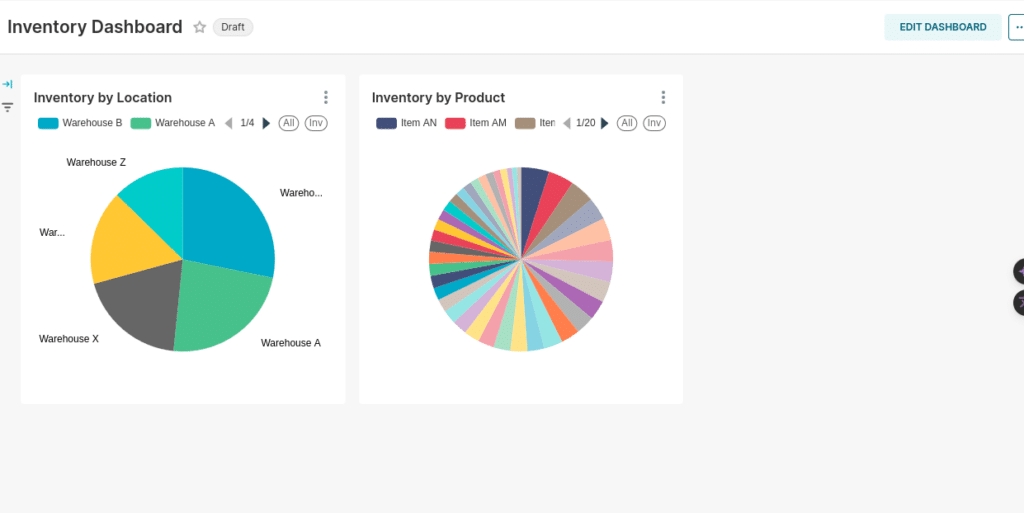
Once the dataset is added, we can create a pie chart, with the dimension being the location_name and the metric being the sum of the quantity.
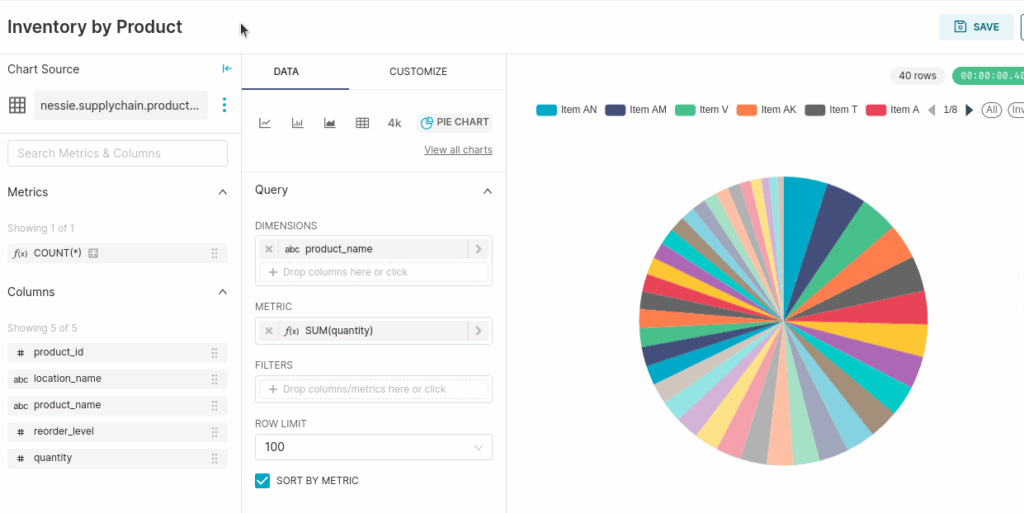
Next, let's create a chart showing the product as the dimension and the sum of the quantity as the metric.
Now, with these two charts saved, let's create a new dashboard and these two charts to it!
Conclusion
We have seen the entire Dremio Lakehouse lifecycle, from data ingestions to BI Dashboards. At this point, you can shut down all the containers we've spun up running.
Text-to-SQL features to make it even easier for less technical users to generate the views of the data they need
Generative AI Wiki generation to make it even easier to document your datasets
Integrated Nessie-based lakehouse catalog that provides a robust UI for commit/branch/tag observability and management along with automated table management features.
Robust autoscaling features to make sure you always have the performance you need without risking the cost of dangling instances
Not having to manage manual software upgrades
Learn more about Dremio; below are some additional exercises if you liked this one to keep learning more about what Dremio offers.
Ingesting Data Into Apache Iceberg Tables with Dremio: A Unified Path to Iceberg
By unifying data from diverse sources, simplifying data operations, and providing powerful tools for data management, Dremio stands out as a comprehensive solution for modern data needs. Whether you are a data engineer, business analyst, or data scientist, harnessing the combined power of Dremio and Apache Iceberg will undoubtedly be a valuable asset in your data management toolkit.
Oct 12, 2023·Product Insights from the Dremio Blog
Table-Driven Access Policies Using Subqueries
This blog helps you learn about table-driven access policies in Dremio Cloud and Dremio Software v24.1+.
Aug 31, 2023·Dremio Blog: News Highlights
Dremio Arctic is Now Your Data Lakehouse Catalog in Dremio Cloud
Dremio Arctic bring new features to Dremio Cloud, including Apache Iceberg table optimization and Data as Code.