Migrating a Hive Table to an Iceberg Table Hands-on Tutorial
Using Apache Iceberg as your data lake table format can enable faster data lake analytics, time travel, partition evolution, ACID transactions, and more. Apache Iceberg is a key piece to achieving an open lakehouse architecture so you can reduce the cost of data warehouses and avoid vendor lock-in.
Recently, I wrote this article regarding different strategies for the migration of Hive tables to Iceberg tables. In this article, I’d like to show you some hands-on exercises to demonstrate how the Hive-to-Iceberg table conversion works on a small scale, so you can try these techniques out before you apply them at scale in your own data pipelines. These same techniques and commands can be used when migrating your existing Hive tables to Iceberg tables.
We will be:
- Spinning up a Docker container with Spark
- Creating Hive tables
- Migrating the Hive table to an Iceberg table without restating the data (in-place migration using the add_files procedure)
- Migrating the Hive table into an Iceberg table by restating the data (shadow migration using “Create Table As Select” AKA CTAS statements)
Spinning Up a Docker Container with Spark
You will need to have Docker installed to follow this example. The first step will start up a container with a Docker image I created called iceberg-starter that will give us an opportunity to get hands-on with Iceberg.
docker run -it --name iceberg-env alexmerced/iceberg-starter
This will put you in a shell in the Docker image. We will then open up Spark using the command below, which configures an Iceberg catalog in our Spark session.
spark-shell --packages org.apache.iceberg:iceberg-spark3-runtime:0.13.0\
    --conf spark.sql.extensions=org.apache.iceberg.spark.extensions.IcebergSparkSessionExtensions \
    --conf spark.sql.catalog.spark_catalog=org.apache.iceberg.spark.SparkSessionCatalog \
    --conf spark.sql.catalog.spark_catalog.type=hive \
    --conf spark.sql.catalog.iceberg=org.apache.iceberg.spark.SparkCatalog \
    --conf spark.sql.catalog.iceberg.type=hadoop \
    --conf spark.sql.catalog.iceberg.warehouse=$PWD/iceberg-warehouse\
    --conf spark.sql.warehouse.dir=$PWD/hive-warehouse
Let’s break down what all these flags are doing.
--packages org.apache.iceberg-spark3-runtime:0.13.0
This instructs Spark to use the Apache Iceberg package.
--conf spark.sql.catalog.spark_catalog=org.apache.Apache Iceberg.spark.SparkSessionCatalog
By default, the Spark catalog uses the V1 Data Source specification, which has a different API than Spark’s V2 Data Source API. In this setting, we change the implementation of the Spark catalog to an Iceberg version of the V2 API to use the features Iceberg needs to interact with the default catalog.
--conf spark.sql.catalog.spark_catalog.type=hive
This sets the default catalog implementation of the interface to Hive.
--conf spark.sql.catalog.iceberg=org.apache.Apache Iceberg.spark.SparkCatalog
This create a new catalog called “iceberg” and sets its implementation to Iceberg’s Spark catalog implementation
--conf spark.sql.catalog.iceberg.type=hadoop
This sets the implementation of the “iceberg” catalog to a file-based Hadoop implementation.
–conf spark.sql.catalog.iceberg.warehouse=$PWD/iceberg-warehouse
This sets the directory where tables created in the “iceberg” catalog will be written to. Iceberg will write files to “~/iceberg-warehouse” in the Docker container’s file system.
--conf spark.sql.warehouse.dir=$PWD/hive-warehouse
This configuration tells the default Spark catalog, which stores tables in the Hive table format, to track tables in “~/hive-warehouse”.
Creating Hive Tables
Now that we are in Spark shell, let’s create some Hive tables to simulate tables you may have in your data lake.
spark.sql("CREATE TABLE people (first_name string, last_name string) USING parquet");Since we used the USING parquet clause, the data will be stored in Apache Parquet files (data must be in Parquet, ORC, or AVRO to do in-place migrations). This will create a Hive table. But since we didn’t refer to the “iceberg” catalog that was configured or use a USING iceberg clause, it will use the default Spark catalog, which uses a Hive implementation that will be stored in ~/spark-warehouse.
Let’s add a few records to the table.
spark.sql("INSERT INTO people VALUES ('Alex', 'Merced'), ('Jason', 'Hughes'), ('Ben', 'Hudson')");Let’s confirm the data was added:
spark.sql("SELECT * FROM people").show()If we see our data, then our Hive table is ready to go.
Before we run the migration, let’s see where the data files for this Hive table live. Quit out of Spark shell.
:quit
In our home directory you’ll notice new “hive-warehouse” and “metastore_db” directories exist. The “metastore_db” directory is where the embedded Hive metastore’s metadata is stored (in a derby database by default) while the hive-warehouse directory is where the data files are stored. Let’s look at the contents of the table directory.
ls ~/hive-warehouse/people
This should yield something like the following as the output:
_SUCCESS
part-00000-bd527ad5-ff32-4704-af79-329ae4b2d008-c000.snappy.parquet
part-00001-bd527ad5-ff32-4704-af79-329ae4b2d008-c000.snappy.parquet
part-00002-bd527ad5-ff32-4704-af79-329ae4b2d008-c000.snappy.parquet
Re-open Spark:
spark-shell --packages org.apache.iceberg:iceberg-spark3-runtime:0.13.0\
    --conf spark.sql.extensions=org.apache.iceberg.spark.extensions.IcebergSparkSessionExtensions \
    --conf spark.sql.catalog.spark_catalog=org.apache.iceberg.spark.SparkSessionCatalog \
    --conf spark.sql.catalog.spark_catalog.type=hive \
    --conf spark.sql.catalog.iceberg=org.apache.iceberg.spark.SparkCatalog \
    --conf spark.sql.catalog.iceberg.type=hadoop \
    --conf spark.sql.catalog.iceberg.warehouse=$PWD/iceberg-warehouse\
    --conf spark.sql.warehouse.dir=$PWD/hive-warehouse
With Spark up and running, let’s confirm our Hive metastore is connected. Check the tables we’ve created in the Hive catalog by running the following command.
spark.sql("SHOW TABLES").show()Now let’s migrate our Hive table to an Iceberg table.
Migrating the Hive Table to an Iceberg Table Without Restating the Data
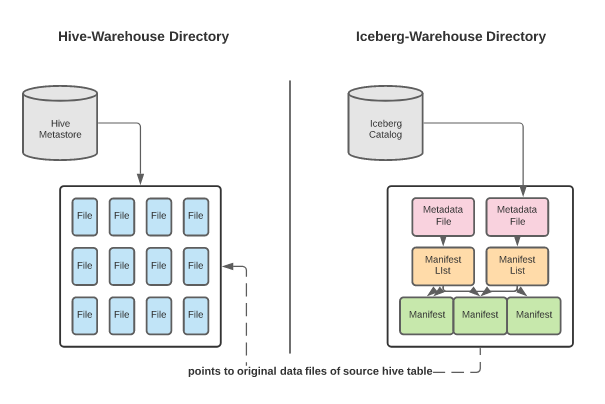
This migration will use an in-place migration strategy. An in-place migration means we will leave the existing data files as-is and create only the metadata for the new Iceberg table using the data files of the existing Hive table. This can be a much less expensive operation than rewriting all the data. The existing Hive table must store the data in Parquet, ORC, or AVRO for this to work, which is why the USING parquet clause was important earlier. This can be done in two ways:
- Using the migrate procedure. This replaces the existing Hive table with an Iceberg table using the existing data files.
- Using the add_files procedure. This adds the files of the Hive table to an existing Iceberg table, also using the existing data files.
As a best practice, I recommend you use the snapshot procedure, which allows you to test the results of the migrate procedure. Snapshot keeps the old Hive table intact, so you should use it before running the actual migrate procedure, which removes the old Hive table.
The benefits of using in-place migration include:
- In-place migration can be less time-consuming as all the data won’t be restated.
- If there is an error in writing the Iceberg metadata, you only need to re-write the metadata, not the data as well.
- Data lineage is preserved since the metadata still exists in the legacy Hive catalog to track the evolution of the data files (with future evolution being tracked in the Iceberg metadata).
This approach has the following drawbacks:
- If data is added to the dataset during the metadata write you’ll need to reattempt the operation to include the new data.
- To prevent having to reattempt this operation you’ll have to enforce write downtime, which may not be feasible in some situations.
- This approach won’t work if any of the data needs to be restated. If you wanted to make alterations to the schema or partition the existing data going into the new Iceberg table, then the data needs restatement.
Using the add_files Procedure
We will be using the add_files procedure for this tutorial. All of the Iceberg procedures can be called through SQL statements using the following syntax:
spark.sql("CALL catalog_name.system.procedure_name(arguments)")Before we use add_files we need to have an existing Iceberg table with a matching schema to migrate our Hive tables data into. So let’s create an Iceberg table with the following command. We’ll use a CTAS (CREATE TABLE AS SELECT) statement to create an empty table with an identical schema to the original.
spark.sql("CREATE TABLE iceberg.db.people USING iceberg AS (SELECT * FROM people LIMIT 0)")If this command throws an error, make sure you have successfully run the SHOW TABLES query from earlier.
Now that the table has been created we can run the add_files procedure telling it to add the data files from the people table to the iceberg.db.people table.
spark.sql("CALL iceberg.system.add_files(table => 'db.people', source_table => 'people')")Now let’s query the Iceberg table to confirm it has the files added.
spark.sql("SELECT * FROM iceberg.db.people").show()We can also run this query to see which files belong to our Iceberg table.
spark.sql("SELECT file_path FROM iceberg.db.people.files").show(20, false)You’ll see the files are in the “spark_warehouse” directory where Hive tables are stored, confirming the table is using the original data files instead of recreating them. Now both tables exist using the same data files.
New metadata has been written and is being stored in the Iceberg warehouse, which we can see in the following query.
spark.sql("SELECT snapshot_id, manifest_list FROM iceberg.db.people.snapshots").show(20, false)Migrating the Hive Table into an Iceberg Table by Restating the Data (Using Shadow Migration)
Let’s once again take our people table and turn it into an Iceberg table, but this time we’ll be restating the data. This is called shadow migration because during the migration process the new Iceberg table acts as a shadow of the original table. Once both tables are in sync, you can flip the switch to all workloads on the Iceberg table. In this scenario, we are creating new data files in the Iceberg table based on the data in the existing Hive tables data files.
Shadow migration has the following benefits:
- Shadow migration allows you to audit and validate the data prior to exposing the table to your users.
- You’re able to apply any desired schema and partition changes upfront. This can also be done after the migration is complete for in-place migrations using Iceberg’s partition evolution and schema evolution features.
- Data corruption issues are unlikely, as data can be audited, validated, and counted through the migration process. So you can clean any imperfect data that existed in the old table and add checks to ensure all records were added correctly in your validations.
And the following drawbacks:
- You will double the storage for the dataset temporarily, as you will store both the original table and the new Iceberg table. You will retire the old table once the migration is complete, so it’s a temporary issue.
- Because you are rewriting all the data in the table, this migration path can take much longer than in-place migration. The time required depends on the size of the table.
- You’ll either have to block write to the source table while the migration is occurring or have a process in place to sync the tables.
Turning the Hive table into an Iceberg table using this method is as simple as running a CTAS statement.
spark.sql("CREATE TABLE iceberg.db.people_restated USING iceberg AS (SELECT * FROM people)")Now the table exists, let’s confirm it by querying the table.
spark.sql("SELECT * FROM iceberg.db.people_restated").show()Let’s look at the location of our data files.
spark.sql("SELECT file_path FROM iceberg.db.people_restated.files").show(20, false)This time the files are located in our Iceberg catalog directory, “iceberg-warehouse”, instead of the Hive directory “hive-warehouse”. This tells us that new data files were written instead of using the old files.
spark.sql("SELECT snapshot_id, manifest_list FROM iceberg.db.people_restated.snapshots").show(20, false)Planning the Migration
Regardless of whether you restate the files or not, you now have an Iceberg table that as it evolves will have all the benefits of time travel, version rollback, partition evolution, and so forth.
In general, your migration should go through a four-phase process:
- As the process begins, the new Iceberg table is not yet created or in sync with the source. User-facing read and write operations remain operating on the source table.
- The table is created but not fully in sync. Read operations are applied on the source table and write operations are applied to the source and new table.
- Once the new table is in sync, you can switch to read operations on the new table. Until you are certain the migration is successful, continue to apply write operations to the source and new table.
- When everything is tested, synced, and working properly, you can apply all read and write operations to the new Iceberg table and retire the source table.

Other important migration considerations:
- Make sure your final plan has visibility with all consumers so they are aware of any blackouts on the ability to read or write data.
- Make sure new query patterns are well documented to make it as easy as possible for data consumers to begin taking advantage of the new Iceberg tables.
- If restating the data, take advantage and run audits, validation, and other quality controls on the data as it gets rewritten.
Now you have hands-on experience migrating Hive tables into Iceberg tables, just take the lessons learned and empower your data. If you use AWS Glue, check out this tutorial on how to make Iceberg tables using Glue.
About the Author
Alex Merced
Alex Merced is a developer advocate for Dremio and has worked as a developer and instructor for companies like GenEd Systems, Crossfield Digital, CampusGuard and General Assembly. Alex is passionate about technology and has put out tech content on outlets such as blogs, videos and his podcasts Datanation and Web Dev 101. Alex Merced has contributed a variety of libraries in the Javascript & Python worlds including SencilloDB, CoquitoJS, dremio-simple-query and more.
Related Articles
Compaction in Apache Iceberg: Fine-Tuning Your Iceberg Table’s Data Files
Read more
Puffins and Icebergs: Additional Stats for Apache Iceberg Tables
Read more